Demo
1 min read

Ticket Automation Software Delivers Results

By Staff Writer on 1/27/22 12:43 PM

Let’s take a look at Automation. 

Automation reduces workload, improves efficiency, and decreases costs. With the right service management solution like Vivantio, you can manage complex workflows and automate recurring processes within your business, removing the need for manual resources. Many tasks can be automated, from finance and HR management to project management, team collaboration and reporting. Watch the video to learn more.


You can simplify ticket automation with Vivantio and create powerful business rules easily.  Use automation to bring information to the front of the screen to help make informed decisions with ticket management. 

Discover for yourself how automation delivers results by scheduling your own personal demo today. 

FREE DEMO

Topics: Automation IT Service Automation Service Automation
5 min read

Why Operational Level Agreements Matter & How to Use Them in Vivantio

By Andrew Stevens on 2/28/20 9:00 AM

WHAT ARE OPERATIONAL LEVEL AGREEMENTS?

In order to provide excellent customer service, you need to meet your service level agreements (SLAs): the agreements you have with your customers about the level of service you’ll provide. But how do you make sure you’re doing that? And if you’re not doing it, how do you understand why? The first step is making sure you hit your internal goals: your operational level agreements (OLAs).

Whereas SLAs are focused on the customer, OLAs are in place to describe the level of service your internal teams can expect from each other. These might include relationships between your front line service desk and the teams who support them: network support, operations management, application management, desktop engineers, etc..

They can–and should!–be used as a key metric in service management because they allow teams to understand where bottlenecks are, and why they’re not hitting those all-important SLAs. OLAs should also be transparent so that everyone knows what their own targets are, and the impact it has on the rest of the business.

However, sometimes service teams bite off more they can chew when attempting to measure SLAs and ultimately fail to meet them. Instead of setting goals for the sake of having them, start small by clarifying or setting up OLAs within your ITSM software tool. From there, you can begin building out SLAs.

Here’s how you can use task management in Vivantio to ensure your OLAs are being met.

TASK MANAGEMENT IN VIVANTIO

Task management in Vivantio can help companies meet OLAs and, in turn, meet target SLAs. Task management can be enabled in all ticket types in the Vivantio service management platform.

In Vivantio Pro, you can assign tasks to licensed technicians. Vivantio ITSM goes a step further and allows you to assign tasks to both licensed technicians and non-licensed end-users.

With task management enabled, technicians can create tasks for the different work required to complete the ticket. The list of tasks can be viewed easily from the ticket. Tasks have the same core capabilities as tickets, including their own set of configurations (categories, status, etc.) and of course a full history of the work done.

There are three ways that tasks are created in Vivantio: Ad hoc as needed, via trigger rules, and through Vivantio’s workflows. Regardless of the way tasks are created, you can easily view them from the ticket to track progress. Here are examples of creating a task using each way.

AD HOC TASK CREATION

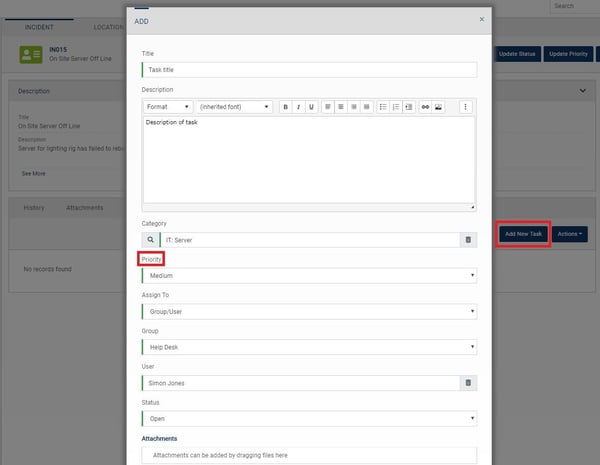
Within Vivantio, users can create ad-hoc tickets as needed in order to request internal or external help to meet an OLA. Perhaps a technician is working on a P4 support request that came in with a corresponding SLA of 16 hours. While working on the request, they discover they’re not trained in a specific area of the required work and will need to ask their colleague for help.

To do this, they can manually assign out an ad-hoc task from within the ticket to their colleague – or if they don’t know who specifically to ask, an assignment group – describing what they need help with.

At this time, four hours have already passed on the SLA and only 12 hours remain. When assigning out the task, the technician gives the task an appropriate OLA to ensure that their colleague knows when they need to have the work completed in order to meet the ticket’s SLA.

Screenshot of ad-hoc tasks outlines

This is a simple way to get started with OLAs. You might wonder why you don’t just re-assign the ticket, but there’s a few advantages in using task management. First up, you get to track each different piece of work separately; one ticket might need work to be completed by four different teams.

Vivantio will let you track the time each team/user owned the ticket, but it’s a lot easier to understand the timeline of a ticket when you’re using task management. Second, and we’ll talk more about the importance of this in a later blog, you improve the customer experience by ensuring the customer has a single named point of contact for their ticket so they don’t end up feeling like the buck is being passed.

Third, you make it very clear to other teams exactly what they do and don’t need to do so there’s no digging through the ticket history to find out their role in resolving this issue.

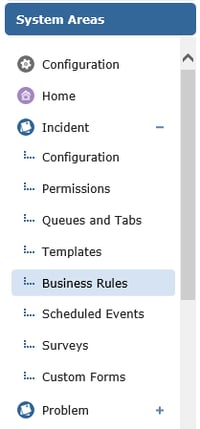
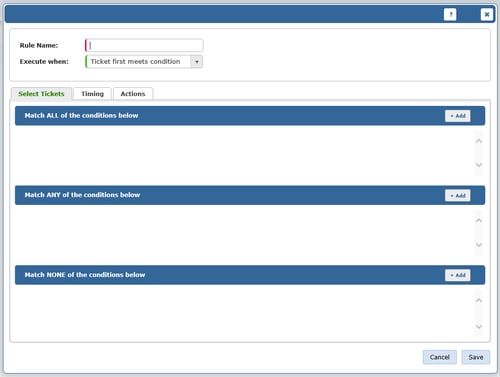
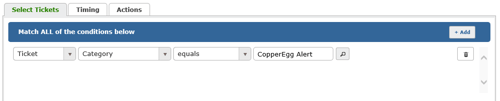
TASK CREATION VIA TRIGGER RULES

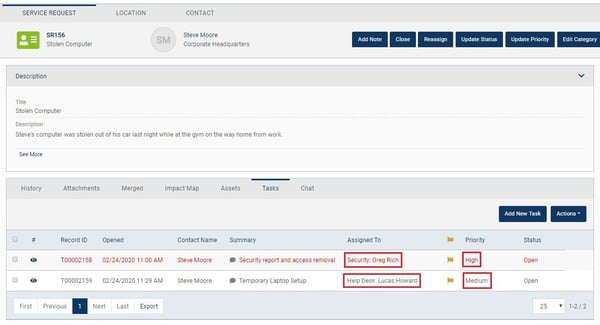
You can automate task creation within Vivantio using trigger rules. For example, when a request is logged reporting that a computer is lost or stolen, there are tasks that always need to be completed by both the IT team and the security team. Due to compliance reasons, it is required that this kind of request needs to be closed out within an eight-hour SLA.

Trigger rules can be created to automatically assign out the required tasks to the IT team and security team any time a lost or stolen computer request is logged. The tasks can have their own associated OLAs so that the teams know how long they have to complete the work in order to meet the request’s SLA.

The below screenshot shows two tasks that were automatically created via trigger rule due to the type of ticket that was logged.

Screenshot of trigger rule tasks outline

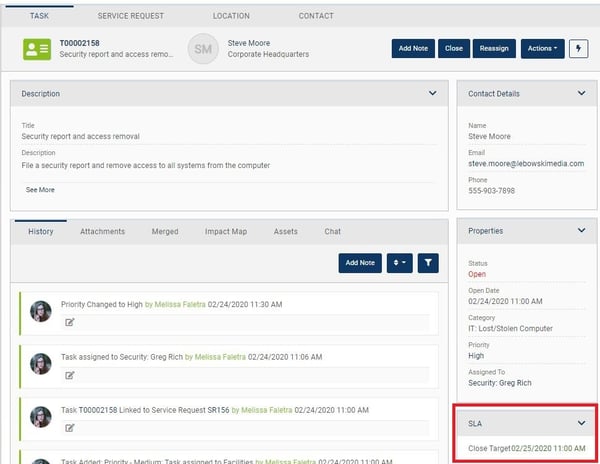
Clicking into one of the tasks, we can see the SLA for the task, providing the target time to complete the work by.

Screenshot security task outline

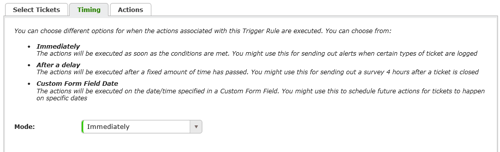
This is a simple way to get your team started using tasks for repetitive work requests. Sometimes though, this isn’t quite enough. You need to ensure tasks are completed in a certain order, or tasks are only worked on after approval has been given. If that’s the case, then you need workflows.

WORKFLOWS

Automated workflows within Vivantio can also help you and your team manage your OLAs. For instance, say a customer of a software company submits a support request, which requires a specific process involving multiple people to complete. The request falls into a P2 priority request with a close SLA of 40 hours on a 9-to-5 working time plan, or five business days from the customer’s view.

Based on the category of the request, four different support teams will need to work on the request in a sequential order. In Vivantio, a specific workflow which automates the assignment of the process tasks is automatically kicked off using Vivantio’s trigger business rules.

Tasks are automatically assigned out to each team when it is their time to complete their portion of the work. In order to meet the SLA agreed upon with the customer, the total time in the SLA is broken down into OLAs, or smaller chunks of time which are allocated to each team.

Screenshot of OLA workflow diagram

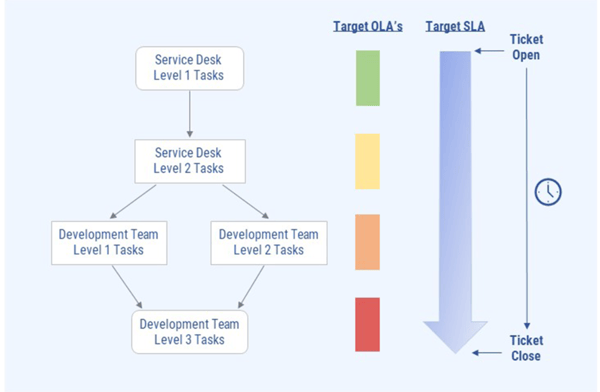
There are several tasks that need to be completed by different teams and technicians during the workflow. In order to make sure to meet the target SLA, you can use operational level agreements for each task that is assigned out in the workflow.

This allows each person who is assigned a task to be aware of how much time they have in order to complete the task. The target OLAs for each task are set up to leave time for the transition between tasks and to complete the tasks themselves.

CONCLUSION

If you’re wondering why you aren’t meeting your SLAs, then implementing OLAs is a good first step in understanding why. Whichever approach you use for Task Management in Vivantio, you can use the reporting tools you’re already familiar with to review your performance, understand which teams are creating bottlenecks, and fix the issues at the source.

Topics: Service Management SLA ITSM Customer Center Customer Service Automation IT Service Automation OLA
6 min read

Tips on How to Successfully Implement Your New ITSM Software Solution

By Staff Writer on 2/12/20 9:00 AM

PREPPING FOR IMPLEMENTATION

Investing in ITSM software can be a time-consuming and expensive process, beginning with researching platforms that meet your service team’s criteria through testing various IT software tools.

Once you’ve decided on the best ITSM software solution for your team, you’ll need to prepare for implementation. Based on our customer’s experience at Vivantio, following our recommendations for having a successful implementation has resulted in long-term success with our service desk software and a greater return on their investment. Here’s how to ensure your implementation process is smooth.

LAYING THE GROUNDWORK

From the get-go, you should set expectations and have clear communication with both your service team and the ITSM software vendor, which means you’ll need to front-load the planning phase of your implementation. But, without a robust plan in place and a way to measure success, the transition to your new IT software solution will be rocky. To start, clearly define and document the following:

Abi providing a demonstration of vivantio features

1. Document the current resources you have available – include employees, teams and departments that will use the service management software, and how you will communicate to them throughout implementation.

It’s important to identify your internal implementation team. Make a list of who needs to be involved in the implementation process and how much time you estimate they will need to reserve for the process, start to finish. You can work backward from your key roll-out date and document milestones that need to be reached in order to have a successful implementation.

Vivantio’s implementation manager, Abi Welsh, recommends mapping your plan early on. “Find out what your key dates are with the resources you have. Do you need to replace an existing solution before the contract expires? What departments are involved and who will implementation affect? Think about what functions need to be live to replace the legacy system or current process,” Abi says.

You should also ensure you have a good communications plan that includes all stakeholders: IT technicians, callers, systems administrators, management, etc. Communicating with everyone throughout the process will keep them engaged and help prevent unforeseen issues that may arise.

TIP: Identify which individuals should have a hands-on approach during implementation, then appoint a few super users who can provide support and be champions for change. Also recognize that some employees might need more support, so listen to their needs and engage them early on.

2. Create a step-by-step timeline of what needs to be done by who and when.

Remember that while having an all-encompassing, detailed implementation plan is crucial to success, you don’t have to tackle implementing your service management software all at once. For example, perhaps the incident management process needs to be up and running immediately, the technicians need to be trained and the historic ticket data from the legacy system needs to be migrated in, but you don’t need the self-service portal or reporting functionality until later in the implementation process.

These are the pieces to consider and outline in your roadmap as you prioritize moving parts of your software implementation, suggests Abi. “Different business areas or functionalities may have their own deadlines. Once you have these dates set, you can continue building out the project plan,” she says.

THE IMPLEMENTATION PROCESS

Now that you’ve laid out your plan, it’s time to begin implementation. Every IT software implementation project has three core phases: the foundation, framework, and custom finishes. Breaking up the process allows others to get a handle on the basics of the software first, then mold it to fit your service team’s specific needs.

Foundation: During the foundation phase, you will begin implementing basic functionalities that replace previous service software and procedures. In this case, you might focus solely on rolling out IT ticketing software first to the service desk before other departments.

Framework: The framework phase typically consists of added functionality and/or new features and processes your company wasn’t using previously but are critical to your improved business processes, such as workflows and automation.

Configuration: Once you have determined the core functionalities of your platform, you can implement your must-haves and tweak customized features specific to your company’s needs. This could consist of setting up specific integrations, or creating ticket categories, custom forms and fields, your asset area or SLAs.

ADJUSTING THE ROADMAP

To stay on track, communicate regularly with your ITSM software vendor and your stakeholders throughout implementation. Continuously review the milestones you’ve outlined in your project plan so you can quickly see if the project is progressing as expected.

You should also be flexible enough to adjust your project roadmap because unforeseen issues—or even great opportunities you hadn’t originally considered—might pop up. If they do, discuss any necessary changes in the project to the relevant people.

KEYS TO SUCCESS BEYOND IMPLEMENTATION

Remember that implementation doesn’t stop once your service management system is up and running. Your ITSM software will need to be configured and will have ongoing troubleshooting, feature revisions, additional training and maintenance. It’s likely your team will require training on these new or improved processes to make your systems and staff more efficient.

Because it takes time to fully train a staff to use new software, you will need to spend time supporting your team post-implementation. Don’t think of this as an expense or waste of time, but rather as an investment in your employees and the organization.

man leaning over his desk writing in a journal next to a laptop

“It’s a good idea to have an enhanced period of support for all users as the new system beds in and to make sure there are clear lines of communication,” Abi says.

As you become familiar with your software, you should begin measuring its effectiveness to ensure you meet your performance goals and desired KPIs. You might also learn about additional features you can add that you didn’t originally plan on using, so keep in touch with your ITSM software provider.

Abi suggests thinking about how you can measure the effectiveness of the solution and how to address issues you encounter. “Schedule a final project review after implementation to think about how to improve future projects. Finally, once you start collecting some data, you should review and update your system reports and dashboards,” she says.

CONCLUSION

Choosing the best ITSM software that meets your key business requirements takes a great deal of time, which is why it’s important to have a smooth implementation process. Remember to follow these recommendations:

  • Make sure you set clear expectations and have clear communication with both your service team and the ITSM software vendor from the start.
  • Develop an implementation plan that includes resources, time allocation and milestones.
  • Break up the process to allow users to get a handle on the basics of the software first, then mold it to fit your service team’s specific needs.
  • Spend time supporting your service teams post-implementation for continued success.

Once your new tech is in place, your data is tracked and positive feedback given, you’ll be glad you invested in a new service management system.

Topics: Service Management ITSM Software Implementation Software Trial ITSM Solution Automation

Video: Learn How To Create Tickets In Vivantio

By Staff Writer on 10/18/19 9:00 AM


In this video, Patrick, one of our solutions consultants, demonstrates the multiple options for creating a ticket within the Vivantio platform: manually through the Vivantio platform, through email automation, and through a custom self-service portal.

Topics: Service Management Automation Video

Video: How & Why to Use Workflows in Vivantio to Automate Processes

By Melissa Faletra on 9/9/19 9:00 AM


In this video, Melissa, one of our product specialists, will demonstrate how users can automate business processes using workflows in Vivantio.

Topics: Service Management Automation Video
3 min read

How Vivantio’s Visual Workflow Tool Automates Service Processes

By Staff Writer on 5/11/18 9:00 AM

BETTER AUTOMATION TOOLS FOR ALL.

At Vivantio, we constantly interact with teams who have mature service strategies but are searching for better ways to notify stakeholders of their incoming tasks, automate standard processes and define KPIs to adequately benchmark team performance.

To combat common process slowdowns, we have designed the Vivantio visual workflow process tool to streamline tasks and approvals for your standard workflow processes. Let’s discuss how the tool functions and then offer a few examples of applicable processes.

WHAT IS THE VISUAL WORKFLOW TOOL?

Vivantio’s Visual Workflow Tool is a flowchart builder that contains conditional statements to determine the order that tasks are assigned to decision-makers in your workflow process. Your processes can adapt based on previous actions. Therefore, our tool is designed to enforce different workflows depending on task decisions. An example of a conditional workflow includes a product return process that triggers separate tasks depending on the return reason.

Let’s look at how the Visual Workflow Tool address various company operation workflows.


EMPLOYEE ONBOARDING WORKFLOW

A disorganized and incomplete employee onboarding workflow can put an organization at risk for non-compliance or improper preparation. As with all workflows, the on-boarding process requires input between different stakeholders, requiring seamless transitions between each workflow stage.

Vivantio’s Visual Workflow Tool ensures that notifications, approvals and forms are displayed at the correct time and filled out by the proper person, so time-consuming processes such as manual emails, phone calls, and document tracking are completely automated.

Conditional task assignment in onboarding workflows may be used to eliminate unnecessary steps if an employee is a re-hire versus a new hire. If the individual is a new hire, the workflow may assign a task to them to fill out an I9 form and HR may initiate a background check based on the information filled out by the new hire. A re-hire instead may bypass this process entirely and automatically assign a task to the hiring manager to send an offer letter and schedule the starting date. Accepting the offer letter may then trigger additional processes such as assigning tasks to IT for hardware and software allocation.


CHANGE MANAGEMENT WORKFLOW

A successful change management workflow requires capturing details on the affected systems, measuring the risks involved, and managing approvals throughout the process.

The challenge with managing changes is efficiently planning, testing, implementing and then analyzing your KPIs to determine if the change was successful. These processes must occur without impeding normal business operations, hence the benefit of automatic approvals and conditional triggers. Triggering separate workflow processes depending on whether a change is pre-approved, normal or an emergency can help place focus on changes that have a larger impact on the organization.

Pre-approved processes, such as a planned asset upgrade, may trigger a single change manager approval. This prevents operational slow down with a lengthy review process. Scheduled reporting on KPIs associated with the change can be delivered to the change manager to determine if the change is successful.


CAPITAL EXPENDITURE WORKFLOW

Teams with improper evaluation and tracking protocols to process capital expenditure requests are open to budget risks. With Vivantio’s Visual Workflow Tool, you can create appropriate workflows to ensure the correct departments have input on reviewing and processing these requests.

An example process involves an IT employee filling out a form online to request funding for a new help desk solution. An approval notification is then sent to the requester’s manager, which, when approved, sends a secondary approval request to the CFO if the project exceeds a defined price threshold. After the CFO approves the purchase, the project details are delivered to the purchasing department to place an order. The contract may then be managed within your assets database for automated notifications when nearing license renewal.


REPORTING WORKFLOW

While streamlining workflows can rapidly improve a team’s output and success, a powerful reporting tool is essential for tracking service trends for continual improvements. Task completion time is tracked in Vivantio, which provides a useful metric in determining your bottlenecks.

Identifying your service pain points is the first stage in reallocating resources for improved service. Large organizations often track important dates within Vivantio, so scheduled reports can be sent to inform managers of start/finish and deliverable dates for changes and projects.


CONCLUSION

We hope you found this article useful in getting your workflows off the ground in our Visual Workflow Tool. Vivantio’s in-house implementation and support teams consist of ITIL-trained professionals who both have extensive knowledge with optimizing workflows and using the Vivantio platform to leverage the workflow tool to automate your processes. If you need more personal help with a specific workflow, please don’t hesitate to get in touch with us directly.

Topics: Service Management Vivantio Customer Center Automation
3 min read

How Trigger Rules Automate Your Unique Business Processes

By Andrew Stevens on 10/19/15 9:00 AM

WHAT ARE TRIGGER RULES?

Trigger Rules is a mechanism that Vivantio users can use to automate processes. The basic concept behind Trigger Rules is:

When a certain condition is met, an action occurs.

They are useful in a wide range of scenarios, but a few common examples are:

  • Sending out surveys after a ticket is closed.
  • Automatically setting the ticket priority when a specific category of ticket is logged.
  • Taking a ticket off “Hold” when it is updated by a customer.

HOW DO THEY WORK IN PRACTICE?

We’ll use a very specific example to help explain: sending an SMS via Twilio for a CopperEgg alert.

(Note: For this example, we will assume you have already set up a CopperEgg Web Method integration and a Twilio Webhook integration.)

BUSINESS RULES

Under Admin » System Areas » Incidents, you will find a menu option for “Business Rules”:

Vivantio Business Rules 1

Within this section, there are three different types of rule available:

  • Routing – These are simple rules to assign new tickets to specific groups or users.
  • Escalation – These are time-based rules used to take action on tickets as SLA targets are approached or breached.
  • Trigger – This is the focus of our example and where you can set an action to occur when a specific condition is met.

Under the Trigger Rules tab, you will be able to click the “Add” button, which will bring you to the following screen:

Vivantio Business Rules 2

Under this screen, you will have a few elements to fill out:

  • Rule Name – This is where you can name the rule to whatever you want.
  • Execute When – You will have the choice beween “Ticket first meets condition” and “Matching Ticket updated”. “Ticket first meets condition” will only execute the action the first time a specific ticket meets the condition. “Matching Ticket updated” executes the action whenever a matching ticket is updated.

To explain each content tab, let’s run through them:

Select Tickets

This is where you will use the Vivantio Expression Builder to set the condition. For our example, we will set this for “Run this rule for tickets with the CopperEgg Alert category” as seen below:

Vivantio Business Rules 3

Timing

This is where you can set timing rules around when the action is completed. For our example, we will want to select the default option of “Immediately”, because we want the SMS to be sent out as soon as the ticket is created:

Vivantio Business Rules 4

There might be scenarios where you want to delay the action. This is where you can control that.

Actions

This is where we define the action that takes place once the condition is met. There are a number of different processes available, but, for our example, we’re only interested in “Send SMS via Twilio” under Webhooks:

Vivantio Business Rules 5

Under that option, it will bring you to a screen where you can set the recipient and text sent. You can also leave an optional note regarding the action.

After saving the rule, you have finished. With this example, the next time CopperEgg creates an alert, the SMS you created will be sent and be noted in Vivantio:

Vivantio Business Rules 11


Topics: Service Management Customer Center Automation