Demo
Andrew Stevens

Andrew Stevens

Andrew joined the Vivantio development team in 2008, working from the Vivantio Head Office near Bristol in the UK. He came from a background in ecommerce web/application development with an earlier history of first and second line technical support/customer services. Now, Andrew is driving expansion of the software teams and the development of the product.

Recent posts by Andrew Stevens

4 min read

Separate Fact from Myth to Master Self Service

By Andrew Stevens on 6/3/20 9:00 AM

THE USE OF SELF SERVICE

Self Service is the most cost effective, efficient way for your end users to get help.

Still, recent data shows that it’s not being used nearly as often as it should be across service teams in nearly all industries.

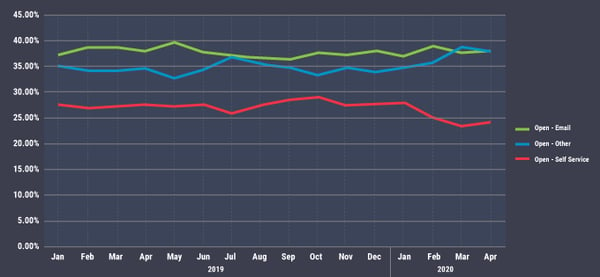
In a recent post, we uncovered that given recent widespread, drastic changes to the way most organizations work on a day-to-day basis, Self Service use is at an all time low among organizations that count Self Service as a part of their overall strategy. The number of tickets opened via Self Service in Vivantio dropped more than 17% from March to April.

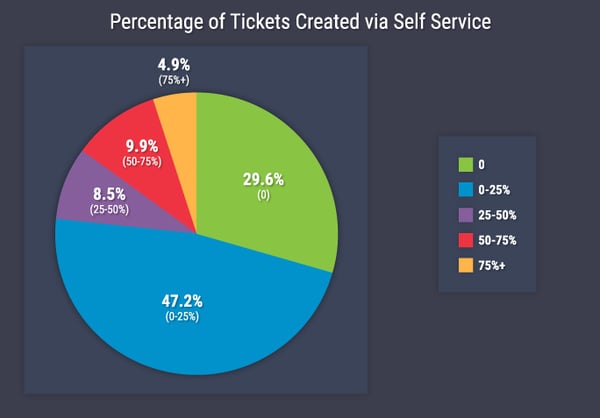
Further analysis from Vivantio’s Product Management team finds that 30% of Vivantio customers forgo the use of Self Service altogether.

And for 50% of Vivantio customers, self service is only a small part of their strategy, with fewer than 1 in 4 tickets being created via self service at those organizations.

self service myths and facts pie chart

Granted, it’s fair to say that self service isn’t the right choice for everyone – no two organizations or service teams are alike, and there are many factors that come into play when deciding not only how much focus you put on Self Service, but whether it should be a part of your strategy at all.

But if you’re part of the 75 percent of customers who aren’t using self service extensively, when was the last time you asked yourself why? To help answer that question, we’re going to look at some facts and myths about self service.

THE FACTS

FACT #1: SELF SERVICE IS MORE COST-EFFECTIVE

We surveyed some of our customers who have a balanced mix of tickets – email, Self Service and “walk ups” – to understand the impact of channel on the cost of resolving a ticket. And as you’d expect, Self Service wins. On average, Self-service tickets are resolved faster and with fewer touches than tickets logged via email.

FACT #2: SELF SERVICE SCALES

The same research showed – unsurprisingly – that the fastest way to get a ticket resolved was a walk-up. If you’re a technician and someone is in your office, on the phone or on Slack asking you questions, then you typically answer that person then and there. That’s how you provide great service, right?

Wrong. What about the five other customers who called, but received your “all staff are busy” message? Maybe one of those was a VIP customer. Maybe their next phone call isn’t to your tech support team, it’s to one of your competitors.

So how do you prioritize a walk-in over your current workload? Should that walk-in have jumped the queue to get your undivided attention? Have they stopped you working on something that’s far more important to the business? Self service is scalable and helps prevent this from happening.

On average, self-service tickets are resolved faster and with fewer touches than tickets logged via email.

FACT #3: SELF SERVICE IS EMPOWERING

We’ve all been there: we’ve run into a problem and we want to fix it. And we want to fix it now. Not when the support desk opens at 9am on Monday, nor when we reach our turn in a seemingly never-ending queue. If you have the resources to fix it yourself, you are going to try to do so. And what’s more is that next time, your first thought isn’t, “I need to call for help,” it will be, “I can probably take care of this myself.”

THE MYTHS

MYTH #1: CUSTOMERS DON’T WANT SELF SERVICE

You might think your customers don’t want Self Service. Maybe you’re right. If you ask your customers if they’d prefer Self Service versus a human on the line, some of them (maybe most of them) will pick a human.

Are you asking the right question, though? What if you ask, “Do you want the same end result, but sooner?” How about asking, “Do you want the issue resolved immediately or tomorrow?”

Of course, there is a time and a place for human contact, but with limited resources, you need to save it for where it counts.

MYTH #2: SELF SERVICE IS IMPERSONAL

OK, so this one is partially true. Bad Self Service is impersonal. Good Self Service isn’t.

Your Self-Service portal is the equivalent to your shop window, and like any shop window, it can put people off or it can welcome–even entice–them in. To entice customers to use Self Service, show them resources that are relevant to them. Give them easy access to their open tickets and service requests. Provide links to articles about the products and services they’ve purchased. Give them news about your business and your people. If you do, they’ll find your Self-Service portal incredibly valuable.

MYTH #3: SELF SERVICE ISN’T WORTH THE EFFORT

We won’t sugar coat it: getting Self Service right isn’t always easy. But if you take the time to do it right, it’ll pay for itself many times over. You don’t need a massive knowledge base, rigorously designed workflows or a huge team to make self service work for you. The only things you need to get started are a commitment to understanding your customers needs, and a desire to improve your service levels.

CONCLUSION

Self Service can be a critical part of your service management strategy, and it’s important to weigh the pros and cons of implementing it. Of course, there are huge benefits to Self Service when it’s done well, and hopefully we’ve given you some insight into those benefits as well as dispelled a couple of common myths. To learn more about the ins and outs of Self Service, check out our self service resource page.

Topics: Service Management Customer Service Customer Self-Service
2 min read

Work-from-Home is Impacting Self Service in an Unexpected Way

By Andrew Stevens on 5/27/20 1:58 PM

Delivering good service is more challenging now than ever before: there are more questions being asked and fewer people available to answer them. Technology has risen to the challenge: Zoom stock has soared, Microsoft has been announcing new features in Teams, and yes, Netflix has been there to snatch us up when we step away from our desks.

Vivantio’s own account management / customer success team have been busy reaching out to customers to see how best we can help. A common theme among the responses has been, “How can we get more out of self service?” either from customers who aren’t using a Self Service Portal yet, or who are using it but not as much as they’d like to.

It made sense to us. With resources at an all-time low, we expected our customers to turn toward Self Service to help keep their service levels up. Wanting to find out more, we dove into our analytics, and the results weren’t quite what we expected.

The Results

Use of Self Service is at an all-time low among Vivantio customers.

Throughout 2019, the percentage of tickets opened via Self Service across the Vivantio SaaS platform stayed pretty constant – around 27% of tickets were opened via Self Service. Email accounted for 33-37% of tickets, with the remainder being opened manually via the Vivantio technician portal.

self service portal data chart dark mode

In March 2020, that dropped down to 23% – not a huge difference on paper, but to the customers impacted the most, that translates to over 5,000 extra phone calls, total. In one month! It looks like the trend may now be reversing – April rose about half a point on March – but it’s still early to tell.
You might have had an internal chat system in place already – Teams, Slack, something else – but it’s probably being used more than ever before. So now, you don’t even have to leave your desk to get hold of IT.
When we sat back and thought about this, we decided maybe it shouldn’t have been that surprising. We all know how easy it has historically been to walk over to your IT team and ask a question instead of logging a ticket. Your first thought might be, “Well, you can’t walk over to IT now, so they’ll have to use the ticketing system.”

Turns out, that’s not the case. You might have had an internal chat system in place already – Teams, Slack, something else – but it’s probably being used more than ever before. Now, employees don’t even have to leave your desk to get hold of IT.

So, what do you do? How do you get people back on to Self Service? Do you even want to get people back on to Self Service? Answering those questions is going to be the focus of our blog posts the next few weeks, with information on new/existing features, best practices, and tips and tricks.

In the meantime, how has this “new normal” impacted your service team’s day-to-day? Have you seen an uptick or a downturn in the use of self-service, or even other channels that weren’t at play pre-work-from-home? Drop us a line at info@vivantio.com or tweet us @Vivantio.


Topics: Self-Service
5 min read

Why Operational Level Agreements Matter & How to Use Them in Vivantio

By Andrew Stevens on 2/28/20 9:00 AM

WHAT ARE OPERATIONAL LEVEL AGREEMENTS?

In order to provide excellent customer service, you need to meet your service level agreements (SLAs): the agreements you have with your customers about the level of service you’ll provide. But how do you make sure you’re doing that? And if you’re not doing it, how do you understand why? The first step is making sure you hit your internal goals: your operational level agreements (OLAs).

Whereas SLAs are focused on the customer, OLAs are in place to describe the level of service your internal teams can expect from each other. These might include relationships between your front line service desk and the teams who support them: network support, operations management, application management, desktop engineers, etc..

They can–and should!–be used as a key metric in service management because they allow teams to understand where bottlenecks are, and why they’re not hitting those all-important SLAs. OLAs should also be transparent so that everyone knows what their own targets are, and the impact it has on the rest of the business.

However, sometimes service teams bite off more they can chew when attempting to measure SLAs and ultimately fail to meet them. Instead of setting goals for the sake of having them, start small by clarifying or setting up OLAs within your ITSM software tool. From there, you can begin building out SLAs.

Here’s how you can use task management in Vivantio to ensure your OLAs are being met.

TASK MANAGEMENT IN VIVANTIO

Task management in Vivantio can help companies meet OLAs and, in turn, meet target SLAs. Task management can be enabled in all ticket types in the Vivantio service management platform.

In Vivantio Pro, you can assign tasks to licensed technicians. Vivantio ITSM goes a step further and allows you to assign tasks to both licensed technicians and non-licensed end-users.

With task management enabled, technicians can create tasks for the different work required to complete the ticket. The list of tasks can be viewed easily from the ticket. Tasks have the same core capabilities as tickets, including their own set of configurations (categories, status, etc.) and of course a full history of the work done.

There are three ways that tasks are created in Vivantio: Ad hoc as needed, via trigger rules, and through Vivantio’s workflows. Regardless of the way tasks are created, you can easily view them from the ticket to track progress. Here are examples of creating a task using each way.

AD HOC TASK CREATION

Within Vivantio, users can create ad-hoc tickets as needed in order to request internal or external help to meet an OLA. Perhaps a technician is working on a P4 support request that came in with a corresponding SLA of 16 hours. While working on the request, they discover they’re not trained in a specific area of the required work and will need to ask their colleague for help.

To do this, they can manually assign out an ad-hoc task from within the ticket to their colleague – or if they don’t know who specifically to ask, an assignment group – describing what they need help with.

At this time, four hours have already passed on the SLA and only 12 hours remain. When assigning out the task, the technician gives the task an appropriate OLA to ensure that their colleague knows when they need to have the work completed in order to meet the ticket’s SLA.

Screenshot of ad-hoc tasks outlines

This is a simple way to get started with OLAs. You might wonder why you don’t just re-assign the ticket, but there’s a few advantages in using task management. First up, you get to track each different piece of work separately; one ticket might need work to be completed by four different teams.

Vivantio will let you track the time each team/user owned the ticket, but it’s a lot easier to understand the timeline of a ticket when you’re using task management. Second, and we’ll talk more about the importance of this in a later blog, you improve the customer experience by ensuring the customer has a single named point of contact for their ticket so they don’t end up feeling like the buck is being passed.

Third, you make it very clear to other teams exactly what they do and don’t need to do so there’s no digging through the ticket history to find out their role in resolving this issue.

TASK CREATION VIA TRIGGER RULES

You can automate task creation within Vivantio using trigger rules. For example, when a request is logged reporting that a computer is lost or stolen, there are tasks that always need to be completed by both the IT team and the security team. Due to compliance reasons, it is required that this kind of request needs to be closed out within an eight-hour SLA.

Trigger rules can be created to automatically assign out the required tasks to the IT team and security team any time a lost or stolen computer request is logged. The tasks can have their own associated OLAs so that the teams know how long they have to complete the work in order to meet the request’s SLA.

The below screenshot shows two tasks that were automatically created via trigger rule due to the type of ticket that was logged.

Screenshot of trigger rule tasks outline

Clicking into one of the tasks, we can see the SLA for the task, providing the target time to complete the work by.

Screenshot security task outline

This is a simple way to get your team started using tasks for repetitive work requests. Sometimes though, this isn’t quite enough. You need to ensure tasks are completed in a certain order, or tasks are only worked on after approval has been given. If that’s the case, then you need workflows.

WORKFLOWS

Automated workflows within Vivantio can also help you and your team manage your OLAs. For instance, say a customer of a software company submits a support request, which requires a specific process involving multiple people to complete. The request falls into a P2 priority request with a close SLA of 40 hours on a 9-to-5 working time plan, or five business days from the customer’s view.

Based on the category of the request, four different support teams will need to work on the request in a sequential order. In Vivantio, a specific workflow which automates the assignment of the process tasks is automatically kicked off using Vivantio’s trigger business rules.

Tasks are automatically assigned out to each team when it is their time to complete their portion of the work. In order to meet the SLA agreed upon with the customer, the total time in the SLA is broken down into OLAs, or smaller chunks of time which are allocated to each team.

Screenshot of OLA workflow diagram

There are several tasks that need to be completed by different teams and technicians during the workflow. In order to make sure to meet the target SLA, you can use operational level agreements for each task that is assigned out in the workflow.

This allows each person who is assigned a task to be aware of how much time they have in order to complete the task. The target OLAs for each task are set up to leave time for the transition between tasks and to complete the tasks themselves.

CONCLUSION

If you’re wondering why you aren’t meeting your SLAs, then implementing OLAs is a good first step in understanding why. Whichever approach you use for Task Management in Vivantio, you can use the reporting tools you’re already familiar with to review your performance, understand which teams are creating bottlenecks, and fix the issues at the source.

Topics: Service Management SLA ITSM Customer Center Customer Service Automation IT Service Automation OLA
1 min read

Application Lifecycle Management in Vivantio

By Andrew Stevens on 9/26/17 9:00 AM

CAN VIVANTIO BE USED AS AN ALM TOOL?

The answer is yes. Vivantio is flexible enough to be configured to model your development processes, whether you’re using Agile, Scrum, Waterfall, Spiral, or some combination of these. The combination of multiple ticket areas, workflow, asset, and knowledge management gives you almost everything you need.


WHAT CAN’T VIVANTIO DO?

There’s still a couple of things Vivantio can’t do. Some examples are:

  • Source control
  • Software development


SHOULD I USE VIVANTIO FOR ALM?

Probably not, at least not just Vivantio. Using it with a combination of tools like Team Foundation Server would be a more optimal solution.

That being said, there is definitely a place for Vivantio in your ALM activities. It is very unlikely your developers will want to share their ALM software suite with the support team. However, there is a good chance that Vivantio can help a support team supplement their development team’s efforts.

Topics: Service Management Vivantio Customer Center Lifecycle Management
7 min read

How to Integrate Microsoft Team Foundation Server (TFS) with Vivantio

By Andrew Stevens on 9/26/17 9:00 AM

PREREQUISITES

In order to connect Vivantio to TFS, you’re going to need:

  • Admin access to your Vivantio instance
  • Admin access to your TFS instance
  • A user account in TFS for Vivantio
  • The IP address(es) for your TFS servers

BASIC CONFIGURATION

Step 1:

Log in to Vivantio, open the Admin Area, and select TFS under the Integration & API heading on the left menu:

TFS Credentials Empty

The first screen you’ll see will prompt you for the version of TFS you’re using, and the credentials to use.

  • If you’re using TFS 2012/13, or 2015, enter a username and password.
  • If you’re using TFS 2017 or VSTS, enter a username and a Personal Access Token. For details on creating a PAT, see the MSDN documentation here.

Having entered those and hit the ‘Save’ button.

Step 2:

The bottom of the screen will update to show a couple of different URLs: the Work Item Alert URL, and the Service Hook URL:

TFS Credentials Populated

You’ll use one of these URLs when you set TFS up to send information back into Vivantio. We’ll get more into that later. But, while you’re here, you should configure the IP Range for Vivantio to accept requests from, using the ‘IP Range’ button in the menu bar:

Jira IP range buttonJira IP range dialogue

Having configured those, you can move on to the next tab, Ticket to Work Item Mapping.


TICKET TO WORK ITEM MAPPING

You can control which types of Vivantio Ticket can be mapped to which types of TFS Work Item by setting up Ticket to Work Item Mappings. This prevents the wrong type of information being transferred or the wrong type of records being created.

Team Foundation Service Ticket To Work Item Mapping Empty

When creating a Ticket to Work Item Mapping, you’ll be prompted for a number of different things:

  • Project Collection – The Project Collection in TFS
  • Project – The Project in TFS
  • Work Item Type – The Work Item Type in TFS
  • Ticket Type – The type of Ticket within Vivantio

These control the basics of the mapping. On the next tab, Sync Options, there are settings relating to the sync of data between:

Team Foundation Server Ticket To Work Item Mapping Empty Sync Options

You can configure Vivantio to automatically send updates to TFS when the Vivantio Ticket is updated. (Note: This option does not force TFS to update Vivantio. That has to be configured within TFS itself.)

Finally, you can add additional field mappings:

Team Foundation Server Ticket To Work Item Mapping Empty Field Mappings

As standard, Vivantio will populate the Work Item Title and Description; if you want to add additional mappings, e.g. for custom fields, you can do so here.

After choosing the appropriate options, hit ‘Save’, and you’re ready to start creating TFS Work Items.


CREATING A NEW WORK ITEM

When viewing a Ticket in Vivantio, under the “More…” menu item, you’ll see the option to “Create New TFS Work Item”:

Jira Create New Jira Issue Menu Item 1

Clicking that button will bring up the “Create New TFS Work Item” dialog:

Team Foundation Service Create New Work Item Dialog Empty

You can optionally enter Notes for the Vivantio Ticket History, then hit ‘Save’ to create the TFS Work Item. After a short period of time, you’ll see a TFS tab appear on the Ticket Details:

Team Foundation Service Ticket Details Tfs Sub Tab

That includes a link to view the Work Item in TFS, along with options to unlink the ticket from TFS, or to add a direct comment to the TFS Work Item, which can be useful if you didn’t choose to automatically sync actions.


GETTING INFORMATION BACK FROM TFS

The next step in the process is getting information added to TFS sent into Vivantio. This is done using one of two mechanisms, depending on what version of TFS you’re using:

  • Work Item Alerts (TFS 2015 or earlier)
  • Service Hooks (TFS 2017 / VSTS)

The configuration is pretty similar either way.

Creating a Work Item Alert

(The Microsoft documentation on Work Item Alerts can be found here.)

Work Item Alerts are the ‘older’ of the two mechanisms that can be used for TFS to update Vivantio. If you’re using a version of TFS that supports Service Hooks, we suggest you use those instead. However, if you do want to use Work Item Alerts, you can do so easily.

You can follow the instructions in the MS documentation to configure the basics of the Work Item Alert – which work items the alert is for, and when. The main difference is that rather than having the alert delivered to an email address, you’ll select the ‘SOAP’ option, and enter in your Work Item URL:

Team Foundation Server TFS Create Work Item Alert

TFS will then send a HTTP request to Vivantio when the alert fires, and Vivantio will add the details of the update as a Note on the ticket.

Creating a Service Hook

(The Microsoft documentation on Service Hooks can be found here.)

Service Hooks are a newer feature within TFS–introduced in TFS 2015. We don’t currently have Vivantio listed within TFS as a dedicated option, so on the first page of the Create Service Hook wizard, you’ll choose the “Webhooks” option:

Team Foundation Server New Service Hook Step 1

On the next page of the wizard, you’ll choose the type of event the Service Hook triggers on:

Team Foundation Service New Service Hook Step 2

Right now, we only support Work Item Commented On and Work Item Updated, but we’re working on introducing support for other events soon. Enter any filters you want for the area or work item type, then move on to the last step:

Team Foundation Server New Service Hook Step 3

All you need to do here is add your Service Hook URL, then click Finish. TFS will then start sending updates on Work Items back in to Vivantio.

If you’re using Vivantio and TFS, and you don’t yet have them integrated, give it a try, and see how it can help you improve communications between your Service Desk and your development team!

Topics: Customer Center Service Integrations Types of System Integration Microsoft Teams TFS Integration Types of Service Integrations
6 min read

How to Integrate JIRA with Vivantio

By Andrew Stevens on 9/26/17 9:00 AM

PREREQUISITES

In order to connect Vivantio to JIRA, you’re going to need:

  • Admin access to your Vivantio instance
  • Admin access to your JIRA instance
  • A user account in JIRA for Vivantio
  • The IP address(es) for your JIRA servers

BASIC CONFIGURATION

Step 1:

Log into Vivantio, open the Admin Area, and select JIRA under the Integration & API heading on the left menu:

Screenshot of Jira Empty

The first screen you’ll see will prompt you for your JIRA credentials. Enter them and hit ‘Save’.

Step 2:

The bottom of the screen will update to show your unique Webhook URL:

Screenshot of Jira Credentials Populated

You’ll use this URL when configuring Webhooks within JIRA.

However: before you can do that, you need to configure the IP Range for Vivantio to accept requests from, using the ‘IP Range’ button in the menu bar:

Jira IP Range ButtonJira IP Range Dialogue

Having configured those options, you can move on to the next tab, Ticket to Issue Mapping.


TICKET TO ISSUE MAPPING

Jira Ticket to Issue Mapping Empty

You can control which types of Vivantio Ticket can be mapped to which types of JIRA Issue by setting up Ticket to Issue Mappings. This prevents the wrong type of information being transferred or the wrong type of records being created.

When creating a Ticket to Issue Mapping, you’ll be prompted for a number of different things:

  • Ticket Type – the Vivantio Ticket Type
  • Project – the Project in JIRA
  • Issue Type – the Issue Type in JIRA
  • Vivantio ID Custom Field – if you have a custom field in JIRA that you want to use to store the Vivantio Ticket ID, you can enter the (system) field name here. This will usually be in the format ‘customfield_10010’
  • Link Issue to Ticket – JIRA has a concept of ‘links’ within a ticket – checking this box will add a link to the Vivantio Ticket to the Issue in JIRA
  • Action / Attachment Sync – you can configure Vivantio to automatically send updates to JIRA when the Vivantio Ticket is updated (Note: this option does not force JIRA to update Vivantio though. That has to be configured within JIRA itself.)

After choosing the appropriate options, hit ‘Save’, and you’re ready to start creating JIRA Issues.


CREATING A NEW ISSUE

When viewing a Ticket in Vivantio, under the “More…” menu item, you’ll see the option to “Create New JIRA Issue”:

Jira Create New Jira Issue Menu Item 1

Clicking that button will bring up the “Create New JIRA Issue” dialog:

Jira Create New Jira Issue Dialogue

You can optionally enter Notes for the Vivantio Ticket History, then hit ‘Save’ to create the JIRA Issue. After a short period of time, you’ll see a JIRA tab appear on the Ticket Details:

Jira Ticket Details Jira Sub Tab

That includes a link to view the Issue in JIRA, along with options to unlink the ticket from JIRA, or to add a direct comment to the JIRA Issue – useful if you didn’t choose to automatically sync actions.


GETTING INFORMATION BACK FROM JIRA

The next step in the process is getting information added to JIRA sent into Vivantio. This is done using Webhooks in JIRA. Full documentation on Webhooks can be found here, but we’ll briefly walk you through the steps required to configure them.

Back in the Vivantio Admin Area, you’ll find your unique Webhook URL, which will look something like:

https://url-to-your-vivantio-instance/webhooks/jira/event?accesskey=xxx-yyy-zzz

Make a note of this, head in to the “System” section of the JIRA Admin Area, and find the ‘WebHooks” menu option under “Advanced” (towards the bottom left of the screen). You’ll then have the option to “Create WebHook”, which is going to give you a screen more-or-less similar to the below:

Jira New WebHook

You can enter whatever you want for the “Name”. Vivantio doesn’t use that field. Add your Unique URL in, then head down to the “Events” section, where you choose when you want the Webhook to fire, and for which Issues:

Jira-JIra-New-WebHook-Select-Events

It’s up to you exactly which events you want the Webhook to fire for. For example, you might want to just have the Webhook fire when an Issue is updated or a Comment is added. More advanced users might want to configure the Webhook to only fire for specific transitions as a post function in a Workflow. (Note: see here in the Atlassian docs for more info on that.)

Having done that, you then need to set Vivantio up to listen for that specific event, and decide what actions to take. Back in the JIRA section of the Vivantio Admin Area, select the Webhooks tab, click Add, and choose the type of Ticket you want the Webhook to run for. Completing that step will show you the Add Webhook dialog:

Jira Vivantio Add Webhook

In the name field, you’ll enter either a standard event name (such as ‘issue:updated’) or the name of a transition. For simple integrations, you can then choose to just add the JIRA Comments as Notes–then when the Webhook in JIRA fires, the comments will be added to Vivantio.

If you’re using transitions though, you might want more complicated actions to take place – for example, when an Issue is resolved in JIRA, you might want to change the status of the Vivantio ticket. You can do that using the Actions grid at the bottom of the page.

And there you have it: bi-directional integration between Vivantio and JIRA. If you’re using Vivantio and JIRA, and you don’t yet have them integrated, give it a try, and see how it can help you improve communications between your Service Desk and your development team!

Topics: Customer Center Service Integrations Types of Service Integrations JIRA
2 min read

How to Use the Vivantio Report Catalog

By Andrew Stevens on 7/27/17 9:00 AM

WHAT IS THE REPORT CATALOG?

All Vivantio customers receive the same standard out-of-the-box reports when they start out with Vivantio. However, every customer has different requirements for reporting in Vivantio, and the out-of-the-box reports are meant as a starting point, only. During your implementation, your Implementation Consultant will work with you to assess your reporting requirements and either build reports for you or empower you to build your own reports using the Vivantio Report Builder.

During the nearly 15 years our implementation team have been going through that process, we’ve seen many different reporting requirements from a lot of different customers. Some are pretty unique. Others have made us think: “Wow, we need to make this available to everyone!” While we don’t want to fill up every customer system with hundreds of reports that aren’t relevant, we did want to find a way to share these reports with all our customers.

Hence the introduction of the Vivantio Report Catalog: a “marketplace” of Reports that you can browse through. If you find a report you like, you can import it into your Vivantio instance, where you can then customize it using the Vivantio Report Builder.


HOW DO I USE THE REPORT CATALOG?

Once the Report Catalog is enabled in your system, you need to choose which Roles have access to it. This is done under:

Admin » Reporting » Reports » Access Control

On that screen, when editing a Role, you can grant the Role the “View Report Catalog” permission. Having enabled that for a Role, when a member of that Role is logged in, they will see the Report Catalog link under the Reports section of the left menu. Clicking that link will open the Report Catalog in a new window, allowing you to browse the selection of available reports, preview them, and then import them into your Vivantio instance. After importing a report, it’s available within Vivantio (and the Vivantio Report Builder) like any other report. So, you can customize it, add branding, change the data, whatever you need!


CAN I PUT MY REPORTS INTO THE REPORT CATALOG FOR OTHER VIVANTIO CUSTOMERS TO SEE?

We won’t be making this available by default. If you have a report that you’re particularly proud of or think other customers would find useful, please contact our support team and let them know. We will then review and contact you with a time to chat and see if we can include it.

Topics: Vivantio Customer Center Report Catalog Report Catalogue
1 min read

How to Set Up Asset Synchronization

By Andrew Stevens on 1/21/16 9:00 AM

ASSET SYNCHRONIZATION IN VIVANTIO

If you’re running an IT service desk or managed service provider using Vivantio, you’ve probably got some IT assets out there. When your end users log a ticket with you, there’s a good chance that it will relate to one of those assets.

If you’re using an Asset Discovery tool, then you’ve also got a database of those assets somewhere. Asset Synchronization allows your technicians to get all the information they need from that database within Vivantio.


WHAT YOU NEED FOR ASSET SYNCHRONIZATION

You can use the Vivantio API to build your own Asset Synchronization, but there is another way. Depending on where your data is stored, there are a couple of out-of-the-box options available via the Vivantio Integration Services Component.


WHAT IS THE INTEGRATION SERVICES COMPONENT?

The Integration Services Component (ISC) is an application you install on your local network. It is designed to run one of several different types of task that require access to local resources, such as your Asset Discovery database. In terms of tasks available from your ISC, there are quite a few including:

  • Asset Sync (what you will use for Asset Synchronization)
  • Active Directory Sync
  • Scheduled Export

The ISC can be downloaded via the Admin Area in Vivantio. Basic setup can be performed via the installer.


WHAT ASSET DISCOVERY TOOLS CAN I CONNECT TO?

The Asset Sync connects directly to the database used by your chosen Asset Discovery tool. At the time of this post, we have support for:

  • SQL Server
  • SQLite databases

It should be noted that connecting directly to the database has pros and cons, but this allows us to connect with the widest range of tools.

Topics: Customer Center Service Integrations Types of System Integration ISC
2 min read

When and How to Use the Vivantio API

By Andrew Stevens on 11/18/15 9:00 AM

WHEN SHOULD I USE THE VIVANTIO API?

We’d encourage the use of Webhooks and Web Methods wherever possible for a number of reasons such as:

  • You don’t need to write any code.
  • They’re hosted within Vivantio so don’t need to be deployed separately.

But there are a number of situations where the API is the better or only choice. Let’s explain with two most common instances: Integrating with Legacy Systems and Developing Custom Applications.


INTEGRATING WITH LEGACY SYSTEMS

In this case, you’ll be integrating Vivantio with another system that:

  • Doesn’t have an HTTP API (or doesn’t support HTTP Basic Authentication)
  • Isn’t externally accessible
  • Doesn’t support Webhooks to send data to other applications

With this situation, you’ll need to write custom middleware to push data to and pull data from the external system. Our API can help with that.

(It’s worth noting that you might find Webhooks and Web Methods are still useful in this scenario. Webhooks are still the only way to have Vivantio automatically push data out in response to another event. Web Methods can also simplify the code you have to write on your side to interact with Vivantio.)

DEVELOPING CUSTOM APPLICATIONS

In this case, you might be developing your own software and need Vivantio to communicate with it.

For example, Vivantio includes a comprehensive and flexible Self Service Portal, but maybe it doesn’t quite work for you. If you need features available that aren’t supported in the standard SSP, you might want to create your own.

In this kind of scenario or ones similar to it, utilizing our API could be more appropriate.


HOW DO I USE THE VIVANTIO API?

There are two key resources available to help you get started: Code Samples and Documentation and the API Reference.

CODE SAMPLES AND DOCUMENTATION

The best place to start is the API Samples repo on our GitHub page. Here you’ll find:

  • Documentation on the core concepts of the API such as API Design, Authentication and Querying
  • Code samples (Note: currently only in .Net, but we’re working on other languages.)

You can also jump straight to our live samples to see sample applications running.

API REFERENCE

Once you’ve got the basics down and are comfortable working with the API, you can find a complete list of available endpoints and methods in the API Reference.


WHAT CAN YOU DO WITH THE VIVANTIO API?

Quite a lot! Vivantio was developed API-first, so the majority of the functions available within Vivantio are available via the API.

We should note that administrative features are not available in the API and only available in the main GUI.

Topics: Vivantio Customer Center Service Integrations API Integration Tools
7 min read

How to Create Simple Contact Forms with Web Methods

By Andrew Stevens on 11/10/15 9:00 AM

CREATING THE WEB METHOD

To create a Web Method in Vivantio, log into the platform, open the Admin Area, and go to:

Integration & API » Web Methods

screenshot of web methods admin area

(If you don’t see Web Methods in this menu, please contact our support team.)

When you reach this screen, select the “Add” button. You’ll then get a dialog with a box for you to enter a name and a few sub tabs below to fill in. Submit a name and then move onto the first tab.

BASIC DETAILS

screenshot of add web method basic details

In this example, because we’re going for a simple form POST, we won’t be authenticating.

So, select Access Key Auth, and enter the IP range of the web server(s) that will host the form.

(Note: We’ve gone for 0.0.0.0 and 255.255.255.255 in our example. Don’t do that in practice!)

The other options on this tab are:

  • HTTP Method
  • Request Content Type

As this is a web form we’re dealing with, you will want to select ‘POST’ and ‘application/x-www-form-urlencoded’ respectively.

PARAMETERS

screenshot of vivantion add web wethod parameters

You can add as many parameters as you like, depending on how complicated you want your form to be.

In this example, we’ve kept it simple with:

  • First Name
  • Last Name
  • Email Address
  • Subject
  • Description

They are all configured in the same way.

ACTIONS

In this example, we want to create a Ticket when the Web Method is called. So, on the Action tab, choose

Add » Create Incident

(Note: You can use whichever of your Ticket Types is more appropriate for the situation.)

screenshot of vivantio add web method actions

After you’ve selected your Action, you will get a popup with two tabs: Conditions and New Record Details.

In this example, we want a Ticket to be created every time the Web Method is called. So, we will leave the Conditions tab empty and move onto New Record Details.

screenshot of vivantio add web methods 2

In this example, you can see we’re using to pass our parameter values into the Ticket Details.

You’ll also want to note though that we’ve put some literal values in for the Priority and Category. In our example, we want these set for every contact form submission, but we don’t want the user to choose them, so we’re specifying fixed values.

RESPONSE

When you’re setting up the Response, you can configure up to three options:

  • Response Type – For this field, you have the choice between Content or Redirect. Content allows you to specify content to be returned to the user as part of the Response Body. Redirect let’s you send them to a specific website with a 302 redirect.
  • Response Content Type – For this field, you have the choice between JSON, XML, or Text/HTML. This field is only available when you select the Content option for the Response Type field. It will inform the user of the Web Method which data type to expect in return.
  • Response Template – This field allows you to enter the actual response you would like to send: either the content or the redirect URL. If your Web Method contains a “Create Ticket” action, you can use to refer to properties from the created ticket within the response template such as {{ticket.displayid}} to get the ID of the inserted ticket.

For our example, we’re going to set up a Content Response using the Content Type “Text/HTML” that shows a basic “Thank You” message and refers to the Ticket ID.

screenshot of add web method response

After you hit the “Save” button, you’ll be shown the unique URL for your Web Method.

screenshot of vivantio web method URL


CREATING THE CONTACT FORM

When creating the form, the things you need to know are:

  • The form method should be “POST”.
  • The form action should be the Web Method URL you noted earlier.
  • When you’re setting the names of your form inputs, they should match the names of the parameters you added earlier.

Here’s a sample form below that is ready to use apart from the action URL on the form:

<!DOCTYPE html>

<html lang=”en”>

<head>

<meta charset=”utf-8″>

<meta http-equiv=”X-UA-Compatible” content=”IE=edge”>

<meta name=”viewport” content=”width=device-width, initial-scale=1″>

<title>HTML Form &raquo; Web Method Example</title>

<link href=”https://maxcdn.bootstrapcdn.com/bootstrap/3.3.5/css/bootstrap.min.css” rel=”stylesheet”>

<!–[if lt IE 9]>

<script src=”https://oss.maxcdn.com/html5shiv/3.7.2/html5shiv.min.js”></script>

<script src=”https://oss.maxcdn.com/respond/1.4.2/respond.min.js”></script>

<![endif]–>

</head>

<body>

<div class=”container”>

<div class=”row”>

<div class=”col-lg-6 col-offset-lg-3″>

<form method=”POST” action=”YOUR WEB METHOD URL HERE”>

<div class=”form-group”>

<label for=”firstname”>First Name</label>

<input type=”text” class=”form-control” id=”firstname” name=”firstname” />

</div>

<div class=”form-group”>

<label for=”lastname”>Last Name</label>

<input type=”text” class=”form-control” id=”lastname” name=”lastname” />

</div>

<div class=”form-group”>

<label for=”email”>Your Email Address</label>

<input type=”email” class=”form-control” id=”email” name=”email” />

</div>

<div class=”form-group”>

<label for=”subject”>What can we help with?</label>

<input type=”text” class=”form-control” id=”subject” name=”subject” />

</div>

<div class=”form-group”>

<label for=”description”>Any additional details?</label>

<textarea class=”form-control” id=”description” name=”description” rows=”10″>


(Note: You’ll note that we’ve referenced Bootstrap in this sample. You do not have to do that and can use whatever UI framework you like.)

Here’s what the sample form would look like in practice:

vivantio web method form sample

Using the code, you can publish the form to your website. After a user fills in and submits the form, a Ticket will be created via the Web Method. The user will then see the content configured on the Web Method Response.

Topics: Customer Center Service Integrations Types of System Integration API Integration Tools WebMethods