Demo
1 min read

How to Set Up Asset Synchronization

By Andrew Stevens on 1/21/16 9:00 AM

ASSET SYNCHRONIZATION IN VIVANTIO

If you’re running an IT service desk or managed service provider using Vivantio, you’ve probably got some IT assets out there. When your end users log a ticket with you, there’s a good chance that it will relate to one of those assets.

If you’re using an Asset Discovery tool, then you’ve also got a database of those assets somewhere. Asset Synchronization allows your technicians to get all the information they need from that database within Vivantio.


WHAT YOU NEED FOR ASSET SYNCHRONIZATION

You can use the Vivantio API to build your own Asset Synchronization, but there is another way. Depending on where your data is stored, there are a couple of out-of-the-box options available via the Vivantio Integration Services Component.


WHAT IS THE INTEGRATION SERVICES COMPONENT?

The Integration Services Component (ISC) is an application you install on your local network. It is designed to run one of several different types of task that require access to local resources, such as your Asset Discovery database. In terms of tasks available from your ISC, there are quite a few including:

  • Asset Sync (what you will use for Asset Synchronization)
  • Active Directory Sync
  • Scheduled Export

The ISC can be downloaded via the Admin Area in Vivantio. Basic setup can be performed via the installer.


WHAT ASSET DISCOVERY TOOLS CAN I CONNECT TO?

The Asset Sync connects directly to the database used by your chosen Asset Discovery tool. At the time of this post, we have support for:

  • SQL Server
  • SQLite databases

It should be noted that connecting directly to the database has pros and cons, but this allows us to connect with the widest range of tools.

Topics: Customer Center Service Integrations Types of System Integration ISC
2 min read

When and How to Use the Vivantio API

By Andrew Stevens on 11/18/15 9:00 AM

WHEN SHOULD I USE THE VIVANTIO API?

We’d encourage the use of Webhooks and Web Methods wherever possible for a number of reasons such as:

  • You don’t need to write any code.
  • They’re hosted within Vivantio so don’t need to be deployed separately.

But there are a number of situations where the API is the better or only choice. Let’s explain with two most common instances: Integrating with Legacy Systems and Developing Custom Applications.


INTEGRATING WITH LEGACY SYSTEMS

In this case, you’ll be integrating Vivantio with another system that:

  • Doesn’t have an HTTP API (or doesn’t support HTTP Basic Authentication)
  • Isn’t externally accessible
  • Doesn’t support Webhooks to send data to other applications

With this situation, you’ll need to write custom middleware to push data to and pull data from the external system. Our API can help with that.

(It’s worth noting that you might find Webhooks and Web Methods are still useful in this scenario. Webhooks are still the only way to have Vivantio automatically push data out in response to another event. Web Methods can also simplify the code you have to write on your side to interact with Vivantio.)

DEVELOPING CUSTOM APPLICATIONS

In this case, you might be developing your own software and need Vivantio to communicate with it.

For example, Vivantio includes a comprehensive and flexible Self Service Portal, but maybe it doesn’t quite work for you. If you need features available that aren’t supported in the standard SSP, you might want to create your own.

In this kind of scenario or ones similar to it, utilizing our API could be more appropriate.


HOW DO I USE THE VIVANTIO API?

There are two key resources available to help you get started: Code Samples and Documentation and the API Reference.

CODE SAMPLES AND DOCUMENTATION

The best place to start is the API Samples repo on our GitHub page. Here you’ll find:

  • Documentation on the core concepts of the API such as API Design, Authentication and Querying
  • Code samples (Note: currently only in .Net, but we’re working on other languages.)

You can also jump straight to our live samples to see sample applications running.

API REFERENCE

Once you’ve got the basics down and are comfortable working with the API, you can find a complete list of available endpoints and methods in the API Reference.


WHAT CAN YOU DO WITH THE VIVANTIO API?

Quite a lot! Vivantio was developed API-first, so the majority of the functions available within Vivantio are available via the API.

We should note that administrative features are not available in the API and only available in the main GUI.

Topics: Vivantio Customer Center Service Integrations API Integration Tools
7 min read

How to Create Simple Contact Forms with Web Methods

By Andrew Stevens on 11/10/15 9:00 AM

CREATING THE WEB METHOD

To create a Web Method in Vivantio, log into the platform, open the Admin Area, and go to:

Integration & API » Web Methods

screenshot of web methods admin area

(If you don’t see Web Methods in this menu, please contact our support team.)

When you reach this screen, select the “Add” button. You’ll then get a dialog with a box for you to enter a name and a few sub tabs below to fill in. Submit a name and then move onto the first tab.

BASIC DETAILS

screenshot of add web method basic details

In this example, because we’re going for a simple form POST, we won’t be authenticating.

So, select Access Key Auth, and enter the IP range of the web server(s) that will host the form.

(Note: We’ve gone for 0.0.0.0 and 255.255.255.255 in our example. Don’t do that in practice!)

The other options on this tab are:

  • HTTP Method
  • Request Content Type

As this is a web form we’re dealing with, you will want to select ‘POST’ and ‘application/x-www-form-urlencoded’ respectively.

PARAMETERS

screenshot of vivantion add web wethod parameters

You can add as many parameters as you like, depending on how complicated you want your form to be.

In this example, we’ve kept it simple with:

  • First Name
  • Last Name
  • Email Address
  • Subject
  • Description

They are all configured in the same way.

ACTIONS

In this example, we want to create a Ticket when the Web Method is called. So, on the Action tab, choose

Add » Create Incident

(Note: You can use whichever of your Ticket Types is more appropriate for the situation.)

screenshot of vivantio add web method actions

After you’ve selected your Action, you will get a popup with two tabs: Conditions and New Record Details.

In this example, we want a Ticket to be created every time the Web Method is called. So, we will leave the Conditions tab empty and move onto New Record Details.

screenshot of vivantio add web methods 2

In this example, you can see we’re using to pass our parameter values into the Ticket Details.

You’ll also want to note though that we’ve put some literal values in for the Priority and Category. In our example, we want these set for every contact form submission, but we don’t want the user to choose them, so we’re specifying fixed values.

RESPONSE

When you’re setting up the Response, you can configure up to three options:

  • Response Type – For this field, you have the choice between Content or Redirect. Content allows you to specify content to be returned to the user as part of the Response Body. Redirect let’s you send them to a specific website with a 302 redirect.
  • Response Content Type – For this field, you have the choice between JSON, XML, or Text/HTML. This field is only available when you select the Content option for the Response Type field. It will inform the user of the Web Method which data type to expect in return.
  • Response Template – This field allows you to enter the actual response you would like to send: either the content or the redirect URL. If your Web Method contains a “Create Ticket” action, you can use to refer to properties from the created ticket within the response template such as {{ticket.displayid}} to get the ID of the inserted ticket.

For our example, we’re going to set up a Content Response using the Content Type “Text/HTML” that shows a basic “Thank You” message and refers to the Ticket ID.

screenshot of add web method response

After you hit the “Save” button, you’ll be shown the unique URL for your Web Method.

screenshot of vivantio web method URL


CREATING THE CONTACT FORM

When creating the form, the things you need to know are:

  • The form method should be “POST”.
  • The form action should be the Web Method URL you noted earlier.
  • When you’re setting the names of your form inputs, they should match the names of the parameters you added earlier.

Here’s a sample form below that is ready to use apart from the action URL on the form:

<!DOCTYPE html>

<html lang=”en”>

<head>

<meta charset=”utf-8″>

<meta http-equiv=”X-UA-Compatible” content=”IE=edge”>

<meta name=”viewport” content=”width=device-width, initial-scale=1″>

<title>HTML Form &raquo; Web Method Example</title>

<link href=”https://maxcdn.bootstrapcdn.com/bootstrap/3.3.5/css/bootstrap.min.css” rel=”stylesheet”>

<!–[if lt IE 9]>

<script src=”https://oss.maxcdn.com/html5shiv/3.7.2/html5shiv.min.js”></script>

<script src=”https://oss.maxcdn.com/respond/1.4.2/respond.min.js”></script>

<![endif]–>

</head>

<body>

<div class=”container”>

<div class=”row”>

<div class=”col-lg-6 col-offset-lg-3″>

<form method=”POST” action=”YOUR WEB METHOD URL HERE”>

<div class=”form-group”>

<label for=”firstname”>First Name</label>

<input type=”text” class=”form-control” id=”firstname” name=”firstname” />

</div>

<div class=”form-group”>

<label for=”lastname”>Last Name</label>

<input type=”text” class=”form-control” id=”lastname” name=”lastname” />

</div>

<div class=”form-group”>

<label for=”email”>Your Email Address</label>

<input type=”email” class=”form-control” id=”email” name=”email” />

</div>

<div class=”form-group”>

<label for=”subject”>What can we help with?</label>

<input type=”text” class=”form-control” id=”subject” name=”subject” />

</div>

<div class=”form-group”>

<label for=”description”>Any additional details?</label>

<textarea class=”form-control” id=”description” name=”description” rows=”10″>


(Note: You’ll note that we’ve referenced Bootstrap in this sample. You do not have to do that and can use whatever UI framework you like.)

Here’s what the sample form would look like in practice:

vivantio web method form sample

Using the code, you can publish the form to your website. After a user fills in and submits the form, a Ticket will be created via the Web Method. The user will then see the content configured on the Web Method Response.

Topics: Customer Center Service Integrations Types of System Integration API Integration Tools WebMethods
3 min read

How to Integrate BeyondTrust (Formerly Bomgar) with Vivantio

By Andrew Stevens on 11/4/15 9:00 AM

Editorial Note: In September 2018, privileged access management (PAM) provider Bomgar acquired BeyondTrust and now operates under this name. We’ve since updated this article text to reflect that change.


BEYONDTRUST API

You can access the BeyondTrust API documentation here.


BASIC CONFIGURATION

There are three main steps required to configure everything in Vivantio:

  1. Create a Custom Form to hold the BeyondTrust Session Details
  2. Create an Email Template to send the session details to customer
  3. Create the Webhook to allows the technician to create the session

CUSTOM FORM

Why do you need a Custom Form?

The “Generate Session” method in the BeyondTrust API gives us back a number of different values and we will need these to be available in Vivantio.

The main value we need is the “key_url” field, but you can also set up fields for:

  • Expiry Date
  • Queue
  • Short Key
  • Key URL

Begin by logging into Vivantio and going to the Admin Area. You will then go to:

System Areas » Incidents » Custom Forms

From there, you can start adding fields:

screenshot of beyondtrust vivantio custom forms and fields

(Note: All of the field can be created as “Read only” fields as they will be populated by the Webhook and not end users.)

Having created the fields: create a Custom Form with those fields on the following screen:

screenshot of beyondtrust vivantio custom form

EMAIL TEMPLATE

In order to create the Email Template, navigate to:

Admin » System Areas » Incidents » Templates » External Emails

From there, you can click the “Add” button and enter the email you would like to be sent to your end user. You can see our example below:

screenshot of beyondtrust vivantio email template

After saving the email, make sure that the template is available for the “Add Note” process by using the “Action Types” button on the email template list.

WEBHOOK

In order to create the Webook, navigate to:

Admin » Integration & API » Webhooks

From there, you can click the “Add Webhook” button. You will then choose “Incident” and see the Add Webhook screen. You can name this what you like, but, for our example, we will name it “Start BeyondTrust Session”. From there, you will need to fill out a number of tabbed parameters. You can see an example of what that will look like below:

screenshot of beyondtrust vivantio add webhook

Notes on Specific Fields:

Basic Details » Request URL:

This is the format it should be in:

https://instance.beyondtrust.com/api/command?username=username&password=password&action=generate_session_key&type=support&queue_id=general

The bolded and italicized values should be specific to your BeyondTrust account. You might also want to change the “type” and “queue_id” values to match your instance.

Response Fields:

This tab allows us to extract information from the BeyondTrust response and put it in a Custom Form. We recommend using XPath to get the values out. Here’s an example of what that would look like in practice:

screenshot of beyondtrust vivantio response fields

USING THE WEBHOOK

Having completed all of these steps, you should be able to see the “Start BeyondTrust Session” link on the Ticket Details page such as in the example below:

screenshot of beyondtrust vivantio webhook session

When selecting that option, an email should be sent to your customer, complete with a link to join the BeyondTrust session.

Topics: Customer Center Service Integrations Types of System Integration API Integration Tools Bomgar
3 min read

How Trigger Rules Automate Your Unique Business Processes

By Andrew Stevens on 10/19/15 9:00 AM

WHAT ARE TRIGGER RULES?

Trigger Rules is a mechanism that Vivantio users can use to automate processes. The basic concept behind Trigger Rules is:

When a certain condition is met, an action occurs.

They are useful in a wide range of scenarios, but a few common examples are:

  • Sending out surveys after a ticket is closed.
  • Automatically setting the ticket priority when a specific category of ticket is logged.
  • Taking a ticket off “Hold” when it is updated by a customer.

HOW DO THEY WORK IN PRACTICE?

We’ll use a very specific example to help explain: sending an SMS via Twilio for a CopperEgg alert.

(Note: For this example, we will assume you have already set up a CopperEgg Web Method integration and a Twilio Webhook integration.)

BUSINESS RULES

Under Admin » System Areas » Incidents, you will find a menu option for “Business Rules”:

Vivantio Business Rules 1

Within this section, there are three different types of rule available:

  • Routing – These are simple rules to assign new tickets to specific groups or users.
  • Escalation – These are time-based rules used to take action on tickets as SLA targets are approached or breached.
  • Trigger – This is the focus of our example and where you can set an action to occur when a specific condition is met.

Under the Trigger Rules tab, you will be able to click the “Add” button, which will bring you to the following screen:

Vivantio Business Rules 2

Under this screen, you will have a few elements to fill out:

  • Rule Name – This is where you can name the rule to whatever you want.
  • Execute When – You will have the choice beween “Ticket first meets condition” and “Matching Ticket updated”. “Ticket first meets condition” will only execute the action the first time a specific ticket meets the condition. “Matching Ticket updated” executes the action whenever a matching ticket is updated.

To explain each content tab, let’s run through them:

Select Tickets

This is where you will use the Vivantio Expression Builder to set the condition. For our example, we will set this for “Run this rule for tickets with the CopperEgg Alert category” as seen below:

Vivantio Business Rules 3

Timing

This is where you can set timing rules around when the action is completed. For our example, we will want to select the default option of “Immediately”, because we want the SMS to be sent out as soon as the ticket is created:

Vivantio Business Rules 4

There might be scenarios where you want to delay the action. This is where you can control that.

Actions

This is where we define the action that takes place once the condition is met. There are a number of different processes available, but, for our example, we’re only interested in “Send SMS via Twilio” under Webhooks:

Vivantio Business Rules 5

Under that option, it will bring you to a screen where you can set the recipient and text sent. You can also leave an optional note regarding the action.

After saving the rule, you have finished. With this example, the next time CopperEgg creates an alert, the SMS you created will be sent and be noted in Vivantio:

Vivantio Business Rules 11


Topics: Service Management Customer Center Automation
12 min read

How to Set up SMS Messaging in Vivantio’s ITSM Software Using Webhooks

By Andrew Stevens on 10/12/15 9:00 AM

LEVERAGING WEBHOOKS IN SERVICE MANAGEMENT

In this post:

  • Webhooks: what they are and why they exist.
  • Worked example: How to leverage Webhooks to send SMS messages from The Vivantio Platform using Twilio (Highly technical)

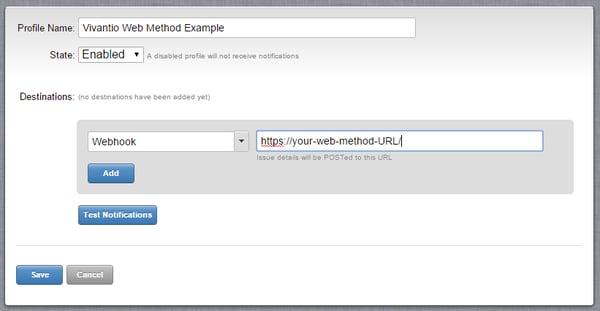
In our last Customer Center post we looked at the what and why of Web Methods and how they can be used to create lightweight endpoints to receive messages from external services such as CopperEgg. In this post, we’re going to look at what you might call the opposite of Web Methods: Webhooks.

What is a Webhook?

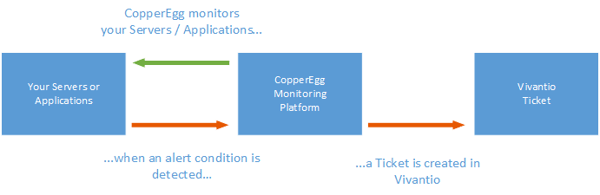
Webhooks are nothing new in the tech sphere. Jeff Lindsay came up with the term Webhook in 2007, and if you’re interested, you can read more about the general principle here. If you’ve been following the series, you’ll know that in the last blog post we looked at using Webhooks coming from Copper Egg to send information to Vivantio. The basic goal of a Webhook is to allow one system to connect to another via a HTTP request to carry out an action of some description – telling us an alert condition was detected in the CopperEgg example. So in this post we’re going to look at how you can use Webhooks coming from Vivantio to send information to other systems.


Why use Webhooks?

If you’re looking at integrating Vivantio’s ITSM software with another business tool – CRM, Bug Tracking, Billing, etc. – there’s a good chance the system you’re integrating with is going to need to know when something has happened in Vivantio, such as a new Ticket has been logged or a Ticket has been closed. Without Webhooks, you’d probably end up with a solution that polls the Vivantio API looking for new events you’re interested in and then doing something with them. There are a few downsides to that approach:

  • You’ve got a lot of code to write and maintain
  • You have to find somewhere to deploy it
  • Your IT solution is either a. very chatty or b. slow to respond to events (or both!)

Webhooks solve some or all of those problems:

  • You don’t need to write code*
  • They’re contained within the Vivantio ITSM Platform
  • Event notifications are sent in near real-time

*At least not in Vivantio’s service management tool. Depending on the system you’re integrating with, you might have to write some code to handle the request coming out of Vivantio – we can’t always help you out there! But feel free to email support@vivantio.com and we might be able to give you some pointers, examples or best practices.


Worked Example – SMS via Twilio

Vivantio Webhooks allow you to easily get up and running with with SMS messaging. There are a number of SMS providers out there with HTTP APIs. Our favorite of these providers is Twilio. In this example we’re going to walk you through setting up a Webhook in Vivantio that lets you easily send an SMS message via Twilio.

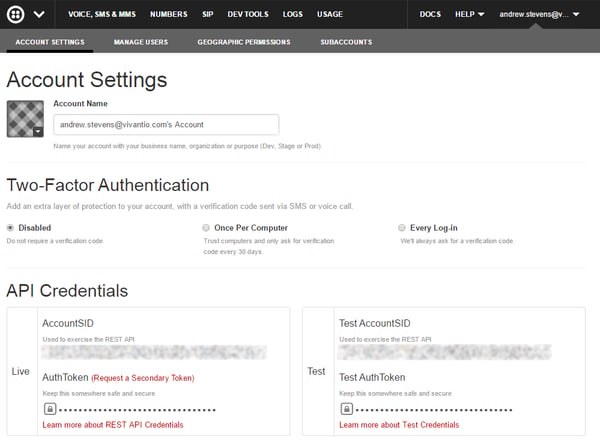
To follow this example, you’ll need to sign up for a Twilio account. Once you’ve done that, make a note of your Account SID and Auth Token from the “My Account” page:

Vivantio SMS 1

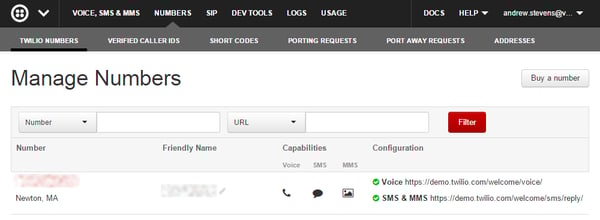
You’ll also need to set up a “From” phone number. You can do this in the “Numbers” section of your account:

Vivantio SMS 2

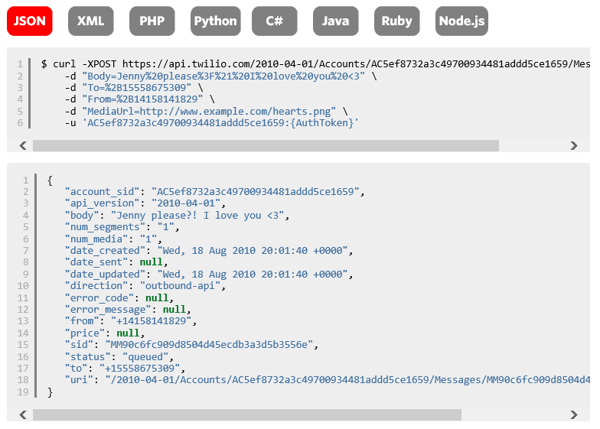
Finally, take a look at Twilio’s API documentation here. That describes the format of the HTTP request that should be sent to Twilio:

Vivantio HTTP SMS 3

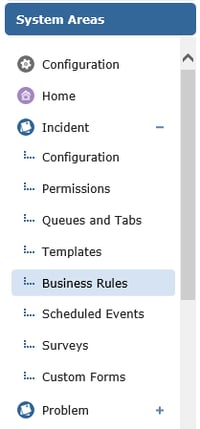
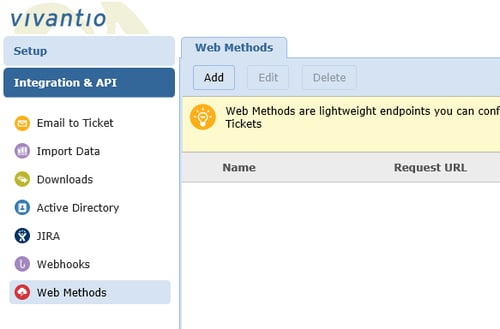
The next step is to set Vivantio up to send a message to Twilio similar to the one shown above. So log in to Vivantio and head to Admin → Integration → API → Webhooks:

Vivantio SMS

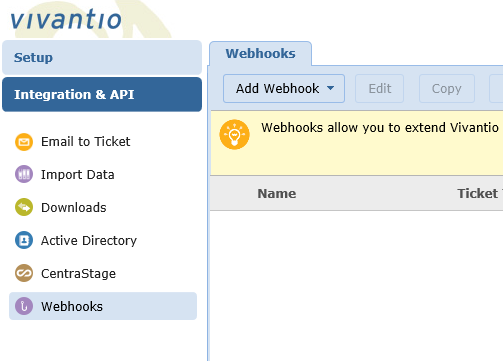
If you don’t see that option there, contact us via email or our support portal and we’ll enable it for you.

Once you’re there, click “Add Webhook” and you’ll see a list of your available Ticket Types.

Vivantio SMS 5

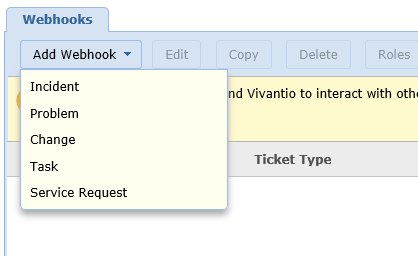
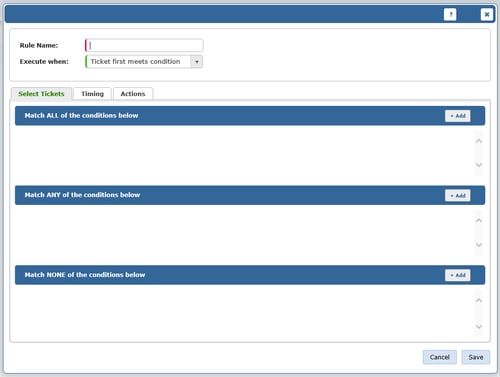
Choose one, and you’ll see the Add Webhook dialog, starting off with the Basic Details tab.
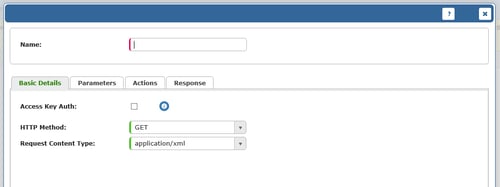
 

Basic Details

Vivantio SMS 15

First up we’re going to give it a name – here, we’ll be using “Send SMS via Twilio.” Then you have a few other simple fields to fill out:

Request URL

This is the URL at Twilio we want to make the HTTP request to when the Webhook is run. You can get this from your Twilio account. It’ll look something like:

https://api.twilio.com/2010-04-01/Accounts/YourAccountSID/Messages.json

Add that into Vivantio:

Vivantio SMS URL

HTTP Method

This is the method the request will use. At the moment we only support GET and POST; for Twilio, we’re going to use POST:

Vivantio HTTP Method

Username / Password

Your username is your Twilio Account SID; your password is your Auth Token. If you’re following this walk-through, you’ll have noted these down earlier:

Vivantio SMS username

Response Content Type

In this example, we’re not going to do anything with the response we get from the request to Twilio, so this isn’t crucial. The response will be in JSON format though, so let’s pick that:

Vivantio SMS json

Action Description

The final box lets you enter some text to appear in the Ticket History after the Webhook has been executed. You can enter whatever you want here:

Vivantio SMS Twillio

Advanced users can use the to reference parameters so that parts of the Webhook can appear in the Ticket History. That can be left as an exercise for the reader to experiment with!

With the Basic Details complete, we move on to the next tab, Parameters.


Parameters

Vivantio SMS Parameters

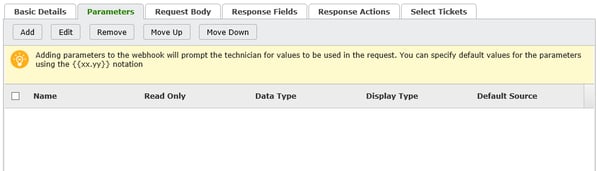
When the Webhook executes, Vivantio is going to send some data to another system. Sometimes, that data is going to come from within the Ticket that started off the Webhook like the Ticket ID or Description, for example. Sometimes though, you might want to allow the person running the Webhook to enter a value to use in the Webhook. In our example, we want to let the user enter a) the text to be sent in the SMS, and b) the number to send it to, so we’re going to add two parameters – Recipient and Text.

Recipient

As you might have guessed, this represents who is going to receive the SMS.
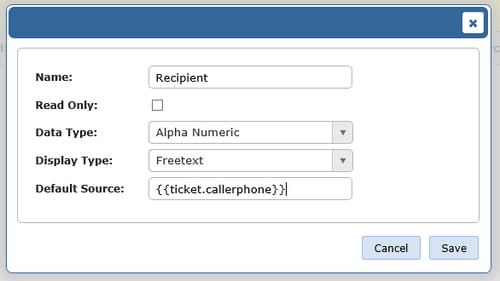
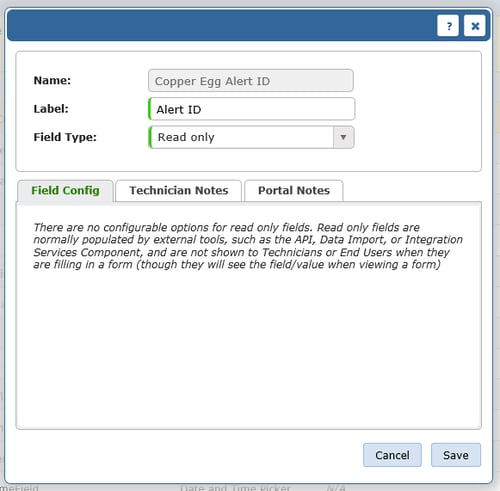
Vivantio SMS Recipient

Name

The label that will appear on screen next to the input field when the user runs the Webhook – we’ve gone with “Recipient”. This is also used to reference the value within the Webhook body as we’ll see a bit later.

Read Only

Whether or not the end user can edit the field when they run the Webhook. In our example we’ll allow the user to adjust the number if needed but in the real world you might want to restrict this.

Data Type

The type of data that the field will allow. At the moment we only support alpha-numeric fields but we’ll be adding more as we continue to develop the Webhooks module. As always, if you need something that isn’t there, let us know!

Display Type

How the field will appear on screen. We only need a single line text box for the recipient phone number so we’ll choose “Freetext”.

Default Source

The “Default Source” for the parameter value, i.e. what the field will be populated with when the user runs the Webhook. You can either enter a fixed value or use the here to reference properties from the ticket. In this example we’ll use {{ticket.callerphone}} to get the phone number of the caller from the Ticket.
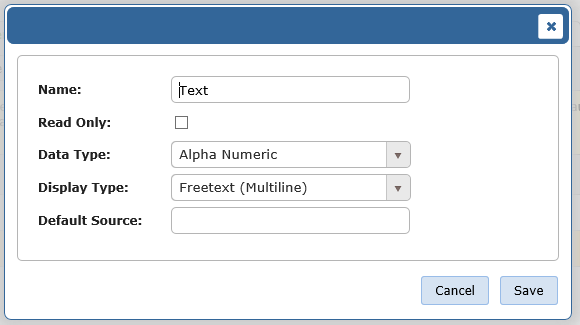
Text

For the second parameter, Text, we’ll use the values shown below. Although similar to the above, here we want a multi-line text box and we don’t need a Default Source specified.

Vivantio SMS Text

Now that the parameters are set up we can move on to the next tab, Request Body.
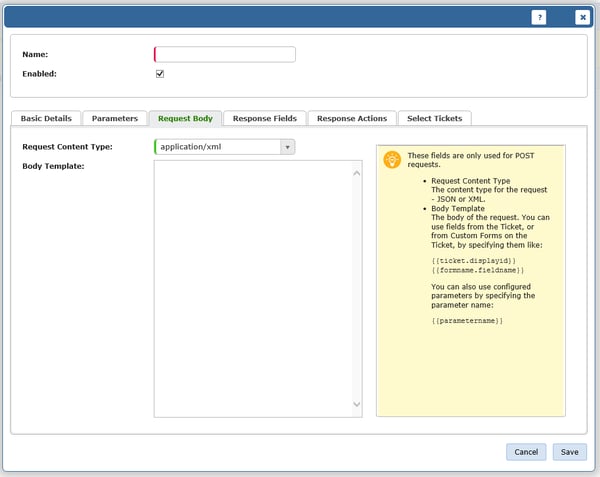
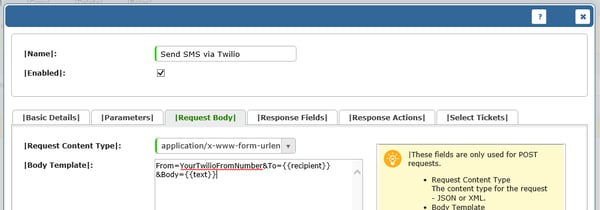
 

Request Body

Vivantio SMS Request Body

This is where we set up the actual HTTP request that will be sent to Twilio. To start, we’re going to set the Request Content Type to application/x-www-form-urlencoded – that’s the format Twilio accepts:

Next, we’re going to give it a name – here, we’ll be using “Send SMS via Twilio.” Then you have a few other simple fields to fill out:

Vivantio SMS json 2

For the Request Body, we need to go back to the Twilio API docs we saw earlier. The Twilio example given is:

Body=Jenny%20please%3F%21%20I%20love%20you%20<3&
To=%2B15558675309&
From=%2B14158141829&
MediaUrl=http://www.example.com/hearts.png

We don’t need the Media URL parameter and we’re going to take the Body and To fields from the parameters we created. Our Request Body is going to look like this:

From=YourTwilioFromNumber&To=&Body=

(Replace the italicized bit with your Twilio From Number – you did set one up earlier, right?)

That leaves us with:

Vivantio SMS Twillio

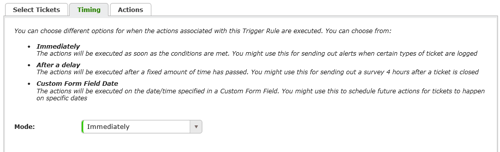
That’s all we need to send a basic SMS out. The next tabs along are “Response Fields” and “Response Actions.” We mentioned earlier that we won’t be using the response from Twilio so we’ll skip these two for now. An upcoming blog post will show you how to use Response Fields effectively. So we’ll go straight on to the final tab we’re interested in, Select Tickets.
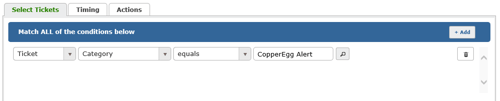
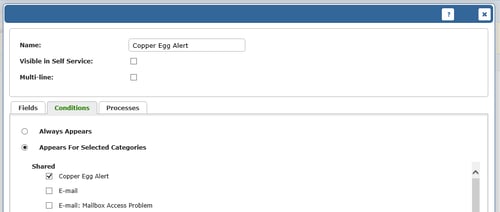
Select Tickets

This tab lets you configure which Tickets the Webhook is available. In our example, it’s a simple restriction – where the “Caller Phone” field isn’t empty. If we haven’t got a phone number for the end user we can’t send them an SMS! Although, since we left the “Recipient” field editable by the technician, we could leave this blank so it appears for all tickets and you’d be able to enter the number when you run the Webhook.

In a more complicated scenario, you might want to restrict it so that SMS messages are only available on tickets logged by end users who have signed up to receive SMS updates. Or any of a variety of other scenarios.

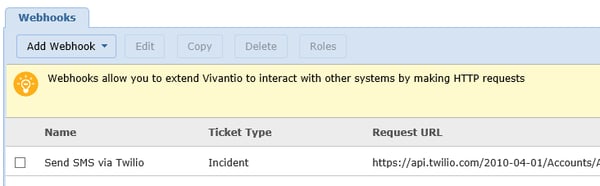
Once you’ve done that, hit “Save” and you’ll see the Webhook in the list. We’re almost ready to use it:

Vivantio SMS webhooks

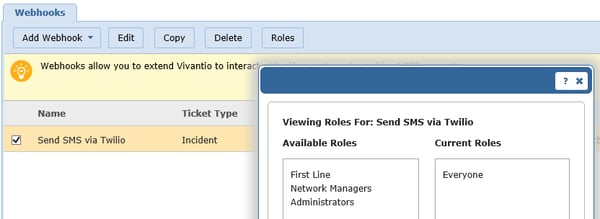
There’s one more step in the admin area: configuring Roles. You can restrict which Roles can execute each Webhook. By default no permissions are granted, so you’ll want to select the Webhook, hit “Roles” and drag over one of the roles you’re a member of:

Vivantio SMS viewing roles

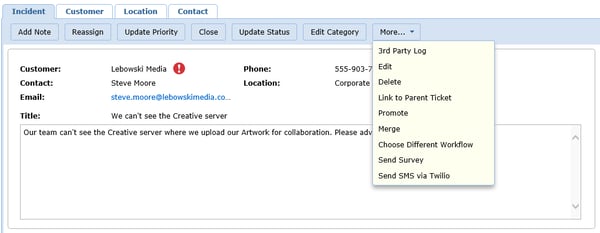
All the configuration is done! Now, when you view a Ticket that meets the conditions set in the “Select Tickets” tab, you’ll see the Webhook appear in the “More” menu on the Ticket Details page:

Vivantio SMS incident

Clicking that option will bring up a dialog prompting you for any parameters (with defaults set, if configured):

Vivantio SMS parameters 2

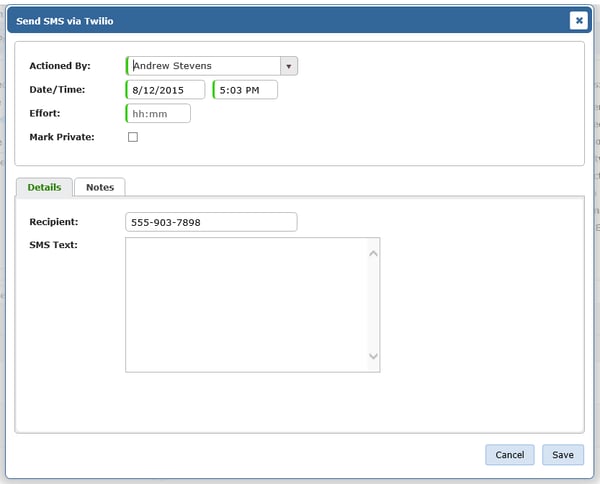
Shortly after hitting “Save” your SMS will be sent.

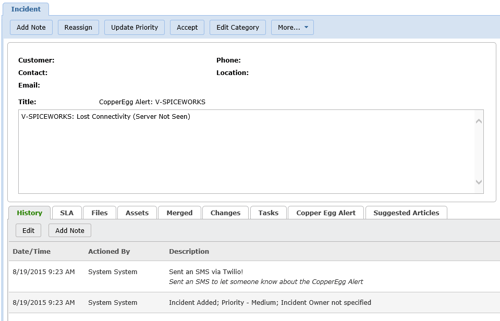
Job done! Vivantio’s service management platform can now send SMS messages via Twilio without writing a single line of code (well…sort of…you had to write the body of a HTTP post, which is almost code – although our development team might take offense if we start calling that coding).

That wraps up this brief introduction to Webhooks. In our next blog post, we’ll be looking at using Business Rules to tie Web Methods and Webhooks together, to give you a more complete end-to-end view of the power of Web Method and Webhooks. You can get started with Webhooks now though – and if you find an interesting use case for them, let us know. We can help you set them up if required, and if what you’re doing is really cool, you might find yourself the subject of an upcoming post!

Topics: Customer Center Service Integrations API Integration Tools SMS Messaging
4 min read

How to Integrate CopperEgg with Vivantio

By Andrew Stevens on 10/5/15 9:00 AM

The primary method for integrating CopperEgg with Vivantio is through Web Methods.

WHAT ARE WEB METHODS?

Web Methods are lightweight HTTP endpoints that are configurable in Vivantio to receive HTTP requests. After receiving a request, Vivantio will then perform a series of actions using data from the request.

From the developer’s point-of-view, it’s similar to a web service, but you don’t write code for it. Web Methods are configured using a GUI.

WHY USE WEB METHODS?

Web Methods were originally developed to address when customers want to create tickets in Vivantio using an HTTP request made by other systems. We wanted to give our customers a way to create integrations without depending on the Vivantio API and development team resources or time.


BASIC CONFIGURATION

When creating a Notification Profile in CopperEgg, you can specify the “Destination” as a “Webhook”. This means the details of the CopperEgg alert will be sent as an HTTP post to the URL you specify. You can see an example of this below:

Vivantio Copper Egg 1

To give you an idea of the target process flow for the integration, it will look something like this:

Web Method Process Flow

After setting this up, you will need to find out what CopperEgg is going to send Vivantio as part of the notification. You can find this in the CopperEgg documentation. As an example, we will use the sample below:

{

“alertid” : 15688482,

“create_time” : “2015-03-11T16:30:52Z”,

“clear_time” : null,

“alert_text” : “V-SPICEWORKS: Lost Connectivity (Server Not Seen)”,

“tags” : [],

“kind” : “active”,

“alert_source” : “system”,

“details” :[

“description”,

“Additional Information”,

{

“inet” : “10.2.150.37”,

“Operating_System” : “Microsoft Windows Server 2012”,

“inet6” : “fe80::14da:773e:b5bf:ee20u0012”,

“hostname” : “V-SPICEWORKS”

}

] }

With this example in mind, let’s walk through how to create a Web Method in Vivantio that can respond to this type of alert.


WEB METHOD CONFIGURATION

(Note: In the future, we hope to have this down to a single button click for CopperEgg.)

Using the previous example, the first step for configuring your Web Method is to create a Category for CopperEgg alerts. You can find this in:

Admin » System Areas » Incidents » Configuration » Categories

From there, select “Add Root” and enter a name. For this example, we will use “Copper Egg Alert”.

Vivantio Copper Egg 3

For the next step, we will create a Custom Form to store the details of the CopperEgg alert. You can find this in:

Admin » System Areas » Incident » Custom Forms & Fields

Using the example, we are looking to store the “Alert ID”, “Alert Text”, and “Hostname”. As these will all be filled in by the Web Method, they can all be created as “Read only” for the Field Type.

CopperEgg Add Field

Once you create the three fields, we can create a Custom Form with those field and set it to appear for the “Copper Egg Alert” Category we created earlier:

Vivantio CopperEgg 5

The next step is creating the Web Method itself. You can do this under:

Admin » Integration & API » Web Methods

In this screen, select Add and it will bring up a dialog similar to this example:

Vivantio Copper Egg 7

Let’s explain what you need for each tab:

Basic Details

  • Name – This is where you can name your Web Method.
  • Access Key Auth – If you have this enabled, enter an IP address range from which requests will be accepted.
  • HTTP Method – CopperEgg uses an HTTP POST when sending webhooks, so select that option from the dropdown.
  • Request Content Type: CopperEgg data is sent in JSON, so select “application/json”.

Parameters

This is where you can set up the values you expect to receive as part of the Web Method. Using our example, we can refer to the “Alert ID” value.

After hitting “Add”:

  • Name – This is where you can specify a name for the parameter for reference.
  • Source Type – This tells the Web Method where to pull the value from. With our example, we are taking from the “Request Body”.
  • Source Path – This is where you specify where to pull the value. You can use XPath or “dot notiation” to note the path. Using our example, we would specifiy “alertid”.
  • Default Value – This is where you would specify a default value for the parameter. In this example, we would not need any default values.

Actions

This is where you can set up what the Web Method will do when invoked. You can add multiple actions for each Web Method. You can also note conditions for the action.

(Note: As of this post, we only allow two choices: Create a New Ticket or Update an Existing Ticket.)

Topics: Customer Center Service Integrations Types of System Integration CopperEgg
2 min read

5 Ways Vivantio Integrates with Your Most Important Systems

By Andrew Stevens on 9/28/15 9:00 AM

HOW TO APPROACH INTEGRATION METHODS

When looking to integrate Vivantio with other platforms, it’s important to understand the different methods available to you. We have many avenues of approach and they each offer different pros and cons.

We’ve divided your integration methods into five distinct areas:

VIVANTIO INTEGRATION SERVICES

The Vivantio Integration Services Component (ISC) provides a growing number of modules to allow your team to connect with other systems via a built-in GUI.

As of this posting, those systems include:

  • Active Directory
  • SQL

You can also schedule data exports such as reporting via the ISC.


DIRECT FIRST CLASS INTEGRATIONS

Over time, due to their popularity with our customers, we have developed a number of direct integrations. These will work out-of-the-box.

As of the time of this post, these include:


WEBHOOKS AND WEB METHODS

In order to offer our customers a method to configure interactions without code, we’ve set up Webhooks and Web Methods in Vivantio. With this method, you can set up outgoing HTTP notifications or allow systems to make simple HTTP requests within Vivantio. This offers great flexibility for use with systems that utilize this functionality.


THE VIVANTIO API

Vivantio is built “API first”. What this means is that we have an extensive API that your development team can use to query, update, and create data. This method offers the most possible flexibility. You can find our (work-in-progress) API documentation here.


BESPOKE DEVELOPMENT

It should be noted that, if none of the above options fit with your needs, we are always welcome to explore bespoke development of integrations for our customers. If you contact our support team, we are happy to arrange for a member of our professional services or product team to discuss your requirements in more detail and work out a solution that works for you.

Topics: Vivantio Customer Center Service Integrations Types of System Integration API Integration Tools
1 min read

4 Types of Integration Options in the Vivantio Platform

By Andrew Stevens on 9/21/15 9:00 AM

CONSIDERING YOUR INTEGRATION OPTIONS

When considering an ITSM platform, it’s always important to understand how it will work with your other tools. The Vivantio Platform comes with a number of different integration options to help you get data in and out of Vivantio. Let’s look at the four most common types of software that can be integrated with Vivantio.


CUSTOMER RELATIONSHIP MANAGEMENT / ACTIVE DIRECTORY

If you are using or considering to use Vivantio, there is a good chance you have end users who are logging support tickets with you. So, it makes sense to have key information such as what asset each ticket is associated with or how to contact your end user stored in Vivantio. We offer a number of integration options to connect to your CRM or Asset Management tools.


ASSET DISCOVERY

Asset management isn’t the only kind of software we work with. You might also have tools that capture and record information on your assets or network such as:

  • SCCM
  • Spiceworks

If you want it on hand for your ITSM toolset in order to track repeat issues, the impact of upcoming changes, or tracking scheduled maintenance, we can connect with those tools as well.


MONITORING TOOLS

You might have tools that proactively monitor your IT assets. This can help you track when servers go down or assets are failing. Vivantio can connect with your monitoring tools in order to help automate support for when these events occur.


APPLICATION LIFECYCLE MANAGEMENT

If you house an internal development team, there is a good chance they use application lifecycle tools such as:

Vivantio allows your support team to connect with these tools in order to connect your teams and share key data.

These are only a few examples of the types of software Vivantio can integrate with. Please contact our support team if you have any questions about specific integrations.

Topics: Vivantio Customer Center Service Integrations API Integration Tools