Demo
9 min read

How to Integrate Vivantio with Microsoft Teams

By Staff Writer on 2/9/21 9:00 AM

INTRODUCTION

In every company, it is crucial to have effective, efficient communication, such as the ability to alert your team about new urgent issues, or let a customer know you’ve responded. Thanks to API integration and webhooks, Vivantio makes sending messages to applications such as Microsoft Teams from your department easy. If your organisation uses Slack instead, you can find a tutorial on sending out communication from Slack here.

This tutorial will show you how to configure this in Microsoft Teams and provides two examples of using notifications in the Vivantio platform. Please note that Microsoft Teams transitioned to a new webhook URL format to enhance security on January 11, 2021. If you've configured this integration prior to that date, there are new set-up instructions included at the end of this blog for Step 7.  

To connect Vivantio to Microsoft Teams, you’ll need:

  1. Vivantio ITSM
  2. Admin access to your Vivantio Instance
  3. Permissions in MS Teams to create, update and remove connectors for the Team you wish to post to


CONFIGURATION IN MS TEAMS

Step 1:

Begin by logging into Microsoft Teams (MS Teams). You will then go to:

Your teams » Click on the channel within MS Teams you want to send notifications to » More options » Connectors
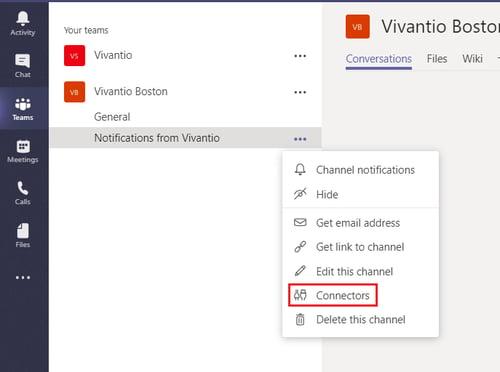
MS Teams Vivantio connectors detail

Step 2:

If it’s not already installed for the selected MS Teams group, add and install Incoming Webhook. Otherwise, configure Incoming Webhook.
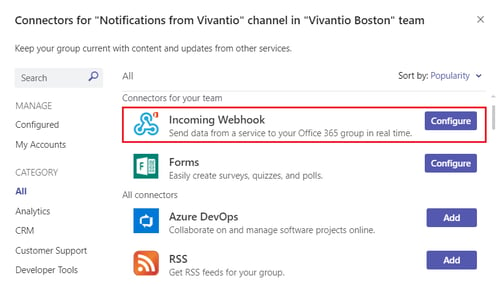
configure webhook 1 detail

Step 3:

Enter a name for your webhook (this will be the username associated with messages sent into MS Teams), upload a custom image if desired, and select Create.
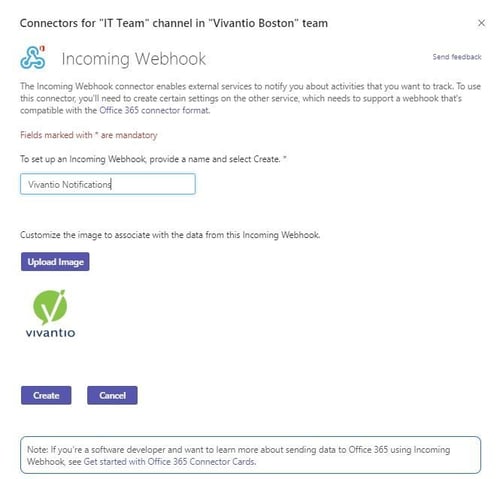
Connectors 1 detail

Step 4:

Next, copy the URL that is created, circled in red below. This will later be used to set up the webhook in Vivantio.
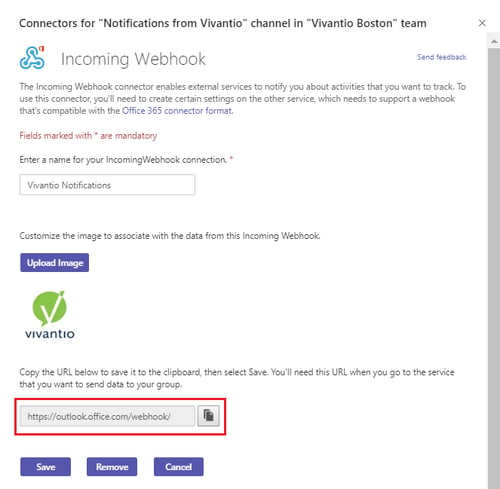
Copy URL 1 detail


CONFIGURATION IN VIVANTIO

Step 5:

Log into Vivantio, open the Admin Area. Navigate to:

Integration & API » Webhooks » Add Webhooks

Then select the ticket type you want the webhook to be available for.
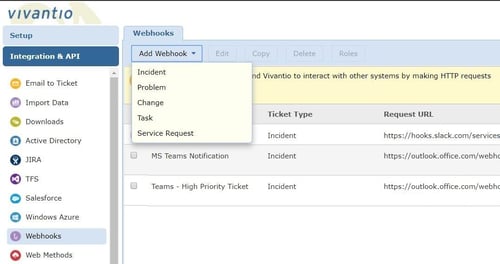
add webhook 2 detail

Step 6:

Enter a name for your webhook.

Step 7:

Next, navigate to the Basic Details tab and enter the following information (please refer to the Update at the end of this blog if you configured this integration prior to January 11, 2021):

  • Request URL: Paste here the URL produced when you configured the incoming webhook in MS Teams.
  • HTTP Method: POST
  • Response Content Type: text/html

Step 8:

This next step, filling out the parameters tab, is optional. Set up parameters for the webhook by selecting Add. These are either values the technician will be prompted to complete, or populated automatically from the ticket. In this example, we have created a multi-line text field for a technician to enter the message that they wish to send into MS Teams.
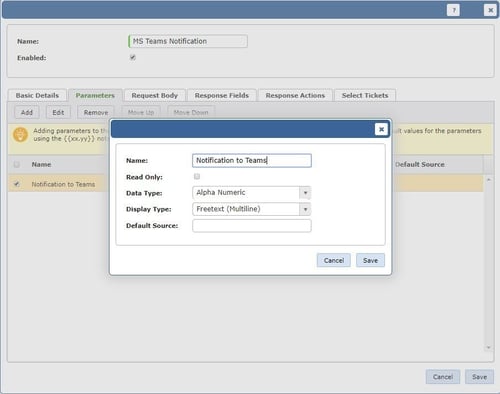
Parameters tab

Step 9:

Now, fill out the Request Body tab.

For the Request Content Type field, select application/json. The Body Template will contain the information you wish to send in MS Teams notification, such as specific text, details from the ticket or a webhook parameter. Screenshots from the Request Body of two example webhooks are given below.

Example 1:

A notification message sent into Teams that utilizes the webhook Parameter we created in the previous step.
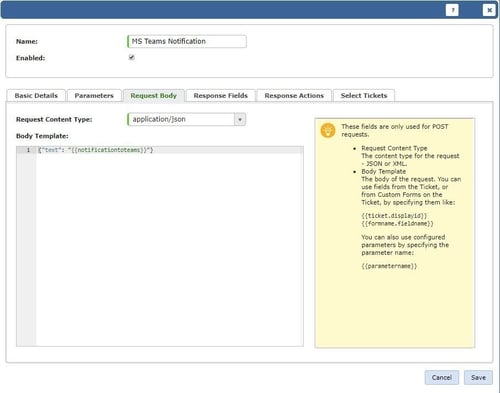
request body detail

{"text": ""}

Example 2:

A notification sent into Teams that includes details from the ticket. In this case, we use fields from the ticket. The “\n\n” signifies a line break. Note that Steps 1 through 8 were followed to create another webhook “Teams – High Priority Ticket.” Once the Request Body is filled in, click save.
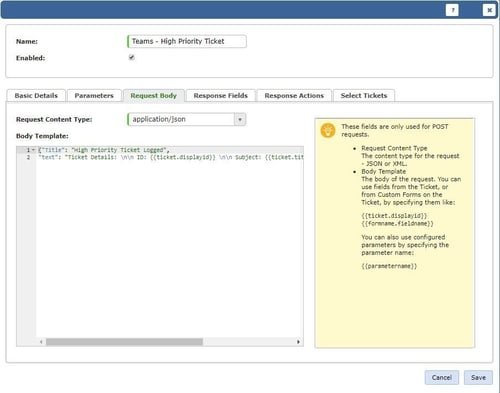
Microsoft Teams request body high Priority

{"Title": "High Priority Ticket Logged",
"text": "Ticket Details: \n\n ID: {{ticket.displayid}} \n\n Subject: {{ticket.title}}
\n\n Caller Name: {{ticket.callername}}"}

Step 10:

The last step before we can use our new webhook is to configure its roles. By default, there will be no roles assigned to the webhook. To update the roles, select the webhook and click Roles. Drag the roles you want the webhook available for into Current Roles.
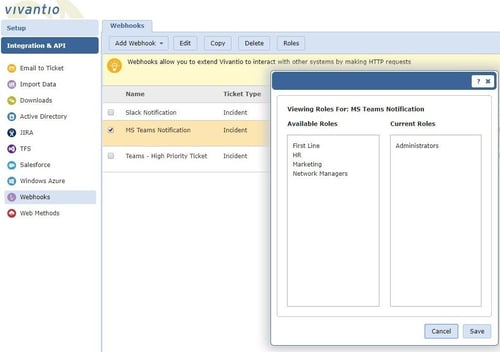
roles 1 details

Now let’s put the webhooks we set up into action!

You can use your webhook to send ad hoc notifications into MS Teams directly from a ticket window or you can execute your webhook through Trigger Rules. Two examples are given below:

Example 3:

An ad hoc message sent into MS Teams from a Vivantio ticket window

Actions » MS Teams Notification
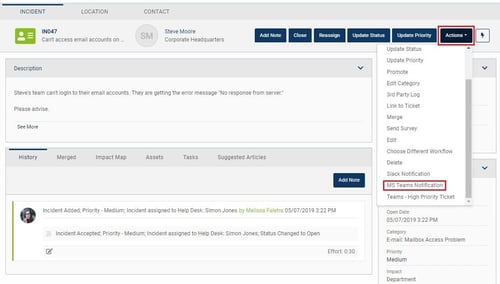
notification from ticket window

The technician is prompted to fill in the “Notification to Teams” parameter we set up in the webhook. Recall that this webhook was configured so that the text entered here will be sent into MS Teams.
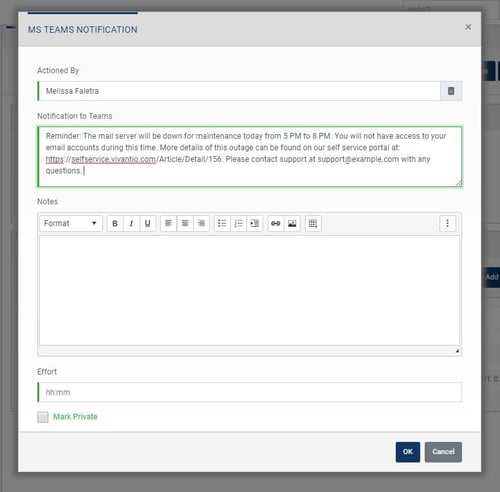
screenshot of notification message

Press OK and voila! This message is sent into MS Teams.
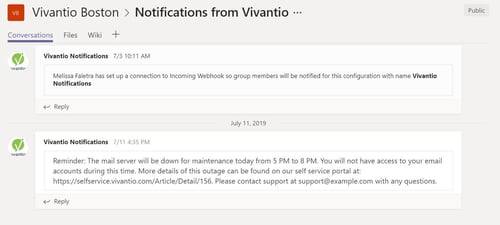
screenshot of notification message from vivantio 2

Example 4:

Sending a notification to an IT team’s channel in MS Teams any time a high priority ticket is logged.

In this case, you can set up a trigger rule to automatically execute the webhook when a high priority ticket is logged. Go to:

Admin area » System Areas » Select the ticket type you created the Webhook for
» Business Rules » Trigger Rules

To add a trigger rule, click Add, then:

• Enter a Rule Name and select when the condition is to be executed, either when the ticket first meets the condition (for example, if you just want people to know the ticket was created) or when the matching ticket is updated (if you want everyone to see all updates to the ticket).

• Enter the condition(s) for the trigger. In this example, the trigger rule condition is for tickets with the priority name equal to “high.”
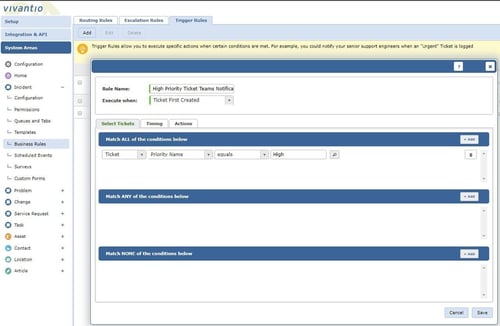
screenshot of trigger rule set up

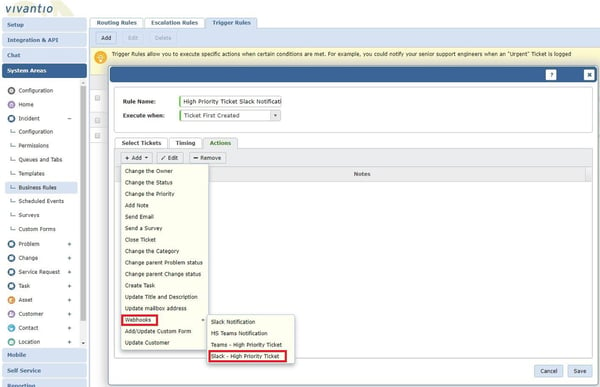
For the trigger rule “Actions” select

Webhooks » Webhook you want to fire; in this case, we chose

Teams – High Priority Ticket » Save
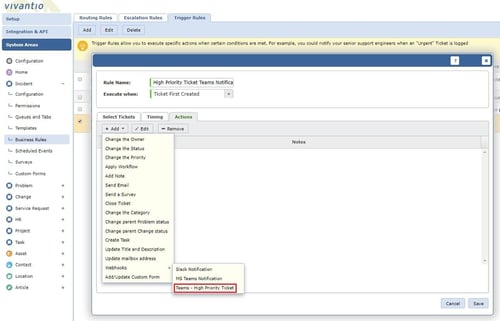
screenshot of trigger rule action

Once the trigger rule is set up, the “Teams – High Priority Ticket Webhook” will automatically send a notification with ticket details into MS Teams any time a “High Priority” ticket is logged.
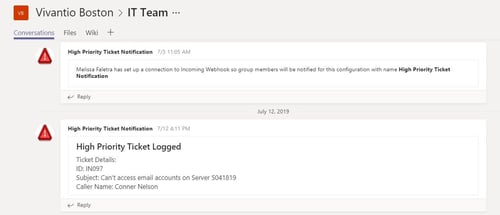
screenshot of high priority notification in MS teams

CONCLUSION

There you have it! Now you can easily communicate to any team in MS Teams directly from Vivantio.

Update (as of January 11, 2021):

This step is for anyone who configured this integration prior to January 11, 2021. On this date, Microsoft Teams transitioned to a new webhook URL format to enhance security. You will need to update your webhook URL from within Microsoft Teams and copy the new URL into the webhook within Vivantio (Step 7).

To update your webhook URL within Teams, navigate to your webhook:

Your Teams >> Click on the channel your webhook is configured on >> More options >> Connectors
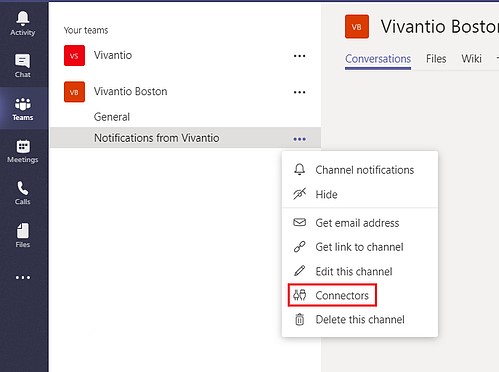
teams-connectors

Select Configured. Find your webhook and select Manage.
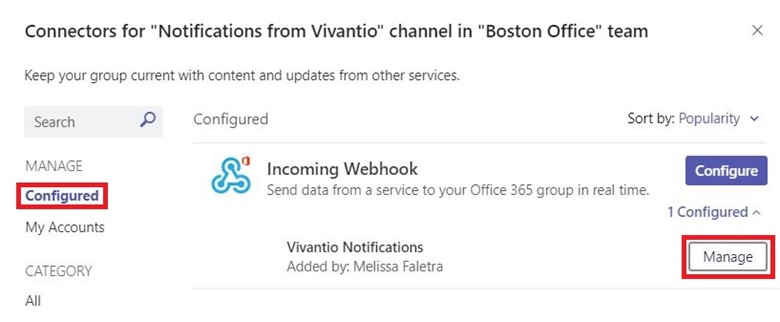
configure-webhook

If your webhook URL needs to be updated, an "Update URL" button will appear to the right of the URL. Select Update URL.
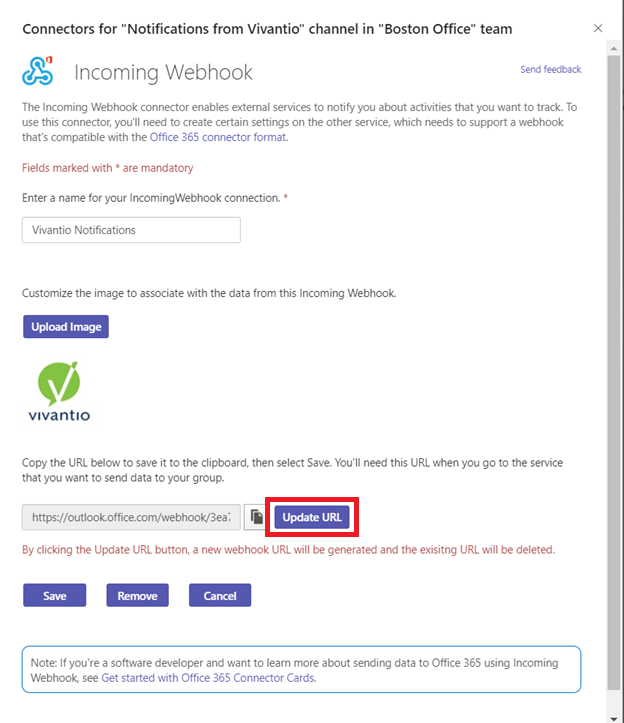
incoming-webhook-notification

Once your URL is updated, it will say "URL is up-to-date" below the URL. Copy the new URL into your webhook within Vivantio (Step 7).

Topics: Vivantio Customer Center Types of Service Integrations API Integration Tools WebMethods Microsoft Teams Integration
7 min read

How to Integrate Vivantio with Slack

By Melissa Faletra on 9/12/19 9:00 AM

INTRODUCTION

In every company, it’s crucial to have effective, efficient communication, such as the ability to alert your team about new urgent issues, or let a customer know you’ve responded to their request. Thanks to API integration and webhooks, Vivantio makes sending messages to applications such as Slack from your department easy.

This tutorial will show you how to configure this in Slack and provides two examples of using notifications in the Vivantio platform. If your company is using Microsoft Teams, you can find the tutorial here.

To connect Vivantio to Slack, you’ll need:

  1. Vivantio ITSM
  2. Admin access to your Vivantio Instance


CONFIGURATION IN SLACK

Step 1:

Begin by logging into Slack. You will then go to:

api.slack.com/apps » Create New App

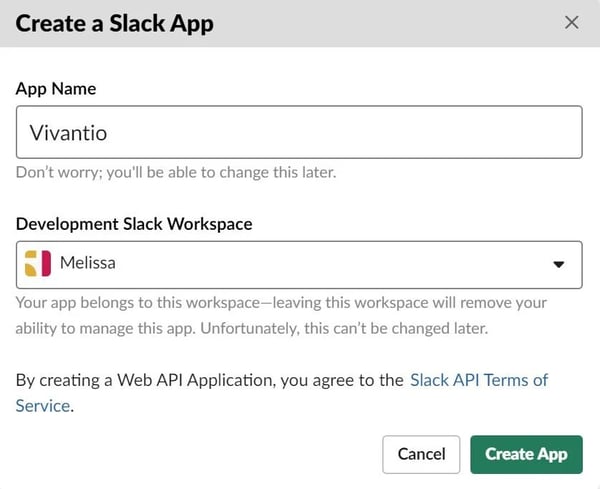
  • Fill in the App Name. This is the username that notifications from Vivantio will be posted in Slack from.
  • Choose a Development Slack Workspace, which is where you will manage your app. If you don’t already have a Development Slack Workspace, you can create one at slack.com/create#email
  • Select Create App

Screenshot of creating a Slack app

Step 2:

Your new app will appear under Your Apps on the api.slack.com/apps page. Select your app. This will bring you to a new page. Navigate to:

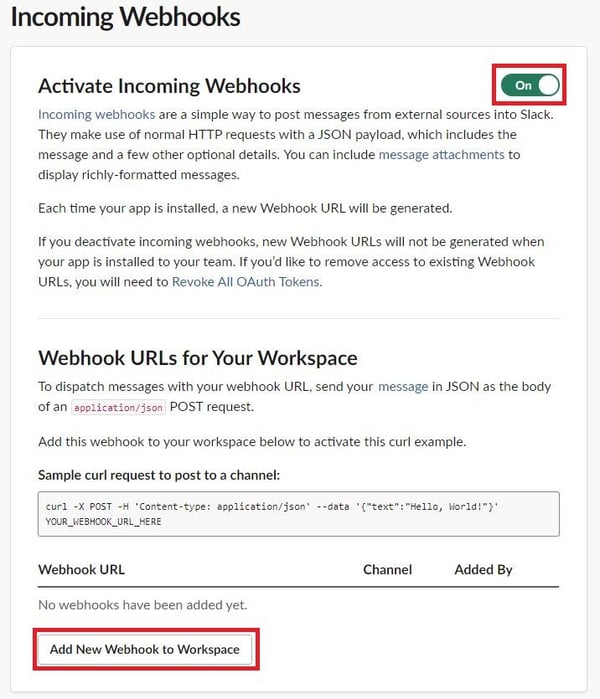
Add features and functionality » Incoming Webhooks » Activate Incoming Webhooks: On » Add New Webhook to Workspace

Screenshot for Adding New Webhook to Workspace

Step 3:

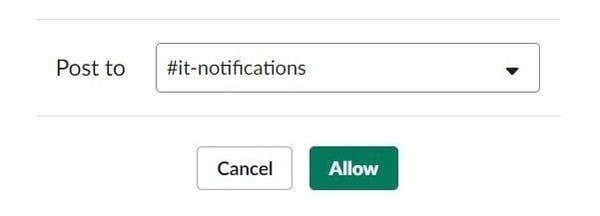
Choose the channel you want to post to in Slack. Select Allow.

Screenshot Selecting Slack Channel

Step 4:

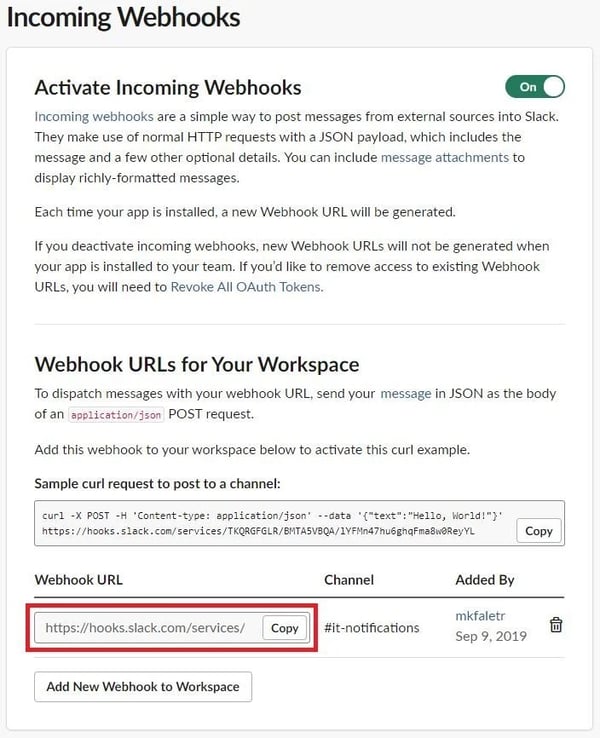
Next, copy the webhook URL that is created, circled in red below. This will later be used to set up the webhook in Vivantio.

Screenshot of sample webhook url


CONFIGURATION IN VIVANTIO

Step 5:

Log into Vivantio, open the Admin Area. Navigate to:

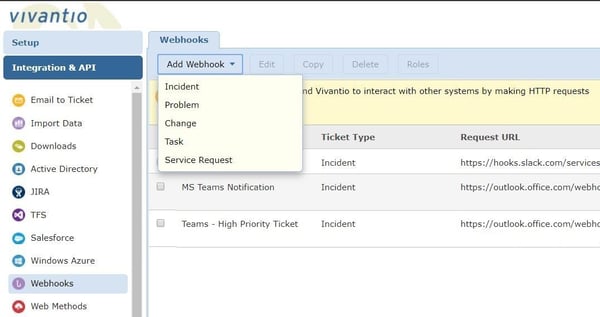
Integration & API » Webhooks » Add Webhooks

Then select the ticket type you want the webhook to be available for.

Screenshot to add webhook in Vivantio

Step 6:

Enter a name for your webhook.

Step 7:

Next, navigate to the Basic Details tab and enter the following information:

  • Request URL: Paste here the URL produced when you configured the incoming webhook in Slack.
  • HTTP Method: POST
  • Response Content Type: application/json

Step 8:

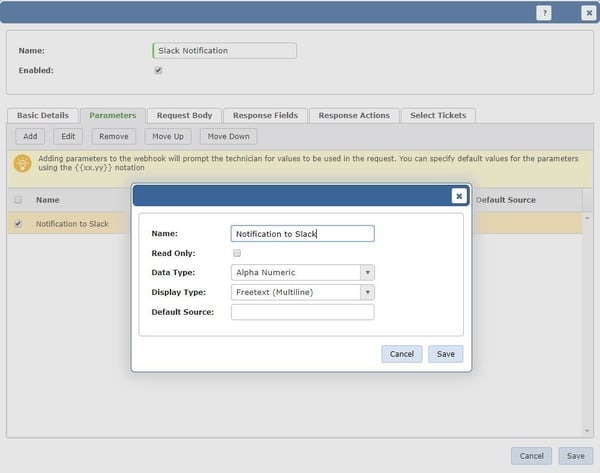
This next step, filling out the parameters tab, is optional. Set up parameters for the webhook by selecting Add. These are either values the technician will be prompted to complete, or populated automatically from the ticket. In this example, we have created a multi-line text field for a technician to enter the message that they wish to send into Slack.

Screenshot of Webhook Parameters in Vivantio

Step 9:

Now, fill out the Request Body tab.

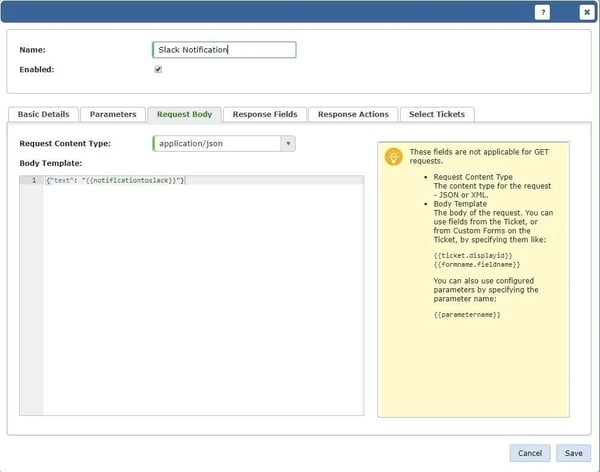
For the Request Content Type field, select application/json. The Body Template will contain the information you wish to send in Slack notification, such as specific text, details from the ticket or a webhook parameter. Screenshots from the Request Body tab of two example webhooks are given below.

Example 1:

A notification message sent into Slack that utilizes the webhook parameter we created in the previous step.

Screenshot of request body example

{"text": ""}

Example 2:

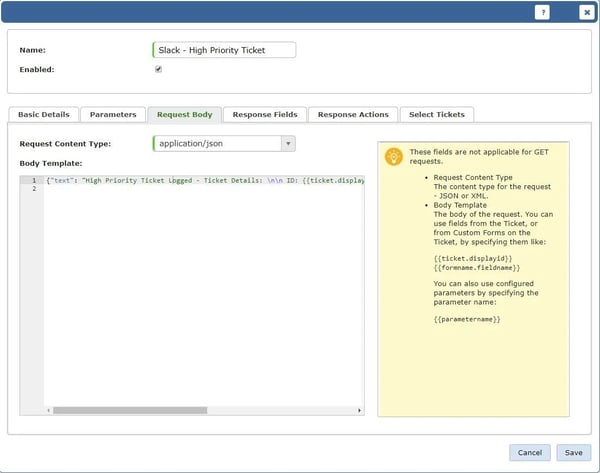
A notification sent into Slack that includes details from the ticket. In this case, we use fields from the ticket. The “\n\n” signifies a line break. Note that Steps 2 through 8 were followed to create another Webhook “Slack – High Priority Ticket.” Once the Request Body is filled in, click save.

Screenshot of Request Body Slack High Priority Ticket Notification

{"text": "High Priority Ticket Logged – Ticket Details: \n\n ID: {{ticket.displayid}} \n\n Subject: {{ticket.title}} \n\n Caller Name: {{ticket.callername}}"}

Step 10:

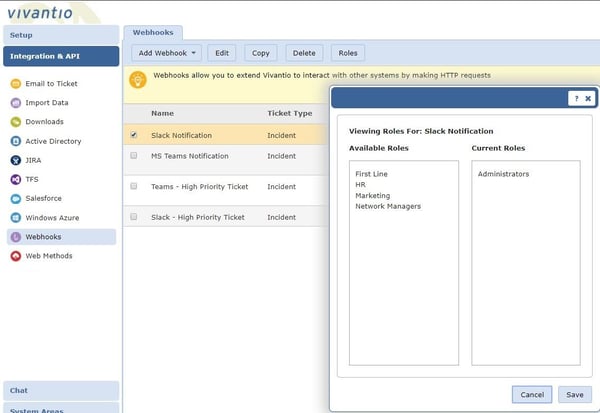
The last step before we can use our new webhook is to configure its roles. By default, there will be no roles assigned to the webhook. To update the roles, select the webhook and click Roles. Drag the roles you want the webhook available for into Current Roles.

Screenshot of Webhook Roles in Vivantio

Now let’s put the webhooks we set up into action!

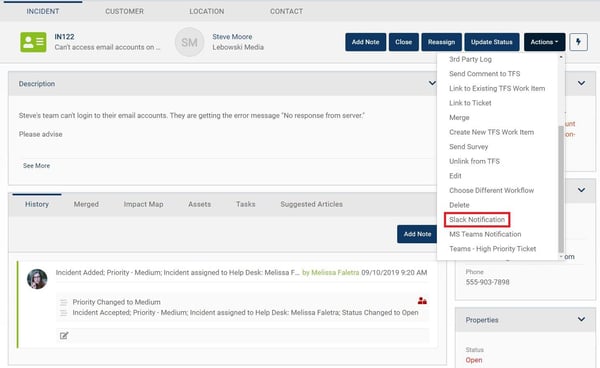
You can use your webhook to send ad hoc notifications into Slack directly from a ticket window or you can execute your webhook through Trigger Rules. Two examples are given below:

Example 3:

An ad hoc message sent into Slack from a Vivantio ticket window

Actions » Slack Notification

Screenshot of Slack Notification from Ticket Window

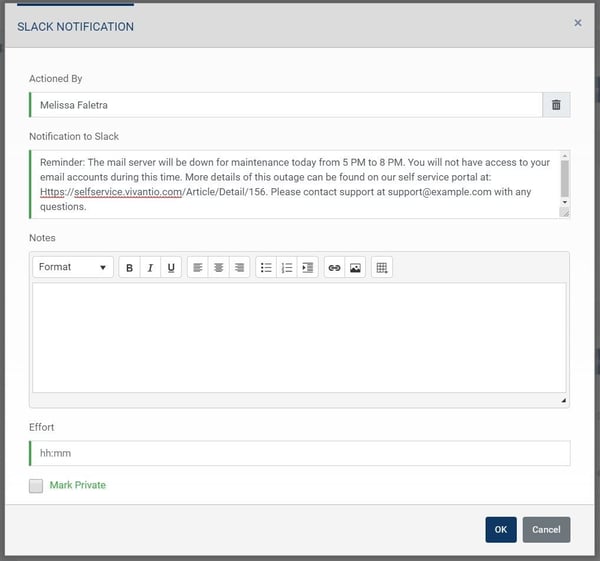
The technician is prompted to fill in the Notification to Slack parameter we set up in the Webhook. Recall that this webhook was configured so that the text entered here will be sent into Slack.

Screenshot of Notification to Slack example

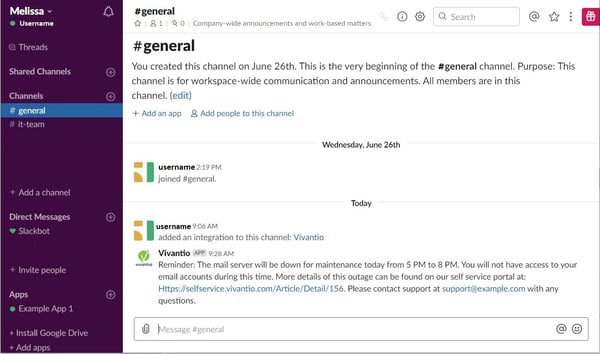
Press OK and voila! This message is sent into Slack.

Example of Notification in Slack

Example 4:

Sending a notification to an IT team’s channel in Slack any time a high priority ticket is logged.

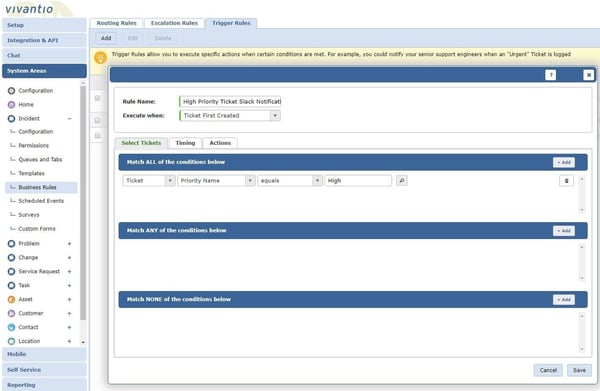
In this case, you can set up a trigger rule to automatically execute the Webhook when a high priority ticket is logged. Go to:

Admin area » System Areas » Select the ticket type you created the Webhook for » Business Rules » Trigger Rules

To add a Trigger Rule, click “Add,” then:

    • Enter a Rule Name and select when the condition is to be executed, either when the ticket first meets the condition (for example, if you just want people to know the ticket has been created) or when the matching ticket is updated (if you want everyone to see all updates to the ticket)
    • Enter the condition(s) for the trigger. In this example, the trigger rule condition is for tickets with the priority name equal to “high.”

Trigger rule example select tickets

For the trigger rule “actions,” select Webhooks » Webhook you want to fire; in this case, we chose

Slack – High Priority Ticket » Save

Trigger rule example actions

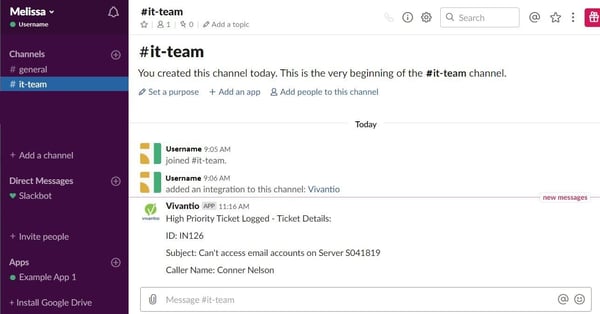
Once the trigger rule is set up, the “Slack – High Priority Ticket” Webhook will automatically send a notification with ticket details into Slack any time a “High Priority” ticket is logged.

Example of High Priority Notification in Slack


CONCLUSION

There you have it! Now you can easily communicate to any team in Slack directly from Vivantio.

Topics: Customer Center Service Integrations Slack Types of System Integration API Integration Tools WebMethods
7 min read

How to Create Simple Contact Forms with Web Methods

By Andrew Stevens on 11/10/15 9:00 AM

CREATING THE WEB METHOD

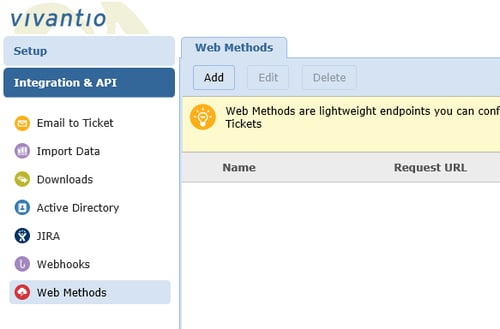
To create a Web Method in Vivantio, log into the platform, open the Admin Area, and go to:

Integration & API » Web Methods

screenshot of web methods admin area

(If you don’t see Web Methods in this menu, please contact our support team.)

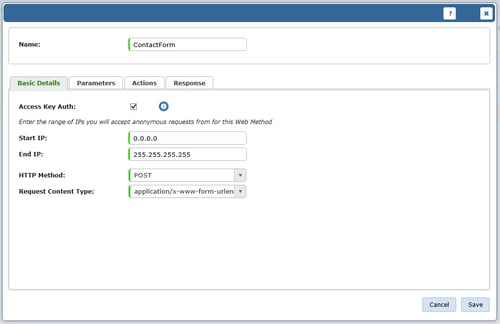
When you reach this screen, select the “Add” button. You’ll then get a dialog with a box for you to enter a name and a few sub tabs below to fill in. Submit a name and then move onto the first tab.

BASIC DETAILS

screenshot of add web method basic details

In this example, because we’re going for a simple form POST, we won’t be authenticating.

So, select Access Key Auth, and enter the IP range of the web server(s) that will host the form.

(Note: We’ve gone for 0.0.0.0 and 255.255.255.255 in our example. Don’t do that in practice!)

The other options on this tab are:

  • HTTP Method
  • Request Content Type

As this is a web form we’re dealing with, you will want to select ‘POST’ and ‘application/x-www-form-urlencoded’ respectively.

PARAMETERS

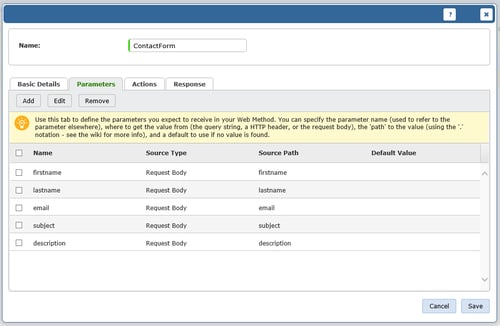
screenshot of vivantion add web wethod parameters

You can add as many parameters as you like, depending on how complicated you want your form to be.

In this example, we’ve kept it simple with:

  • First Name
  • Last Name
  • Email Address
  • Subject
  • Description

They are all configured in the same way.

ACTIONS

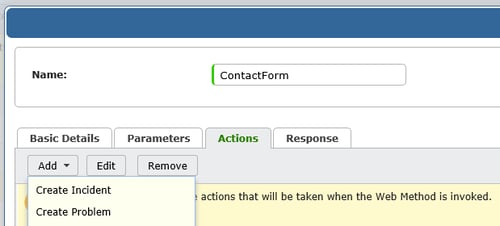
In this example, we want to create a Ticket when the Web Method is called. So, on the Action tab, choose

Add » Create Incident

(Note: You can use whichever of your Ticket Types is more appropriate for the situation.)

screenshot of vivantio add web method actions

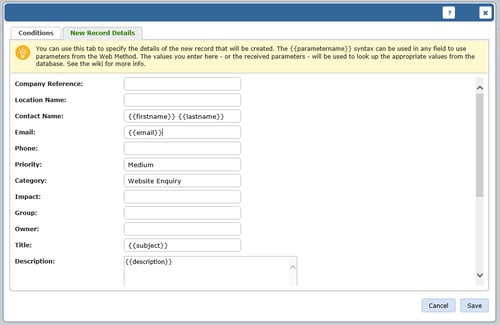
After you’ve selected your Action, you will get a popup with two tabs: Conditions and New Record Details.

In this example, we want a Ticket to be created every time the Web Method is called. So, we will leave the Conditions tab empty and move onto New Record Details.

screenshot of vivantio add web methods 2

In this example, you can see we’re using to pass our parameter values into the Ticket Details.

You’ll also want to note though that we’ve put some literal values in for the Priority and Category. In our example, we want these set for every contact form submission, but we don’t want the user to choose them, so we’re specifying fixed values.

RESPONSE

When you’re setting up the Response, you can configure up to three options:

  • Response Type – For this field, you have the choice between Content or Redirect. Content allows you to specify content to be returned to the user as part of the Response Body. Redirect let’s you send them to a specific website with a 302 redirect.
  • Response Content Type – For this field, you have the choice between JSON, XML, or Text/HTML. This field is only available when you select the Content option for the Response Type field. It will inform the user of the Web Method which data type to expect in return.
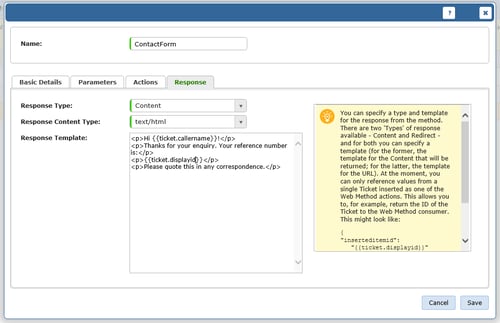
  • Response Template – This field allows you to enter the actual response you would like to send: either the content or the redirect URL. If your Web Method contains a “Create Ticket” action, you can use to refer to properties from the created ticket within the response template such as {{ticket.displayid}} to get the ID of the inserted ticket.

For our example, we’re going to set up a Content Response using the Content Type “Text/HTML” that shows a basic “Thank You” message and refers to the Ticket ID.

screenshot of add web method response

After you hit the “Save” button, you’ll be shown the unique URL for your Web Method.

screenshot of vivantio web method URL


CREATING THE CONTACT FORM

When creating the form, the things you need to know are:

  • The form method should be “POST”.
  • The form action should be the Web Method URL you noted earlier.
  • When you’re setting the names of your form inputs, they should match the names of the parameters you added earlier.

Here’s a sample form below that is ready to use apart from the action URL on the form:

<!DOCTYPE html>

<html lang=”en”>

<head>

<meta charset=”utf-8″>

<meta http-equiv=”X-UA-Compatible” content=”IE=edge”>

<meta name=”viewport” content=”width=device-width, initial-scale=1″>

<title>HTML Form &raquo; Web Method Example</title>

<link href=”https://maxcdn.bootstrapcdn.com/bootstrap/3.3.5/css/bootstrap.min.css” rel=”stylesheet”>

<!–[if lt IE 9]>

<script src=”https://oss.maxcdn.com/html5shiv/3.7.2/html5shiv.min.js”></script>

<script src=”https://oss.maxcdn.com/respond/1.4.2/respond.min.js”></script>

<![endif]–>

</head>

<body>

<div class=”container”>

<div class=”row”>

<div class=”col-lg-6 col-offset-lg-3″>

<form method=”POST” action=”YOUR WEB METHOD URL HERE”>

<div class=”form-group”>

<label for=”firstname”>First Name</label>

<input type=”text” class=”form-control” id=”firstname” name=”firstname” />

</div>

<div class=”form-group”>

<label for=”lastname”>Last Name</label>

<input type=”text” class=”form-control” id=”lastname” name=”lastname” />

</div>

<div class=”form-group”>

<label for=”email”>Your Email Address</label>

<input type=”email” class=”form-control” id=”email” name=”email” />

</div>

<div class=”form-group”>

<label for=”subject”>What can we help with?</label>

<input type=”text” class=”form-control” id=”subject” name=”subject” />

</div>

<div class=”form-group”>

<label for=”description”>Any additional details?</label>

<textarea class=”form-control” id=”description” name=”description” rows=”10″>


(Note: You’ll note that we’ve referenced Bootstrap in this sample. You do not have to do that and can use whatever UI framework you like.)

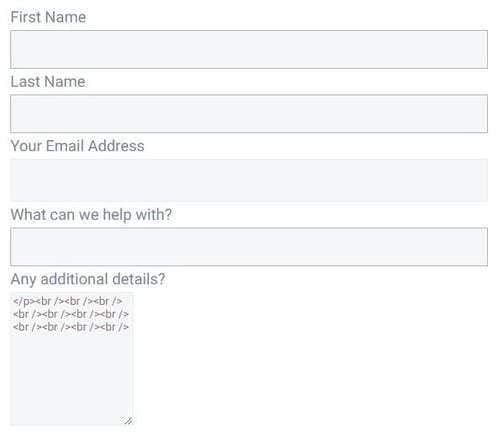
Here’s what the sample form would look like in practice:

vivantio web method form sample

Using the code, you can publish the form to your website. After a user fills in and submits the form, a Ticket will be created via the Web Method. The user will then see the content configured on the Web Method Response.

Topics: Customer Center Service Integrations Types of System Integration API Integration Tools WebMethods