Demo
2 min read

Vivantio's New Integration with Microsoft Power BI

By Staff Writer on 11/12/21 11:13 AM

As a provider of a Unified Service Management Platform, Vivantio allows you to seamlessly switch on integrations with virtually any other essential business application for a holistic view of your customers. Whether it’s JIRA, Active Directory or, as we will show you today, Microsoft Power BI, you can easily use these tools in concert with each other to get the data your team needs.

BUSINESS INTELLIGENCE

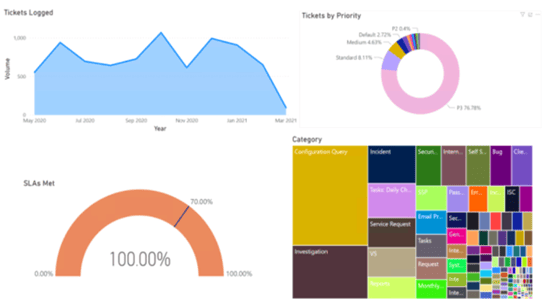
Using real-time data to achieve true continuous improvement is an integral part of any service management solution. These reports allow you to make informed decisions about your day-to-day activity, future planning, and evaluation of performance. Vivantio offers both custom dashboards as well as a robust built-in reporting tool within the solution alongside an out-of-the-box integration with Microsoft Power BI that allows you access to even more interactive visualizations and business intelligence capabilities.

GETTING STARTED

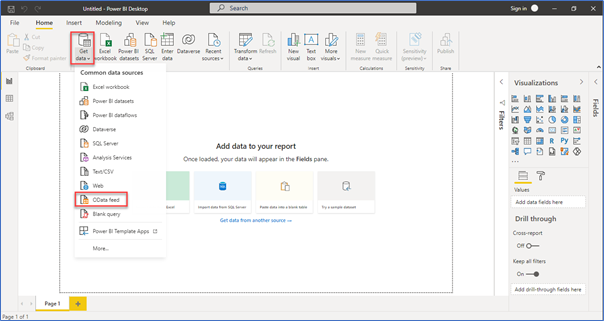
From Power BI, you can connect with the Vivantio OData Feed.

powerbi

All you need to do is specify the URL of your Vivantio instance.

powerbi1

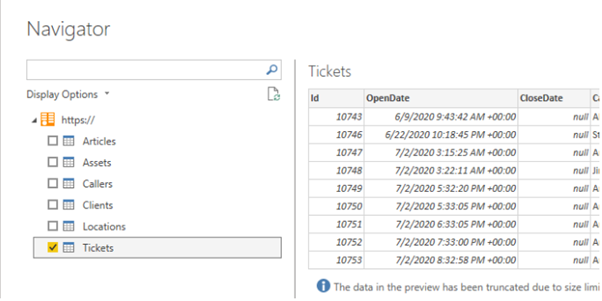
Once connected, you can select the data items in Vivantio that you wish to include in your Power BI reports.

powerbi2

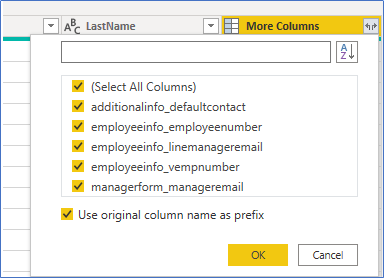
You also have the opportunity to bring data from your custom fields into Power BI.

powerbi3

Once connected, Power BI will load your Vivantio data set and you can start building reports and dashboards using the full functionality of Power BI.

powerbi4

If your organization uses Power BI and you don’t have it integrated with Vivantio yet, give it a try and take advantage of the full power of your service management solution!

LEARN MORE

If you would like a quick demo or consultation on how Vivantio can empower your teams to elevate your customer experience, contact us below.

FREE DEMO

Topics: Service Integrations Types of Service Integrations Power BI
7 min read

How to Integrate Vivantio with Slack

By Melissa Faletra on 9/12/19 9:00 AM

INTRODUCTION

In every company, it’s crucial to have effective, efficient communication, such as the ability to alert your team about new urgent issues, or let a customer know you’ve responded to their request. Thanks to API integration and webhooks, Vivantio makes sending messages to applications such as Slack from your department easy.

This tutorial will show you how to configure this in Slack and provides two examples of using notifications in the Vivantio platform. If your company is using Microsoft Teams, you can find the tutorial here.

To connect Vivantio to Slack, you’ll need:

  1. Vivantio ITSM
  2. Admin access to your Vivantio Instance


CONFIGURATION IN SLACK

Step 1:

Begin by logging into Slack. You will then go to:

api.slack.com/apps » Create New App

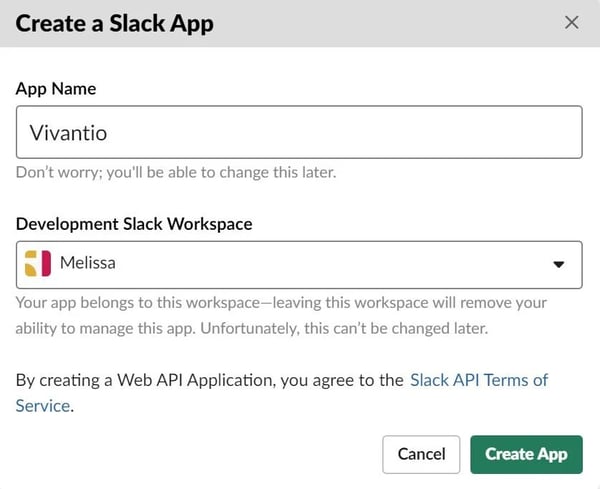
  • Fill in the App Name. This is the username that notifications from Vivantio will be posted in Slack from.
  • Choose a Development Slack Workspace, which is where you will manage your app. If you don’t already have a Development Slack Workspace, you can create one at slack.com/create#email
  • Select Create App

Screenshot of creating a Slack app

Step 2:

Your new app will appear under Your Apps on the api.slack.com/apps page. Select your app. This will bring you to a new page. Navigate to:

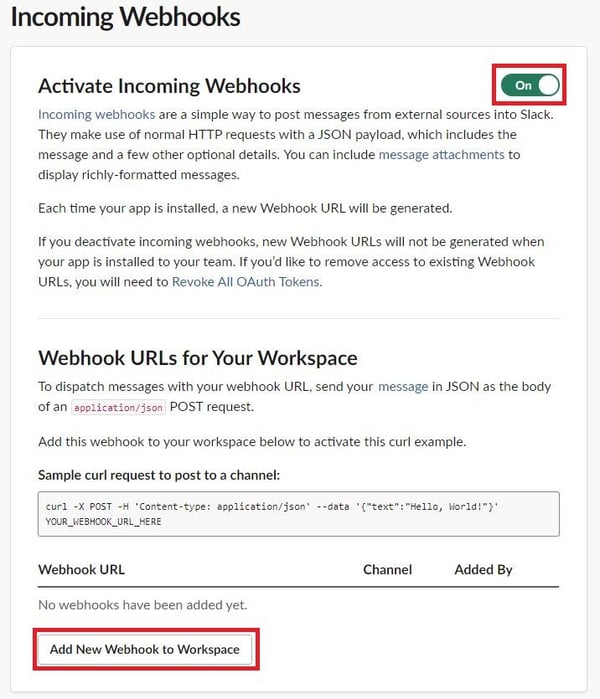
Add features and functionality » Incoming Webhooks » Activate Incoming Webhooks: On » Add New Webhook to Workspace

Screenshot for Adding New Webhook to Workspace

Step 3:

Choose the channel you want to post to in Slack. Select Allow.

Screenshot Selecting Slack Channel

Step 4:

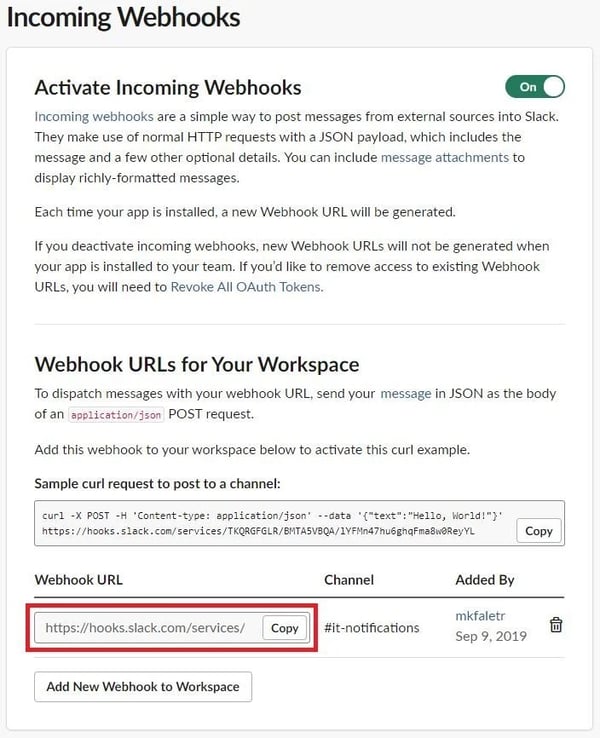
Next, copy the webhook URL that is created, circled in red below. This will later be used to set up the webhook in Vivantio.

Screenshot of sample webhook url


CONFIGURATION IN VIVANTIO

Step 5:

Log into Vivantio, open the Admin Area. Navigate to:

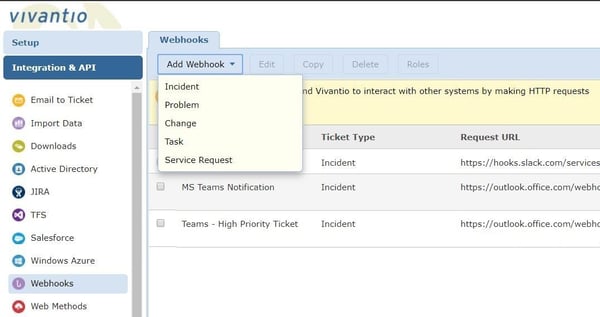
Integration & API » Webhooks » Add Webhooks

Then select the ticket type you want the webhook to be available for.

Screenshot to add webhook in Vivantio

Step 6:

Enter a name for your webhook.

Step 7:

Next, navigate to the Basic Details tab and enter the following information:

  • Request URL: Paste here the URL produced when you configured the incoming webhook in Slack.
  • HTTP Method: POST
  • Response Content Type: application/json

Step 8:

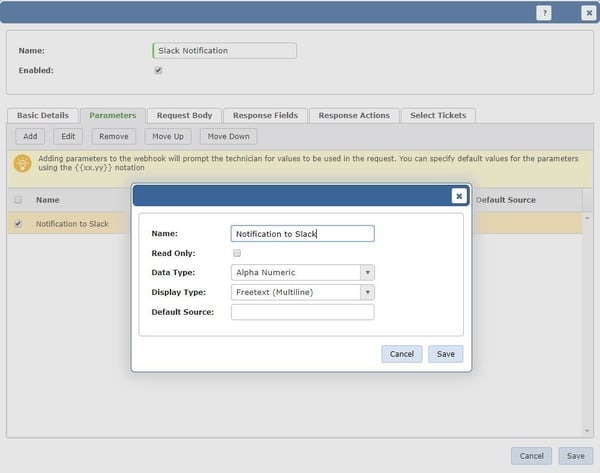
This next step, filling out the parameters tab, is optional. Set up parameters for the webhook by selecting Add. These are either values the technician will be prompted to complete, or populated automatically from the ticket. In this example, we have created a multi-line text field for a technician to enter the message that they wish to send into Slack.

Screenshot of Webhook Parameters in Vivantio

Step 9:

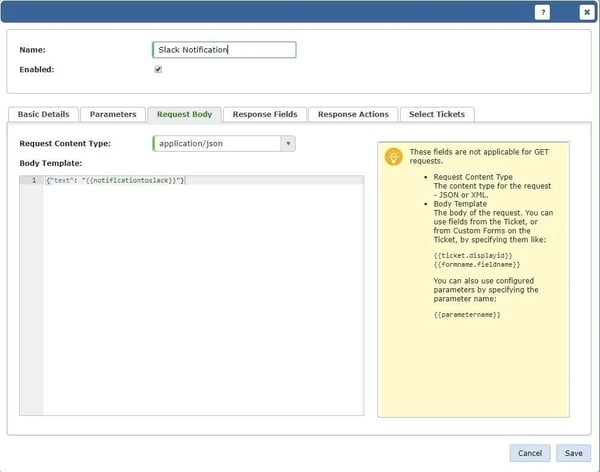
Now, fill out the Request Body tab.

For the Request Content Type field, select application/json. The Body Template will contain the information you wish to send in Slack notification, such as specific text, details from the ticket or a webhook parameter. Screenshots from the Request Body tab of two example webhooks are given below.

Example 1:

A notification message sent into Slack that utilizes the webhook parameter we created in the previous step.

Screenshot of request body example

{"text": ""}

Example 2:

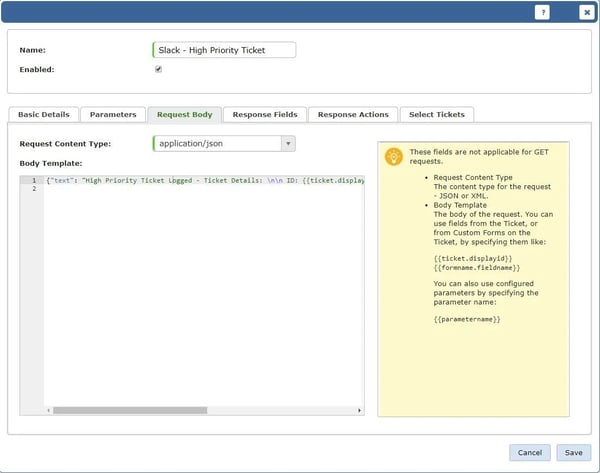
A notification sent into Slack that includes details from the ticket. In this case, we use fields from the ticket. The “\n\n” signifies a line break. Note that Steps 2 through 8 were followed to create another Webhook “Slack – High Priority Ticket.” Once the Request Body is filled in, click save.

Screenshot of Request Body Slack High Priority Ticket Notification

{"text": "High Priority Ticket Logged – Ticket Details: \n\n ID: {{ticket.displayid}} \n\n Subject: {{ticket.title}} \n\n Caller Name: {{ticket.callername}}"}

Step 10:

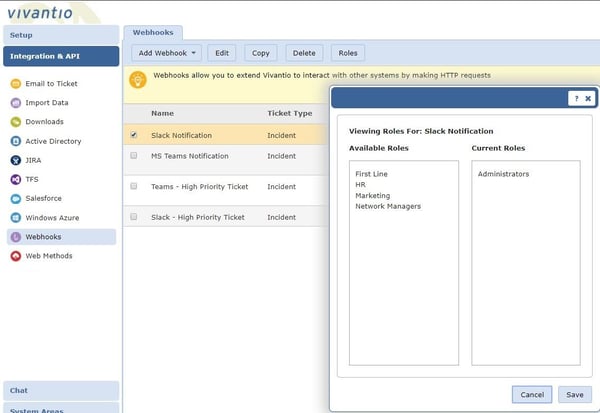
The last step before we can use our new webhook is to configure its roles. By default, there will be no roles assigned to the webhook. To update the roles, select the webhook and click Roles. Drag the roles you want the webhook available for into Current Roles.

Screenshot of Webhook Roles in Vivantio

Now let’s put the webhooks we set up into action!

You can use your webhook to send ad hoc notifications into Slack directly from a ticket window or you can execute your webhook through Trigger Rules. Two examples are given below:

Example 3:

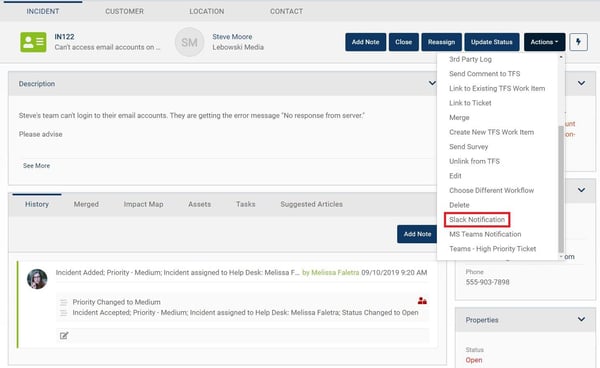
An ad hoc message sent into Slack from a Vivantio ticket window

Actions » Slack Notification

Screenshot of Slack Notification from Ticket Window

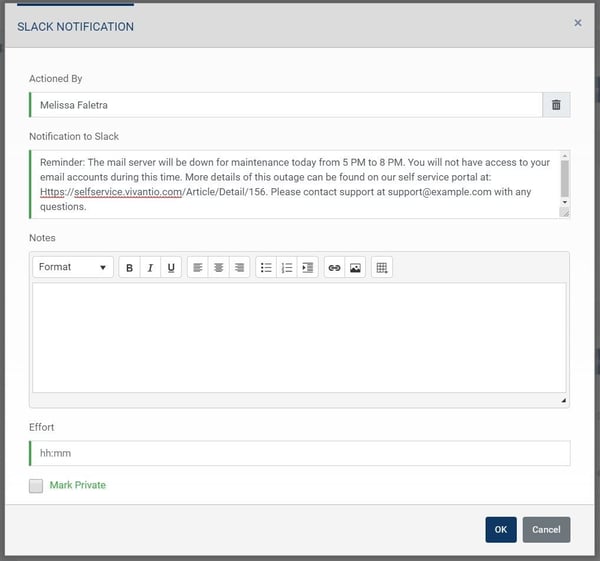
The technician is prompted to fill in the Notification to Slack parameter we set up in the Webhook. Recall that this webhook was configured so that the text entered here will be sent into Slack.

Screenshot of Notification to Slack example

Press OK and voila! This message is sent into Slack.

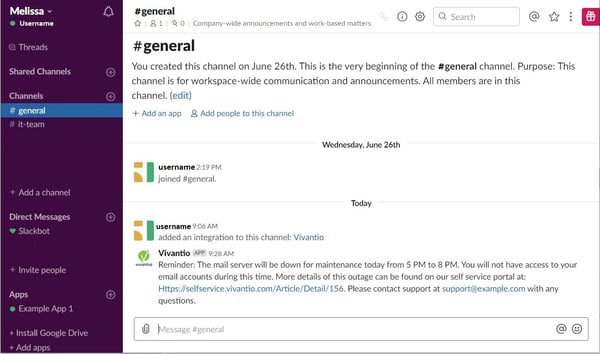
Example of Notification in Slack

Example 4:

Sending a notification to an IT team’s channel in Slack any time a high priority ticket is logged.

In this case, you can set up a trigger rule to automatically execute the Webhook when a high priority ticket is logged. Go to:

Admin area » System Areas » Select the ticket type you created the Webhook for » Business Rules » Trigger Rules

To add a Trigger Rule, click “Add,” then:

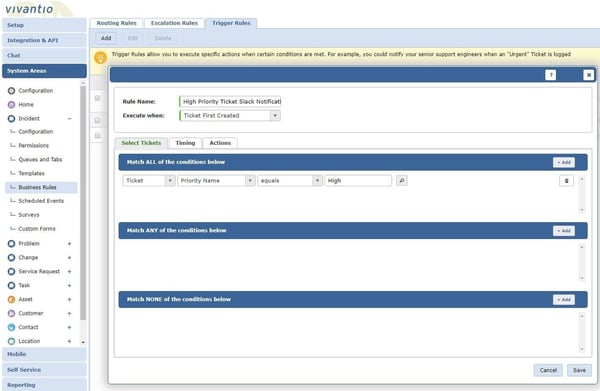
    • Enter a Rule Name and select when the condition is to be executed, either when the ticket first meets the condition (for example, if you just want people to know the ticket has been created) or when the matching ticket is updated (if you want everyone to see all updates to the ticket)
    • Enter the condition(s) for the trigger. In this example, the trigger rule condition is for tickets with the priority name equal to “high.”

Trigger rule example select tickets

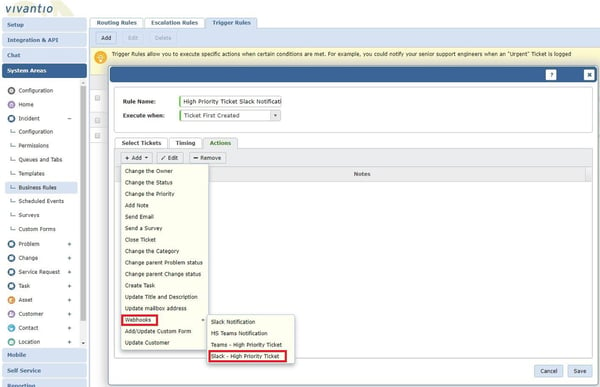
For the trigger rule “actions,” select Webhooks » Webhook you want to fire; in this case, we chose

Slack – High Priority Ticket » Save

Trigger rule example actions

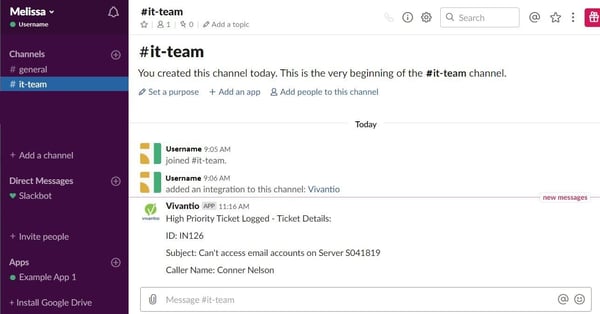
Once the trigger rule is set up, the “Slack – High Priority Ticket” Webhook will automatically send a notification with ticket details into Slack any time a “High Priority” ticket is logged.

Example of High Priority Notification in Slack


CONCLUSION

There you have it! Now you can easily communicate to any team in Slack directly from Vivantio.

Topics: Customer Center Service Integrations Slack Types of System Integration API Integration Tools WebMethods
4 min read

4 Types of Integration Methods with Your Service Management Software

By Staff Writer on 10/11/18 9:00 AM

IT Service Requires More Than One Integration Tool

JIRA, Active Directory, and Beyond Trust (formally Bomgar) are a few examples of many third-party services and technology that can help your team by providing outsourced IT service. Using these tools in concert with each other is vital to getting the service data your team needs. So, when considering an ITSM platform, it is critical to understand the availability of integrations.

But what are the differences between the types of software integration tools out there? Here are the 4 major types of third-party integration methods available for service management software along with the pros and cons of each for your service team.


1. API Integration

Application Programming Interface (API) is the most common tool for connecting different applications for service management software. There are many different types of API that are either public, partner, or private. What they all have in common is how they enable interaction between applications. An API uses a common code language to specify functionality and set protocols. This gives your applications the ability to transfer data.

Pros:

  • Highly Flexible: Even though you are dependent on the developer resources, specific data becomes highly flexible because the integration uses product code.
  • App Changes Aren’t Disruptive: Service providers offer better functionality that goes uninterrupted since APIs are often limited in scope.
  • Widely Available: As stated earlier, API is the most common tool for third-party integration. So, it will be unlikely that you run into a service that won’t offer API integration options.

Cons:

  • Dependent on Vendor: Vendors are responsible for creating APIs. So, you are reliant on the vendor to create APIs for the specific type of information you are trying to pull.
  • Code-Intensive: Because they are code-based, APIs need an understanding of programming languages to install.


2. Webhooks

Webhooks or HTTP callbacks are an alternative to API integration. They are both tools that link to a web application but have two key differences. For webhooks, implementation is often not code-based. They often have modules that are programmable within a web application. Instead of being request-based, webhooks are event-based. They only trigger when specific events occur within a third-party service.

Pros:

  • Real-Time Data: Webhooks don’t use a request-based system. They allow your team to view data on a real-time scale.
  • Supports Automation Efforts: Because data requests are event-based, you don’t have to set up poll timings to your data center. This can help streamline data flow and automation.

Cons:

  • Limits Data Manipulation: A webhook requires the service to trigger a data transfer based on an update. In contrast to webhooks, APIs can list, create, edit, or delete an item without triggering a transfer.


3. ISC

Integration Services Component (ISC) lives on a local server unlike code-based integrations.  The ISC creates a bridge with on-premise tools such as directories, asset management tools, and BI tools without the need for file imports.

Pros:

  • (Near) Out-of-the-Box Solution: The ISC immediately offers many data synchronization options you would likely use.
  • Wider Range of Functionality: With an ISC, you have complete data access that you can do anything with.  Any data that you can access on the backend with your cloud service will be available.

Cons:

  • Knowledge of Database Architecture Necessary: If you are unfamiliar with how your local database is set up, implementing an ISC will be challenging.
  • Requires Access to the Backend of Your Applications: There will be many cases where backend access isn’t there for your team, so you won’t be able to use an ISC in those situations.


4. ORCHESTRATION

The most automated integration option is orchestrations. If you are not familiar with orchestrations, they refer to the process of automating multiple systems and services together. Teams will often use software configuration management tools such as PowerShell to build orchestrations. Software configuration management tools offer various methods such as snap-ins or hosting APIs to connect with applications to manage the automation workflow.

Pros:

  • Full Automation: Automation across all processes.
  • Manages Multiple Systems: Ability to manage the integrations of multiple systems collectively.

Cons:

  • Code-Intensive: You need to have coding skills to manage your software configuration management tool.
  • Labor-Intensive: Because the workflows are quite complex, the setup can be a drawn-out process. Also, any asset or process changes force you to check how it will affect your orchestrations.


Make sure you check what integration options your ITSM provider offers before you commit.  With Vivantio, you have several options including our rapid integration platform, FLEXBridge. 

Discover for yourself how Vivantio offers codeless integrations, customize ticket views, built-in CRM and much more. Schedule a free personalized demo to learn more.  

FREE DEMO


Topics: Service Integrations System Integration Methods API Integration Tools
7 min read

How to Integrate Microsoft Team Foundation Server (TFS) with Vivantio

By Andrew Stevens on 9/26/17 9:00 AM

PREREQUISITES

In order to connect Vivantio to TFS, you’re going to need:

  • Admin access to your Vivantio instance
  • Admin access to your TFS instance
  • A user account in TFS for Vivantio
  • The IP address(es) for your TFS servers

BASIC CONFIGURATION

Step 1:

Log in to Vivantio, open the Admin Area, and select TFS under the Integration & API heading on the left menu:

TFS Credentials Empty

The first screen you’ll see will prompt you for the version of TFS you’re using, and the credentials to use.

  • If you’re using TFS 2012/13, or 2015, enter a username and password.
  • If you’re using TFS 2017 or VSTS, enter a username and a Personal Access Token. For details on creating a PAT, see the MSDN documentation here.

Having entered those and hit the ‘Save’ button.

Step 2:

The bottom of the screen will update to show a couple of different URLs: the Work Item Alert URL, and the Service Hook URL:

TFS Credentials Populated

You’ll use one of these URLs when you set TFS up to send information back into Vivantio. We’ll get more into that later. But, while you’re here, you should configure the IP Range for Vivantio to accept requests from, using the ‘IP Range’ button in the menu bar:

Jira IP range buttonJira IP range dialogue

Having configured those, you can move on to the next tab, Ticket to Work Item Mapping.


TICKET TO WORK ITEM MAPPING

You can control which types of Vivantio Ticket can be mapped to which types of TFS Work Item by setting up Ticket to Work Item Mappings. This prevents the wrong type of information being transferred or the wrong type of records being created.

Team Foundation Service Ticket To Work Item Mapping Empty

When creating a Ticket to Work Item Mapping, you’ll be prompted for a number of different things:

  • Project Collection – The Project Collection in TFS
  • Project – The Project in TFS
  • Work Item Type – The Work Item Type in TFS
  • Ticket Type – The type of Ticket within Vivantio

These control the basics of the mapping. On the next tab, Sync Options, there are settings relating to the sync of data between:

Team Foundation Server Ticket To Work Item Mapping Empty Sync Options

You can configure Vivantio to automatically send updates to TFS when the Vivantio Ticket is updated. (Note: This option does not force TFS to update Vivantio. That has to be configured within TFS itself.)

Finally, you can add additional field mappings:

Team Foundation Server Ticket To Work Item Mapping Empty Field Mappings

As standard, Vivantio will populate the Work Item Title and Description; if you want to add additional mappings, e.g. for custom fields, you can do so here.

After choosing the appropriate options, hit ‘Save’, and you’re ready to start creating TFS Work Items.


CREATING A NEW WORK ITEM

When viewing a Ticket in Vivantio, under the “More…” menu item, you’ll see the option to “Create New TFS Work Item”:

Jira Create New Jira Issue Menu Item 1

Clicking that button will bring up the “Create New TFS Work Item” dialog:

Team Foundation Service Create New Work Item Dialog Empty

You can optionally enter Notes for the Vivantio Ticket History, then hit ‘Save’ to create the TFS Work Item. After a short period of time, you’ll see a TFS tab appear on the Ticket Details:

Team Foundation Service Ticket Details Tfs Sub Tab

That includes a link to view the Work Item in TFS, along with options to unlink the ticket from TFS, or to add a direct comment to the TFS Work Item, which can be useful if you didn’t choose to automatically sync actions.


GETTING INFORMATION BACK FROM TFS

The next step in the process is getting information added to TFS sent into Vivantio. This is done using one of two mechanisms, depending on what version of TFS you’re using:

  • Work Item Alerts (TFS 2015 or earlier)
  • Service Hooks (TFS 2017 / VSTS)

The configuration is pretty similar either way.

Creating a Work Item Alert

(The Microsoft documentation on Work Item Alerts can be found here.)

Work Item Alerts are the ‘older’ of the two mechanisms that can be used for TFS to update Vivantio. If you’re using a version of TFS that supports Service Hooks, we suggest you use those instead. However, if you do want to use Work Item Alerts, you can do so easily.

You can follow the instructions in the MS documentation to configure the basics of the Work Item Alert – which work items the alert is for, and when. The main difference is that rather than having the alert delivered to an email address, you’ll select the ‘SOAP’ option, and enter in your Work Item URL:

Team Foundation Server TFS Create Work Item Alert

TFS will then send a HTTP request to Vivantio when the alert fires, and Vivantio will add the details of the update as a Note on the ticket.

Creating a Service Hook

(The Microsoft documentation on Service Hooks can be found here.)

Service Hooks are a newer feature within TFS–introduced in TFS 2015. We don’t currently have Vivantio listed within TFS as a dedicated option, so on the first page of the Create Service Hook wizard, you’ll choose the “Webhooks” option:

Team Foundation Server New Service Hook Step 1

On the next page of the wizard, you’ll choose the type of event the Service Hook triggers on:

Team Foundation Service New Service Hook Step 2

Right now, we only support Work Item Commented On and Work Item Updated, but we’re working on introducing support for other events soon. Enter any filters you want for the area or work item type, then move on to the last step:

Team Foundation Server New Service Hook Step 3

All you need to do here is add your Service Hook URL, then click Finish. TFS will then start sending updates on Work Items back in to Vivantio.

If you’re using Vivantio and TFS, and you don’t yet have them integrated, give it a try, and see how it can help you improve communications between your Service Desk and your development team!

Topics: Customer Center Service Integrations Types of System Integration Microsoft Teams TFS Integration Types of Service Integrations
6 min read

How to Integrate JIRA with Vivantio

By Andrew Stevens on 9/26/17 9:00 AM

PREREQUISITES

In order to connect Vivantio to JIRA, you’re going to need:

  • Admin access to your Vivantio instance
  • Admin access to your JIRA instance
  • A user account in JIRA for Vivantio
  • The IP address(es) for your JIRA servers

BASIC CONFIGURATION

Step 1:

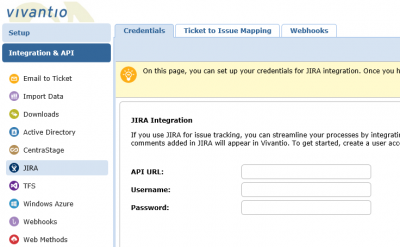
Log into Vivantio, open the Admin Area, and select JIRA under the Integration & API heading on the left menu:

Screenshot of Jira Empty

The first screen you’ll see will prompt you for your JIRA credentials. Enter them and hit ‘Save’.

Step 2:

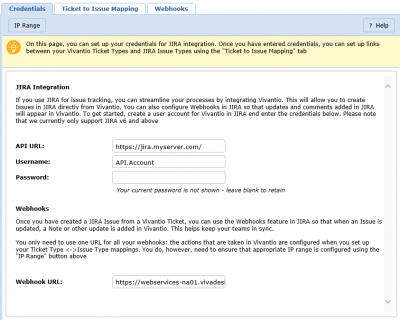
The bottom of the screen will update to show your unique Webhook URL:

Screenshot of Jira Credentials Populated

You’ll use this URL when configuring Webhooks within JIRA.

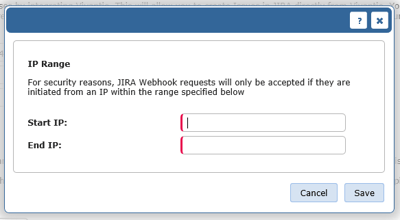
However: before you can do that, you need to configure the IP Range for Vivantio to accept requests from, using the ‘IP Range’ button in the menu bar:

Jira IP Range ButtonJira IP Range Dialogue

Having configured those options, you can move on to the next tab, Ticket to Issue Mapping.


TICKET TO ISSUE MAPPING

Jira Ticket to Issue Mapping Empty

You can control which types of Vivantio Ticket can be mapped to which types of JIRA Issue by setting up Ticket to Issue Mappings. This prevents the wrong type of information being transferred or the wrong type of records being created.

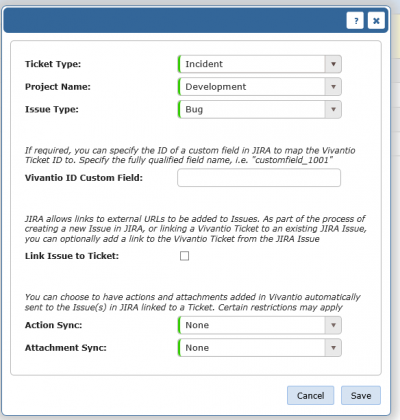
When creating a Ticket to Issue Mapping, you’ll be prompted for a number of different things:

  • Ticket Type – the Vivantio Ticket Type
  • Project – the Project in JIRA
  • Issue Type – the Issue Type in JIRA
  • Vivantio ID Custom Field – if you have a custom field in JIRA that you want to use to store the Vivantio Ticket ID, you can enter the (system) field name here. This will usually be in the format ‘customfield_10010’
  • Link Issue to Ticket – JIRA has a concept of ‘links’ within a ticket – checking this box will add a link to the Vivantio Ticket to the Issue in JIRA
  • Action / Attachment Sync – you can configure Vivantio to automatically send updates to JIRA when the Vivantio Ticket is updated (Note: this option does not force JIRA to update Vivantio though. That has to be configured within JIRA itself.)

After choosing the appropriate options, hit ‘Save’, and you’re ready to start creating JIRA Issues.


CREATING A NEW ISSUE

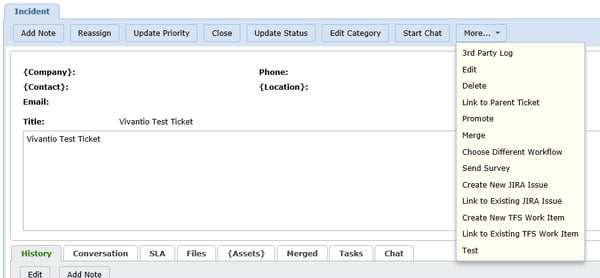
When viewing a Ticket in Vivantio, under the “More…” menu item, you’ll see the option to “Create New JIRA Issue”:

Jira Create New Jira Issue Menu Item 1

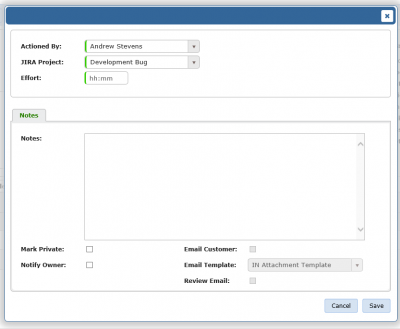
Clicking that button will bring up the “Create New JIRA Issue” dialog:

Jira Create New Jira Issue Dialogue

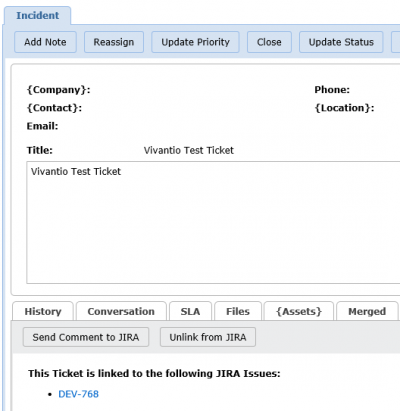
You can optionally enter Notes for the Vivantio Ticket History, then hit ‘Save’ to create the JIRA Issue. After a short period of time, you’ll see a JIRA tab appear on the Ticket Details:

Jira Ticket Details Jira Sub Tab

That includes a link to view the Issue in JIRA, along with options to unlink the ticket from JIRA, or to add a direct comment to the JIRA Issue – useful if you didn’t choose to automatically sync actions.


GETTING INFORMATION BACK FROM JIRA

The next step in the process is getting information added to JIRA sent into Vivantio. This is done using Webhooks in JIRA. Full documentation on Webhooks can be found here, but we’ll briefly walk you through the steps required to configure them.

Back in the Vivantio Admin Area, you’ll find your unique Webhook URL, which will look something like:

https://url-to-your-vivantio-instance/webhooks/jira/event?accesskey=xxx-yyy-zzz

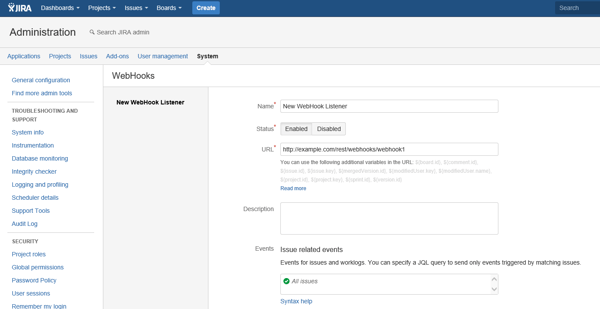
Make a note of this, head in to the “System” section of the JIRA Admin Area, and find the ‘WebHooks” menu option under “Advanced” (towards the bottom left of the screen). You’ll then have the option to “Create WebHook”, which is going to give you a screen more-or-less similar to the below:

Jira New WebHook

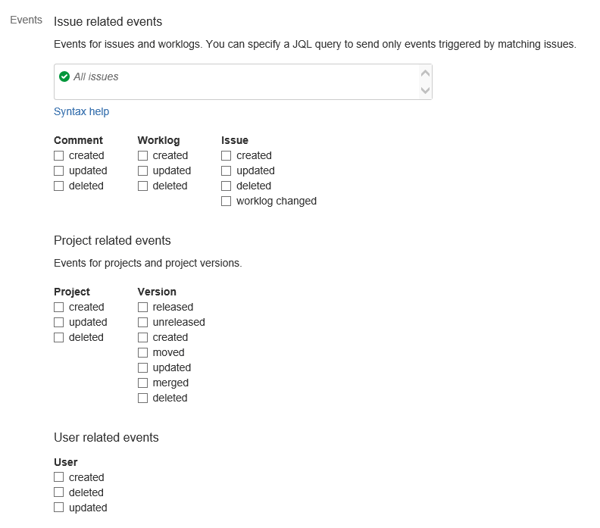
You can enter whatever you want for the “Name”. Vivantio doesn’t use that field. Add your Unique URL in, then head down to the “Events” section, where you choose when you want the Webhook to fire, and for which Issues:

Jira-JIra-New-WebHook-Select-Events

It’s up to you exactly which events you want the Webhook to fire for. For example, you might want to just have the Webhook fire when an Issue is updated or a Comment is added. More advanced users might want to configure the Webhook to only fire for specific transitions as a post function in a Workflow. (Note: see here in the Atlassian docs for more info on that.)

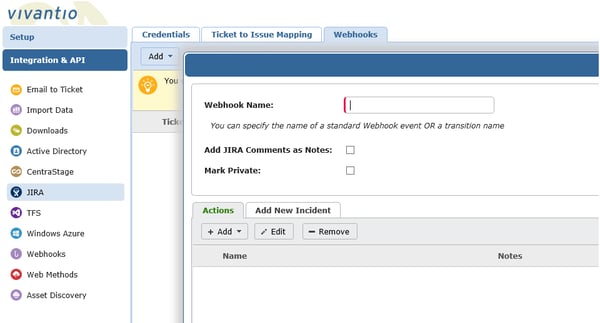
Having done that, you then need to set Vivantio up to listen for that specific event, and decide what actions to take. Back in the JIRA section of the Vivantio Admin Area, select the Webhooks tab, click Add, and choose the type of Ticket you want the Webhook to run for. Completing that step will show you the Add Webhook dialog:

Jira Vivantio Add Webhook

In the name field, you’ll enter either a standard event name (such as ‘issue:updated’) or the name of a transition. For simple integrations, you can then choose to just add the JIRA Comments as Notes–then when the Webhook in JIRA fires, the comments will be added to Vivantio.

If you’re using transitions though, you might want more complicated actions to take place – for example, when an Issue is resolved in JIRA, you might want to change the status of the Vivantio ticket. You can do that using the Actions grid at the bottom of the page.

And there you have it: bi-directional integration between Vivantio and JIRA. If you’re using Vivantio and JIRA, and you don’t yet have them integrated, give it a try, and see how it can help you improve communications between your Service Desk and your development team!
Topics: Customer Center Service Integrations Types of Service Integrations JIRA
1 min read

SIAM Group Test: How It Works and How Vivantio Compares

By Staff Writer on 7/14/16 9:00 AM

LEARN HOW VIVANTIO’S INTEGRATION CAPABILITIES REALLY COMPARE.

When considering possible ITSM tools, one key element to consider is how well each product will integrate with your available resources to provide a seamless IT organization. With so many options out there, it can be difficult to determine what will work best for your team. In order to see how our product compares, Vivantio participated in a SIAM group test that was run by The ITSM Review. The ITSM Review is an IT community that focuses on sharing knowledge about various tools out there that are available to professionals. But, what is a SIAM group test exactly? Let’s explain.


WHAT IS A SIAM GROUP TEST?

SIAM (service integration and management) is a framework for managing multiple suppliers of IT services and integrating them to provide a single, business-facing IT organization.

In other words, SIAM is all about joining all of your IT tools – email, systems monitoring, development tracking, notification services, etc. – into one unified hub, saving your service team time and money while never losing out on important data.


THE RESULTS ARE IN

Vivantio took part in the Group Test and garnered some high praise.

“What really impressed me about Vivantio was their dedication to making life easier for beleaguered Ops and Supplier Managers,” wrote Vawns Murphy, senior ITSM analyst for ITSM Review parent Enterprise Opinions and author of the study. “The use of technology to not only support integration but also automate pre-defined responses to ticket event, really makes this a strong contender in the tools universe.”

“The Vivantio ethos is to deliver flexible, reliable, trusted ITSM software to empower the delivery of service excellence to the customer organisation. From the product demonstration, this ethos was clear to see as the flexibility of the product spans interfaces from everything; from Microsoft to Google,” Murphy goes on to write.

For the full results of the SIAM Group Test, visit The ITSM Review.

Topics: News & Awards Vivantio Service Integrations SIAM
1 min read

PC Magazine Notes Vivantio’s Integration Power

By Staff Writer on 5/12/16 9:00 AM

TECH EXPERTS AT PC MAG TAKE NOTE OF VIVANTIO'S INTEGRATION CAPABILITIES.

If you’re familiar with our platform, you already know that flexibility is a big theme for Vivantio. This theme ties directly into our platform’s approach to integrations. The Vivantio Platform is a workhorse in IT service management in its own right. But, the typical service team may utilize dozens of different tools in day-to-day operations, making it imperative that the Platform work in-sync with all the pieces in your service ecosystem.


LEARN DIRECTLY FROM THE EXPERTS AT PCMAG

PC Magazine published a great piece on taking the Vivantio Platform’s functionality to the next level by integrating with key outside tools.

Read the full story here: 4 Integrations for a More Powerful Vivantio Experience.

Topics: News Vivantio Service Integrations
1 min read

How to Set Up Asset Synchronization

By Andrew Stevens on 1/21/16 9:00 AM

ASSET SYNCHRONIZATION IN VIVANTIO

If you’re running an IT service desk or managed service provider using Vivantio, you’ve probably got some IT assets out there. When your end users log a ticket with you, there’s a good chance that it will relate to one of those assets.

If you’re using an Asset Discovery tool, then you’ve also got a database of those assets somewhere. Asset Synchronization allows your technicians to get all the information they need from that database within Vivantio.


WHAT YOU NEED FOR ASSET SYNCHRONIZATION

You can use the Vivantio API to build your own Asset Synchronization, but there is another way. Depending on where your data is stored, there are a couple of out-of-the-box options available via the Vivantio Integration Services Component.


WHAT IS THE INTEGRATION SERVICES COMPONENT?

The Integration Services Component (ISC) is an application you install on your local network. It is designed to run one of several different types of task that require access to local resources, such as your Asset Discovery database. In terms of tasks available from your ISC, there are quite a few including:

  • Asset Sync (what you will use for Asset Synchronization)
  • Active Directory Sync
  • Scheduled Export

The ISC can be downloaded via the Admin Area in Vivantio. Basic setup can be performed via the installer.


WHAT ASSET DISCOVERY TOOLS CAN I CONNECT TO?

The Asset Sync connects directly to the database used by your chosen Asset Discovery tool. At the time of this post, we have support for:

  • SQL Server
  • SQLite databases

It should be noted that connecting directly to the database has pros and cons, but this allows us to connect with the widest range of tools.

Topics: Customer Center Service Integrations Types of System Integration ISC
2 min read

When and How to Use the Vivantio API

By Andrew Stevens on 11/18/15 9:00 AM

WHEN SHOULD I USE THE VIVANTIO API?

We’d encourage the use of Webhooks and Web Methods wherever possible for a number of reasons such as:

  • You don’t need to write any code.
  • They’re hosted within Vivantio so don’t need to be deployed separately.

But there are a number of situations where the API is the better or only choice. Let’s explain with two most common instances: Integrating with Legacy Systems and Developing Custom Applications.


INTEGRATING WITH LEGACY SYSTEMS

In this case, you’ll be integrating Vivantio with another system that:

  • Doesn’t have an HTTP API (or doesn’t support HTTP Basic Authentication)
  • Isn’t externally accessible
  • Doesn’t support Webhooks to send data to other applications

With this situation, you’ll need to write custom middleware to push data to and pull data from the external system. Our API can help with that.

(It’s worth noting that you might find Webhooks and Web Methods are still useful in this scenario. Webhooks are still the only way to have Vivantio automatically push data out in response to another event. Web Methods can also simplify the code you have to write on your side to interact with Vivantio.)

DEVELOPING CUSTOM APPLICATIONS

In this case, you might be developing your own software and need Vivantio to communicate with it.

For example, Vivantio includes a comprehensive and flexible Self Service Portal, but maybe it doesn’t quite work for you. If you need features available that aren’t supported in the standard SSP, you might want to create your own.

In this kind of scenario or ones similar to it, utilizing our API could be more appropriate.


HOW DO I USE THE VIVANTIO API?

There are two key resources available to help you get started: Code Samples and Documentation and the API Reference.

CODE SAMPLES AND DOCUMENTATION

The best place to start is the API Samples repo on our GitHub page. Here you’ll find:

  • Documentation on the core concepts of the API such as API Design, Authentication and Querying
  • Code samples (Note: currently only in .Net, but we’re working on other languages.)

You can also jump straight to our live samples to see sample applications running.

API REFERENCE

Once you’ve got the basics down and are comfortable working with the API, you can find a complete list of available endpoints and methods in the API Reference.


WHAT CAN YOU DO WITH THE VIVANTIO API?

Quite a lot! Vivantio was developed API-first, so the majority of the functions available within Vivantio are available via the API.

We should note that administrative features are not available in the API and only available in the main GUI.

Topics: Vivantio Customer Center Service Integrations API Integration Tools
7 min read

How to Create Simple Contact Forms with Web Methods

By Andrew Stevens on 11/10/15 9:00 AM

CREATING THE WEB METHOD

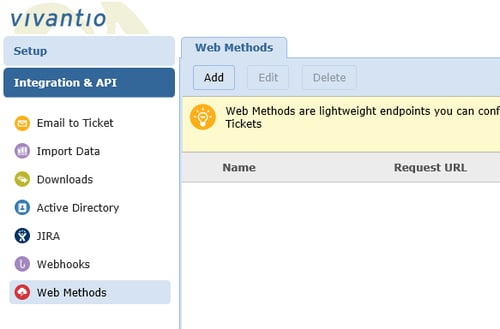
To create a Web Method in Vivantio, log into the platform, open the Admin Area, and go to:

Integration & API » Web Methods

screenshot of web methods admin area

(If you don’t see Web Methods in this menu, please contact our support team.)

When you reach this screen, select the “Add” button. You’ll then get a dialog with a box for you to enter a name and a few sub tabs below to fill in. Submit a name and then move onto the first tab.

BASIC DETAILS

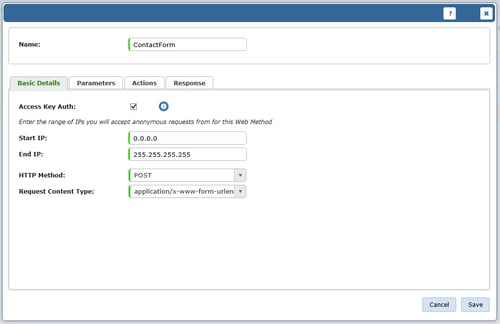
screenshot of add web method basic details

In this example, because we’re going for a simple form POST, we won’t be authenticating.

So, select Access Key Auth, and enter the IP range of the web server(s) that will host the form.

(Note: We’ve gone for 0.0.0.0 and 255.255.255.255 in our example. Don’t do that in practice!)

The other options on this tab are:

  • HTTP Method
  • Request Content Type

As this is a web form we’re dealing with, you will want to select ‘POST’ and ‘application/x-www-form-urlencoded’ respectively.

PARAMETERS

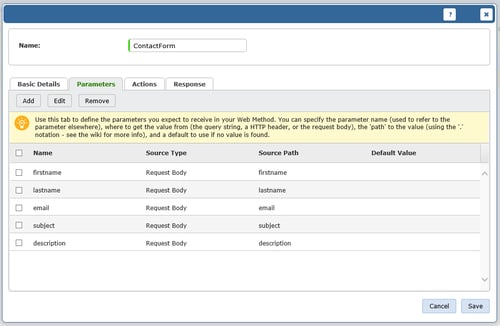
screenshot of vivantion add web wethod parameters

You can add as many parameters as you like, depending on how complicated you want your form to be.

In this example, we’ve kept it simple with:

  • First Name
  • Last Name
  • Email Address
  • Subject
  • Description

They are all configured in the same way.

ACTIONS

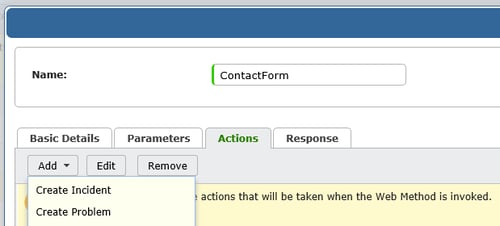
In this example, we want to create a Ticket when the Web Method is called. So, on the Action tab, choose

Add » Create Incident

(Note: You can use whichever of your Ticket Types is more appropriate for the situation.)

screenshot of vivantio add web method actions

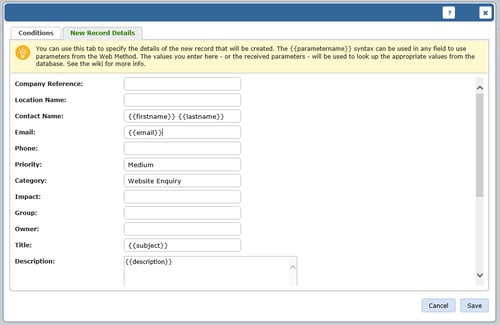
After you’ve selected your Action, you will get a popup with two tabs: Conditions and New Record Details.

In this example, we want a Ticket to be created every time the Web Method is called. So, we will leave the Conditions tab empty and move onto New Record Details.

screenshot of vivantio add web methods 2

In this example, you can see we’re using to pass our parameter values into the Ticket Details.

You’ll also want to note though that we’ve put some literal values in for the Priority and Category. In our example, we want these set for every contact form submission, but we don’t want the user to choose them, so we’re specifying fixed values.

RESPONSE

When you’re setting up the Response, you can configure up to three options:

  • Response Type – For this field, you have the choice between Content or Redirect. Content allows you to specify content to be returned to the user as part of the Response Body. Redirect let’s you send them to a specific website with a 302 redirect.
  • Response Content Type – For this field, you have the choice between JSON, XML, or Text/HTML. This field is only available when you select the Content option for the Response Type field. It will inform the user of the Web Method which data type to expect in return.
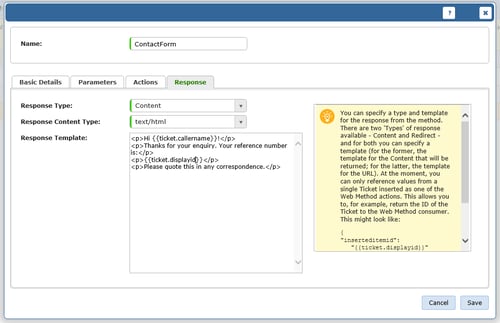
  • Response Template – This field allows you to enter the actual response you would like to send: either the content or the redirect URL. If your Web Method contains a “Create Ticket” action, you can use to refer to properties from the created ticket within the response template such as {{ticket.displayid}} to get the ID of the inserted ticket.

For our example, we’re going to set up a Content Response using the Content Type “Text/HTML” that shows a basic “Thank You” message and refers to the Ticket ID.

screenshot of add web method response

After you hit the “Save” button, you’ll be shown the unique URL for your Web Method.

screenshot of vivantio web method URL


CREATING THE CONTACT FORM

When creating the form, the things you need to know are:

  • The form method should be “POST”.
  • The form action should be the Web Method URL you noted earlier.
  • When you’re setting the names of your form inputs, they should match the names of the parameters you added earlier.

Here’s a sample form below that is ready to use apart from the action URL on the form:

<!DOCTYPE html>

<html lang=”en”>

<head>

<meta charset=”utf-8″>

<meta http-equiv=”X-UA-Compatible” content=”IE=edge”>

<meta name=”viewport” content=”width=device-width, initial-scale=1″>

<title>HTML Form &raquo; Web Method Example</title>

<link href=”https://maxcdn.bootstrapcdn.com/bootstrap/3.3.5/css/bootstrap.min.css” rel=”stylesheet”>

<!–[if lt IE 9]>

<script src=”https://oss.maxcdn.com/html5shiv/3.7.2/html5shiv.min.js”></script>

<script src=”https://oss.maxcdn.com/respond/1.4.2/respond.min.js”></script>

<![endif]–>

</head>

<body>

<div class=”container”>

<div class=”row”>

<div class=”col-lg-6 col-offset-lg-3″>

<form method=”POST” action=”YOUR WEB METHOD URL HERE”>

<div class=”form-group”>

<label for=”firstname”>First Name</label>

<input type=”text” class=”form-control” id=”firstname” name=”firstname” />

</div>

<div class=”form-group”>

<label for=”lastname”>Last Name</label>

<input type=”text” class=”form-control” id=”lastname” name=”lastname” />

</div>

<div class=”form-group”>

<label for=”email”>Your Email Address</label>

<input type=”email” class=”form-control” id=”email” name=”email” />

</div>

<div class=”form-group”>

<label for=”subject”>What can we help with?</label>

<input type=”text” class=”form-control” id=”subject” name=”subject” />

</div>

<div class=”form-group”>

<label for=”description”>Any additional details?</label>

<textarea class=”form-control” id=”description” name=”description” rows=”10″>


(Note: You’ll note that we’ve referenced Bootstrap in this sample. You do not have to do that and can use whatever UI framework you like.)

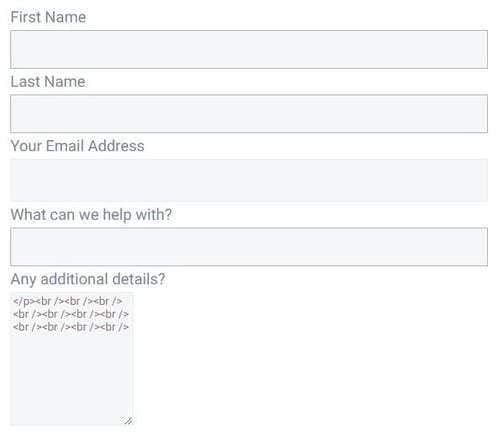
Here’s what the sample form would look like in practice:

vivantio web method form sample

Using the code, you can publish the form to your website. After a user fills in and submits the form, a Ticket will be created via the Web Method. The user will then see the content configured on the Web Method Response.

Topics: Customer Center Service Integrations Types of System Integration API Integration Tools WebMethods