Demo
2 min read

Vivantio's New Integration with Microsoft Power BI

By Staff Writer on 11/12/21 11:13 AM

As a provider of a Unified Service Management Platform, Vivantio allows you to seamlessly switch on integrations with virtually any other essential business application for a holistic view of your customers. Whether it’s JIRA, Active Directory or, as we will show you today, Microsoft Power BI, you can easily use these tools in concert with each other to get the data your team needs.

BUSINESS INTELLIGENCE

Using real-time data to achieve true continuous improvement is an integral part of any service management solution. These reports allow you to make informed decisions about your day-to-day activity, future planning, and evaluation of performance. Vivantio offers both custom dashboards as well as a robust built-in reporting tool within the solution alongside an out-of-the-box integration with Microsoft Power BI that allows you access to even more interactive visualizations and business intelligence capabilities.

GETTING STARTED

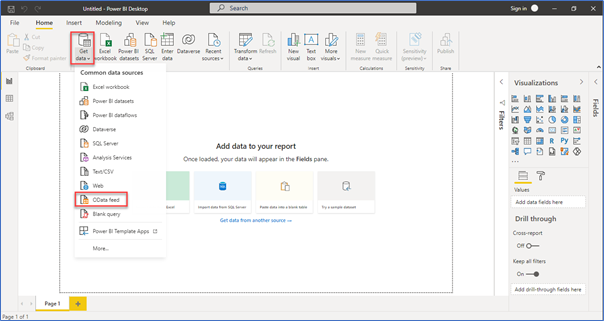
From Power BI, you can connect with the Vivantio OData Feed.

powerbi

All you need to do is specify the URL of your Vivantio instance.

powerbi1

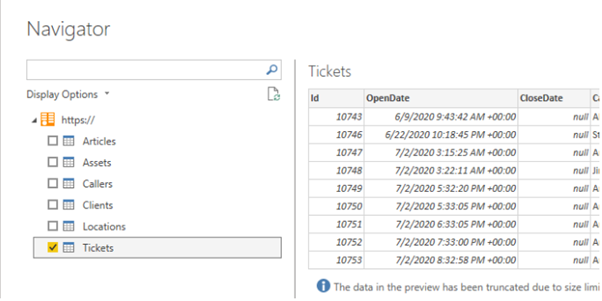
Once connected, you can select the data items in Vivantio that you wish to include in your Power BI reports.

powerbi2

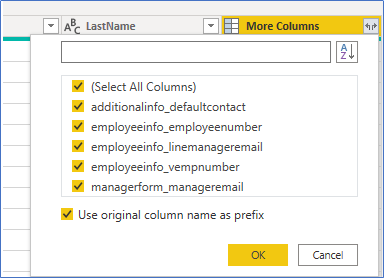
You also have the opportunity to bring data from your custom fields into Power BI.

powerbi3

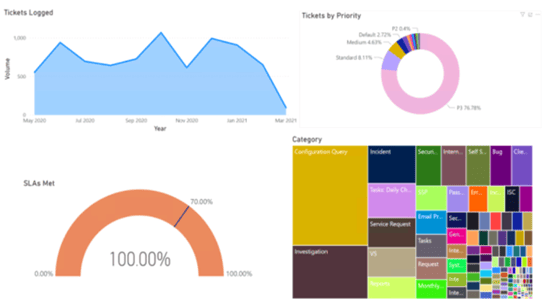
Once connected, Power BI will load your Vivantio data set and you can start building reports and dashboards using the full functionality of Power BI.

powerbi4

If your organization uses Power BI and you don’t have it integrated with Vivantio yet, give it a try and take advantage of the full power of your service management solution!

LEARN MORE

If you would like a quick demo or consultation on how Vivantio can empower your teams to elevate your customer experience, contact us below.

FREE DEMO

Topics: Service Integrations Types of Service Integrations Power BI
9 min read

How to Integrate Vivantio with Microsoft Teams

By Staff Writer on 2/9/21 9:00 AM

INTRODUCTION

In every company, it is crucial to have effective, efficient communication, such as the ability to alert your team about new urgent issues, or let a customer know you’ve responded. Thanks to API integration and webhooks, Vivantio makes sending messages to applications such as Microsoft Teams from your department easy. If your organisation uses Slack instead, you can find a tutorial on sending out communication from Slack here.

This tutorial will show you how to configure this in Microsoft Teams and provides two examples of using notifications in the Vivantio platform. Please note that Microsoft Teams transitioned to a new webhook URL format to enhance security on January 11, 2021. If you've configured this integration prior to that date, there are new set-up instructions included at the end of this blog for Step 7.  

To connect Vivantio to Microsoft Teams, you’ll need:

  1. Vivantio ITSM
  2. Admin access to your Vivantio Instance
  3. Permissions in MS Teams to create, update and remove connectors for the Team you wish to post to


CONFIGURATION IN MS TEAMS

Step 1:

Begin by logging into Microsoft Teams (MS Teams). You will then go to:

Your teams » Click on the channel within MS Teams you want to send notifications to » More options » Connectors
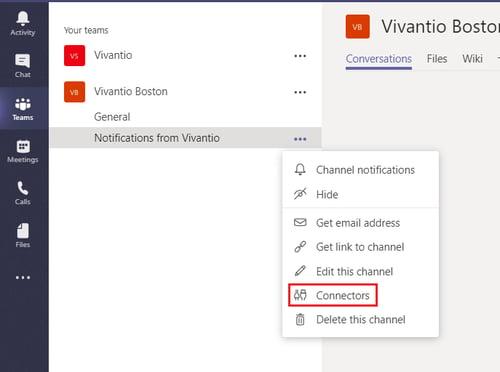
MS Teams Vivantio connectors detail

Step 2:

If it’s not already installed for the selected MS Teams group, add and install Incoming Webhook. Otherwise, configure Incoming Webhook.
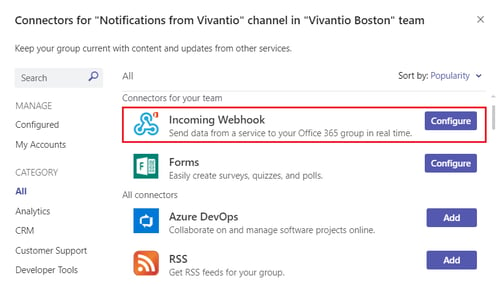
configure webhook 1 detail

Step 3:

Enter a name for your webhook (this will be the username associated with messages sent into MS Teams), upload a custom image if desired, and select Create.
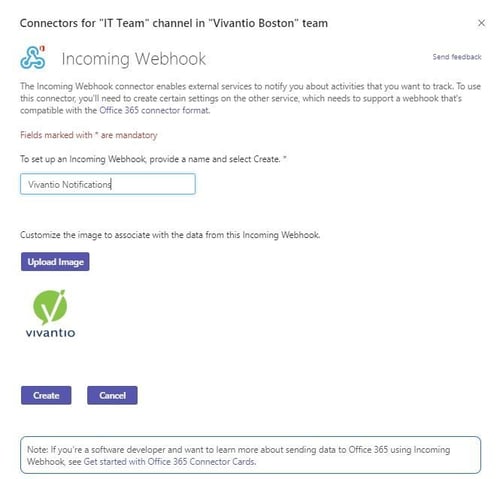
Connectors 1 detail

Step 4:

Next, copy the URL that is created, circled in red below. This will later be used to set up the webhook in Vivantio.
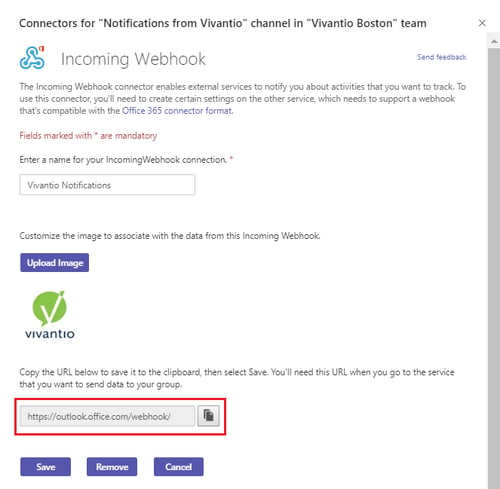
Copy URL 1 detail


CONFIGURATION IN VIVANTIO

Step 5:

Log into Vivantio, open the Admin Area. Navigate to:

Integration & API » Webhooks » Add Webhooks

Then select the ticket type you want the webhook to be available for.
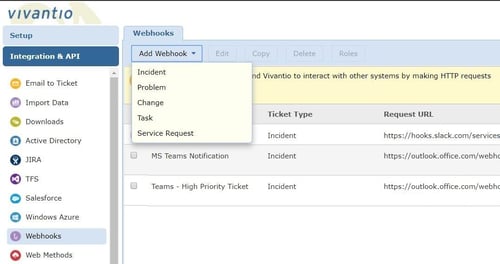
add webhook 2 detail

Step 6:

Enter a name for your webhook.

Step 7:

Next, navigate to the Basic Details tab and enter the following information (please refer to the Update at the end of this blog if you configured this integration prior to January 11, 2021):

  • Request URL: Paste here the URL produced when you configured the incoming webhook in MS Teams.
  • HTTP Method: POST
  • Response Content Type: text/html

Step 8:

This next step, filling out the parameters tab, is optional. Set up parameters for the webhook by selecting Add. These are either values the technician will be prompted to complete, or populated automatically from the ticket. In this example, we have created a multi-line text field for a technician to enter the message that they wish to send into MS Teams.
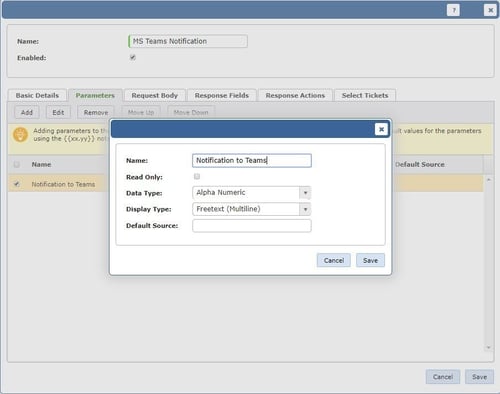
Parameters tab

Step 9:

Now, fill out the Request Body tab.

For the Request Content Type field, select application/json. The Body Template will contain the information you wish to send in MS Teams notification, such as specific text, details from the ticket or a webhook parameter. Screenshots from the Request Body of two example webhooks are given below.

Example 1:

A notification message sent into Teams that utilizes the webhook Parameter we created in the previous step.
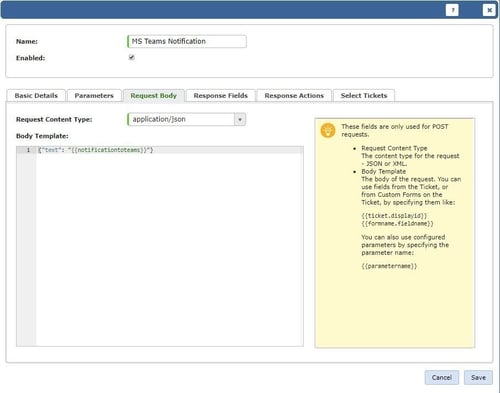
request body detail

{"text": ""}

Example 2:

A notification sent into Teams that includes details from the ticket. In this case, we use fields from the ticket. The “\n\n” signifies a line break. Note that Steps 1 through 8 were followed to create another webhook “Teams – High Priority Ticket.” Once the Request Body is filled in, click save.
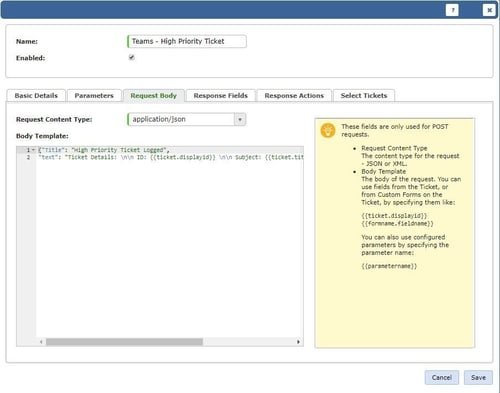
Microsoft Teams request body high Priority

{"Title": "High Priority Ticket Logged",
"text": "Ticket Details: \n\n ID: {{ticket.displayid}} \n\n Subject: {{ticket.title}}
\n\n Caller Name: {{ticket.callername}}"}

Step 10:

The last step before we can use our new webhook is to configure its roles. By default, there will be no roles assigned to the webhook. To update the roles, select the webhook and click Roles. Drag the roles you want the webhook available for into Current Roles.
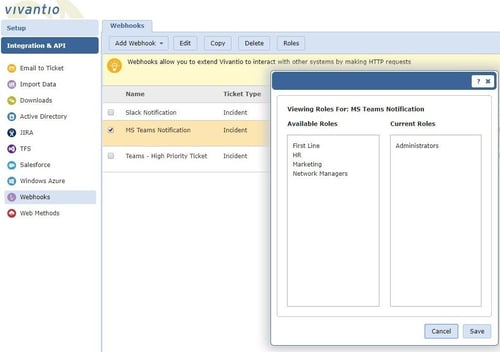
roles 1 details

Now let’s put the webhooks we set up into action!

You can use your webhook to send ad hoc notifications into MS Teams directly from a ticket window or you can execute your webhook through Trigger Rules. Two examples are given below:

Example 3:

An ad hoc message sent into MS Teams from a Vivantio ticket window

Actions » MS Teams Notification
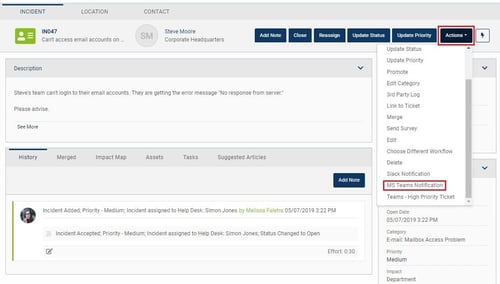
notification from ticket window

The technician is prompted to fill in the “Notification to Teams” parameter we set up in the webhook. Recall that this webhook was configured so that the text entered here will be sent into MS Teams.
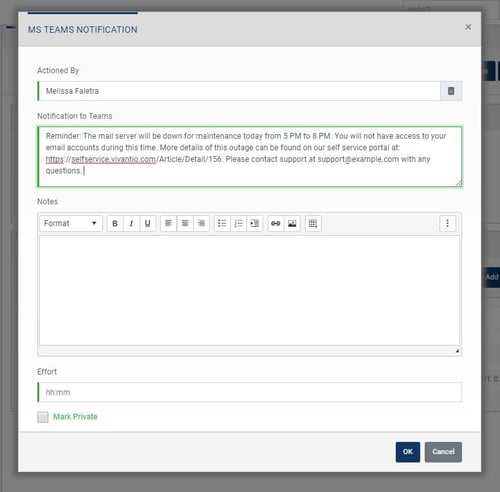
screenshot of notification message

Press OK and voila! This message is sent into MS Teams.
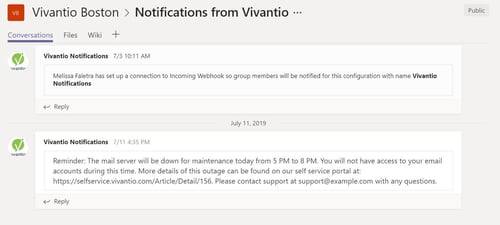
screenshot of notification message from vivantio 2

Example 4:

Sending a notification to an IT team’s channel in MS Teams any time a high priority ticket is logged.

In this case, you can set up a trigger rule to automatically execute the webhook when a high priority ticket is logged. Go to:

Admin area » System Areas » Select the ticket type you created the Webhook for
» Business Rules » Trigger Rules

To add a trigger rule, click Add, then:

• Enter a Rule Name and select when the condition is to be executed, either when the ticket first meets the condition (for example, if you just want people to know the ticket was created) or when the matching ticket is updated (if you want everyone to see all updates to the ticket).

• Enter the condition(s) for the trigger. In this example, the trigger rule condition is for tickets with the priority name equal to “high.”
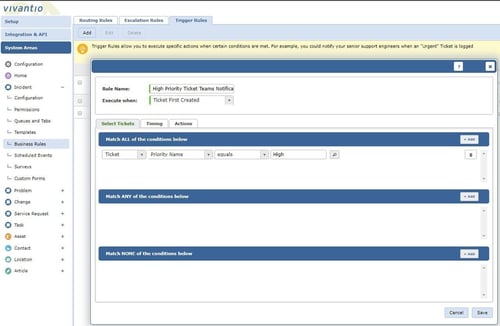
screenshot of trigger rule set up

For the trigger rule “Actions” select

Webhooks » Webhook you want to fire; in this case, we chose

Teams – High Priority Ticket » Save
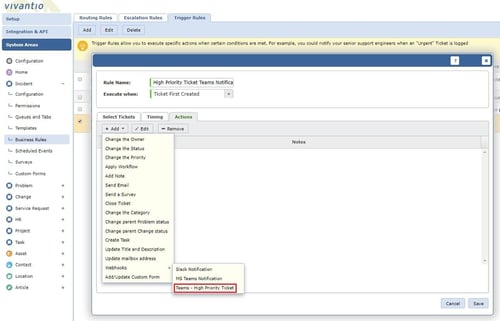
screenshot of trigger rule action

Once the trigger rule is set up, the “Teams – High Priority Ticket Webhook” will automatically send a notification with ticket details into MS Teams any time a “High Priority” ticket is logged.
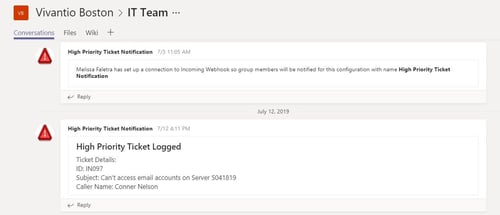
screenshot of high priority notification in MS teams

CONCLUSION

There you have it! Now you can easily communicate to any team in MS Teams directly from Vivantio.

Update (as of January 11, 2021):

This step is for anyone who configured this integration prior to January 11, 2021. On this date, Microsoft Teams transitioned to a new webhook URL format to enhance security. You will need to update your webhook URL from within Microsoft Teams and copy the new URL into the webhook within Vivantio (Step 7).

To update your webhook URL within Teams, navigate to your webhook:

Your Teams >> Click on the channel your webhook is configured on >> More options >> Connectors
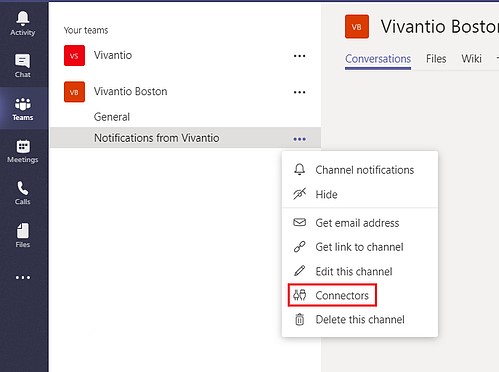
teams-connectors

Select Configured. Find your webhook and select Manage.
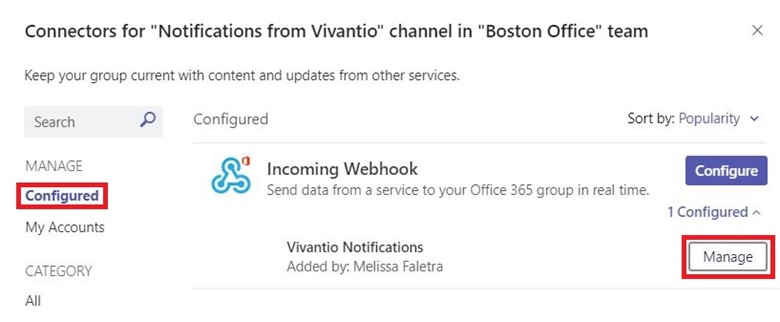
configure-webhook

If your webhook URL needs to be updated, an "Update URL" button will appear to the right of the URL. Select Update URL.
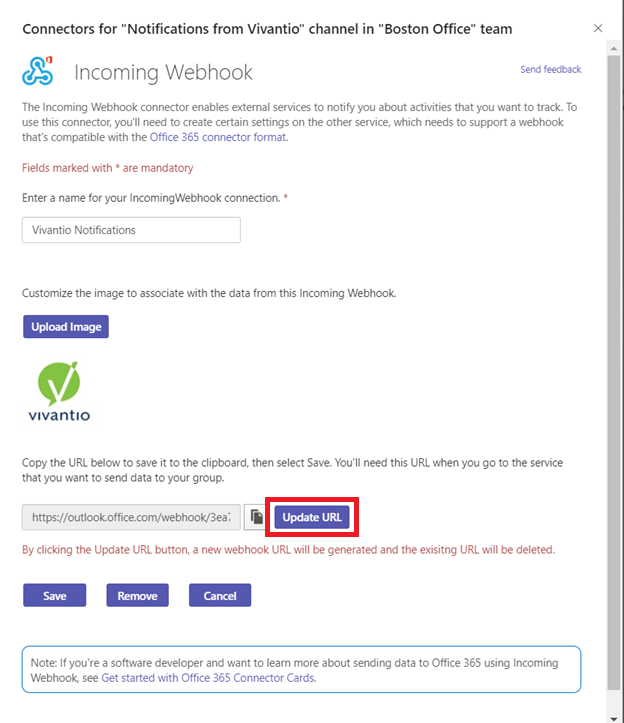
incoming-webhook-notification

Once your URL is updated, it will say "URL is up-to-date" below the URL. Copy the new URL into your webhook within Vivantio (Step 7).

Topics: Vivantio Customer Center Types of Service Integrations API Integration Tools WebMethods Microsoft Teams Integration
7 min read

How to integrate Vivantio with Azure DevOps

By Melissa Faletra on 7/13/20 2:33 PM

Azure DevOps–formerly named Visual Studio Team Foundation Server (TFS)–is a Microsoft product that allows developers to plan work, collaborate on code development and build and deploy applications. If your development teams are using Azure DevOps, integrating it with your service desk software can provide the following benefits:

  • Create bugs directly from Incidents or Tickets
  • Create Product Backlog Items from Service Requests or Change Requests

Vivantio includes an out-of-the-box, two-way integration with Azure DevOps, making it simple to have open communication and visibility between your support and development teams.

Our Azure DevOps integration helps you streamline your processes and keep everyone informed of what is going on, regardless of which tool they work in day-to-day, so there's no need for your developers to log into Vivantio, and no more phone calls to the development team to check on the status of bugs!

This tutorial will show you how to configure the integration and provides an example of creating a Work Item in Azure DevOps directly from Vivantio.

To connect Vivantio to Azure DevOps, you’ll need:

  1. Vivantio ITSM
  2. Admin access to your Vivantio Instance
  3. Credentials to a user account for Vivantio in Azure DevOps


CONFIGURATION IN VIVANTIO

Step 1:

Log into Vivantio, open the Admin Area. Navigate to:

Integration & API >> TFS

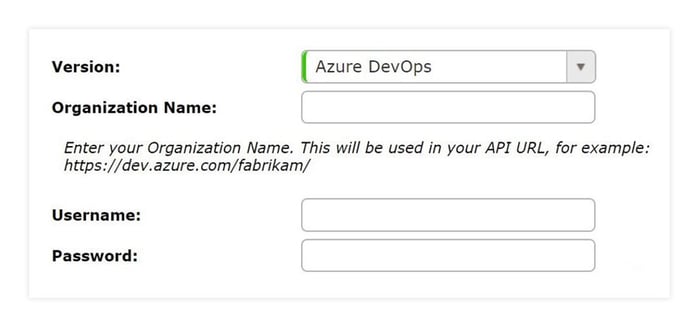
Fill in your Azure DevOps login credentials:

  • Version: Azure DevOps
  • Organization Name: Enter your organization name. This will be used in your API URL, for example: https://dev.azure.com/OrganizationName/
  • Username: The username for the Vivantio user account in Azure DevOps
  • Password: The Personal Access Token for the Vivantio user account in Azure DevOps. For details on creating a Personal Access Token, see the Microsoft Documentation here.

DevOps CredentialsThe bottom of the screen will update to show a couple of different URLs: the Work Item Alert URL and the Service Hook URL. You will use the Service Hook URL to set up Azure DevOps to send information back into Vivantio.
work item alerts

Step 2:

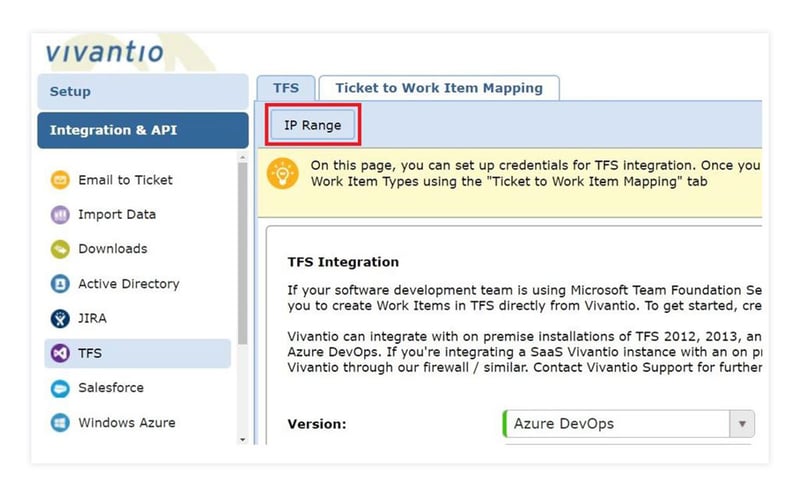
Select IP Range in the top left corner of the screen and configure the IP Range for Vivantio to accept requests from.

Azure DevOps Credentials

Step 3:

Configure your ticket to Work Item Mapping settings. This allows you to control which types of Vivantio Tickets can be mapped to which types of Azure DevOps Work Items so that the correct type of information can be transferred to the correct type of records. Any number of necessary ticket-to-work item mappings can be configured.

Navigate to the Ticket to Work Item Mapping tab and select Add.

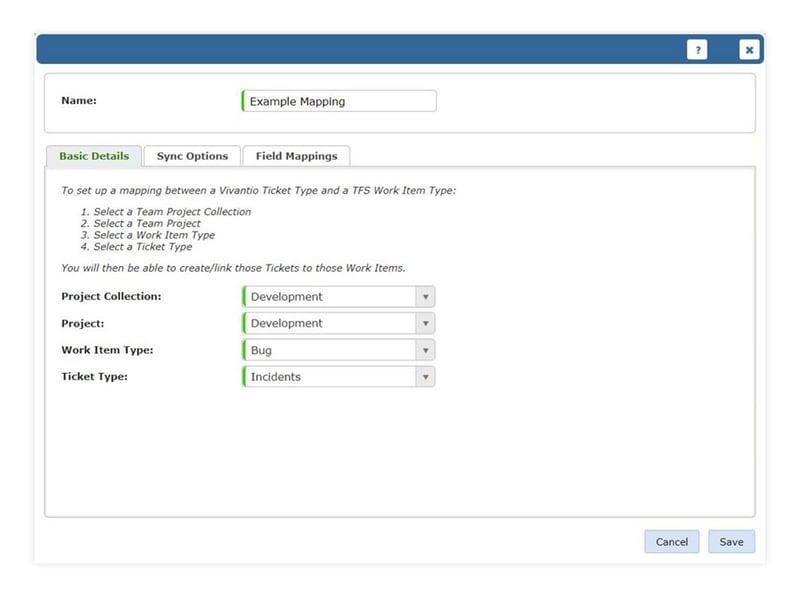
On the Basic Details tab, give the mapping a name and fill in the following information:

  • Project Collection: The Project in Azure DevOps (If you’re using the hosted version of Azure DevOps, there will normally only be one option available here)
  • Project: The Project in Azure DevOps
  • Work Item Type: The Work Item Type in Azure DevOps
  • Ticket Type: The type of ticket within Vivantio that you want to create the Work Item from

basic details tab

Step 4:

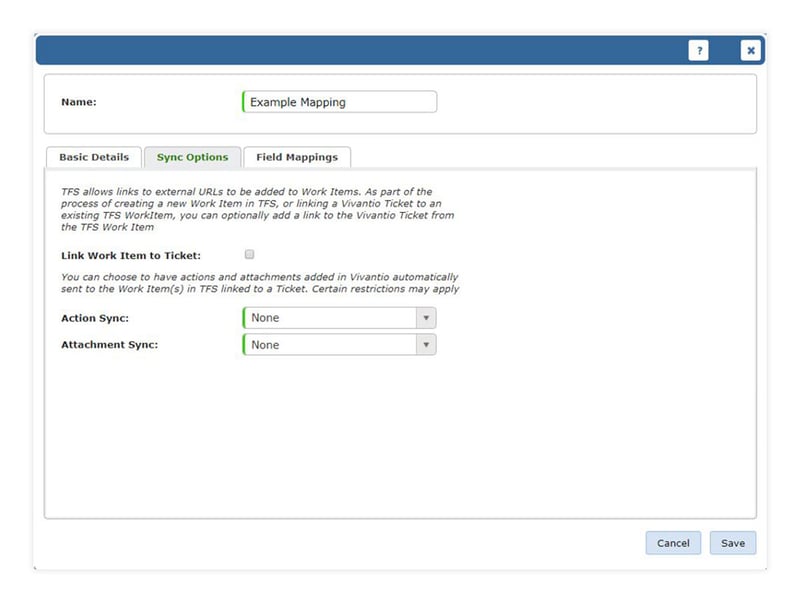
Navigate to the Sync Options tab. Here you can configure the settings relating to the sync of data from Vivantio to Azure DevOps. (Note that this option does not force Azure DevOps to update Vivantio–that is configured within Azure DevOps itself). You have the option to fill in the following fields:

  • Link Work Item to Ticket: Checking this box will create a link to the Vivantio ticket from within the Azure DevOps ticket
  • Action Sync: Selecting “All” or “Non Private” will automatically sync all (or only non-private) actions made in Vivantio to the “Discussion” section within the Work Item in Azure DevOps
  • Attachment Sync: Selecting “All” or “Non Private” will automatically sync all (or only non-private) attachments added in the Vivantio ticket to the “Attachments” section within the Work Item in Azure DevOps

sync options

Step 5:

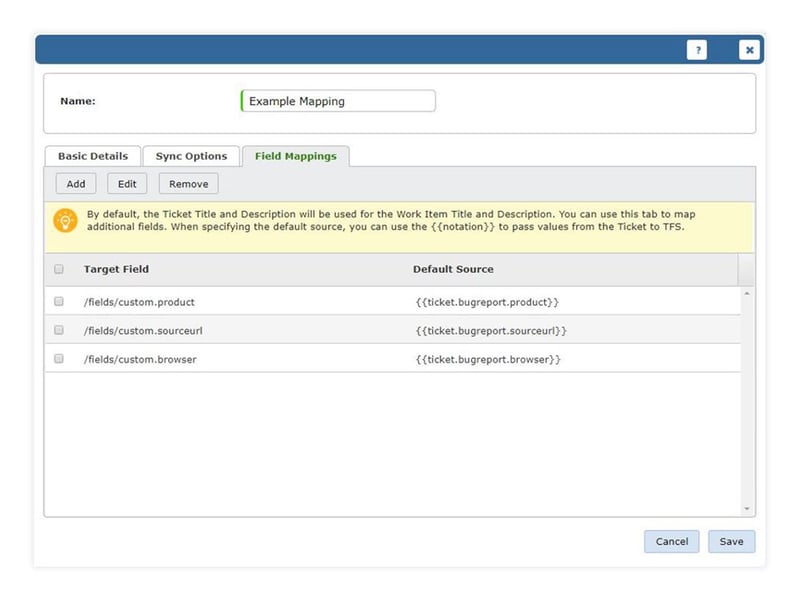
Select the Field Mappings tab and configure any additional field mappings. As standard, Vivantio will populate the Work Item Title and Description. If you want to add additional mappings, e.g., for custom fields, you can do so here. You can also choose to override the default mappings for Title and Description.

In the example below, we chose to map several custom fields from Vivantio to Azure DevOps.

field mappings

After choosing the appropriate options, hit Save, and you’re ready to start creating Azure DevOps Work Items directly from Vivantio.


CREATING A NEW WORK ITEM FROM VIVANTIO

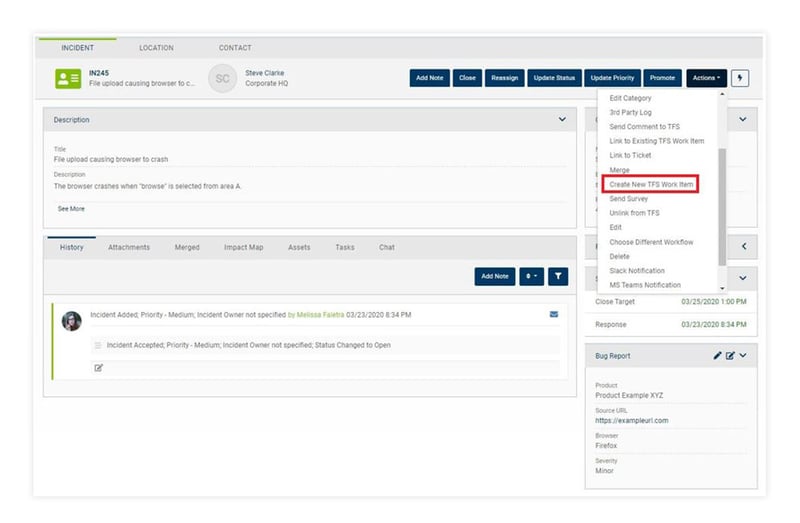
When viewing a Ticket in Vivantio, under the Actions menu item, you’ll see the option to “Create New TSF Work Item.”


create work item

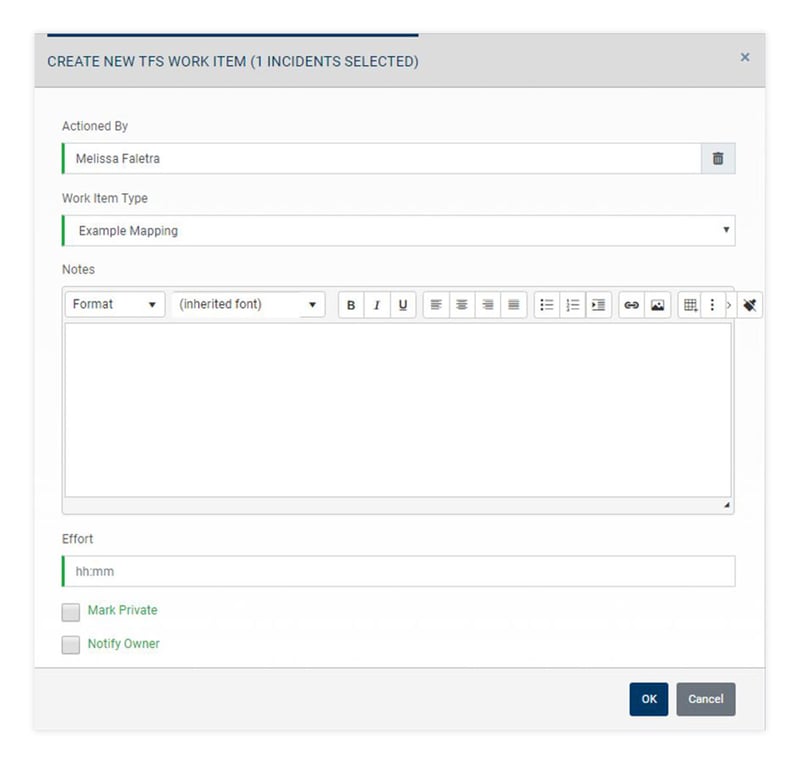
Selecting Create New TFS Work Item will open a pop-up window where you can select the Work Item Type. Any mappings created for the ticket type, using steps 3 through 5, will appear as options.create work item pop upSelecting OK will cause a TFSForm to appear in the Vivantio Ticket Window and a Work Item to be created in Azure DevOps.

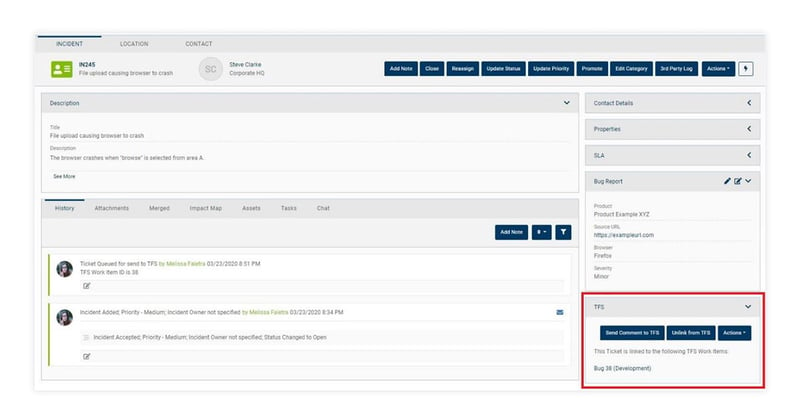
DevOps form in ticket windowThe TFS form provides a direct link to the Work Item in Azure DevOps and provides the technician with the options to unlink the Vivantio ticket from the DevOps Work Item and to send ad-hoc comments and attachments to DevOps, which can be useful if you didn’t choose to automatically sync actions.

Clicking on the link to the Work Item in DevOps, we can see that the Work Item was created and the mapped fields were passed from the Vivantio Ticket to the Work Item.

DevOps ticket example


CONFIGURATION IN AZURE DEVOPS

Getting Information Back From Azure DevOps

Configurations can be made in Azure DevOps to automatically send information from DevOps into Vivantio. This is done using the Service Hook that was create in Step 1.

Step 6:

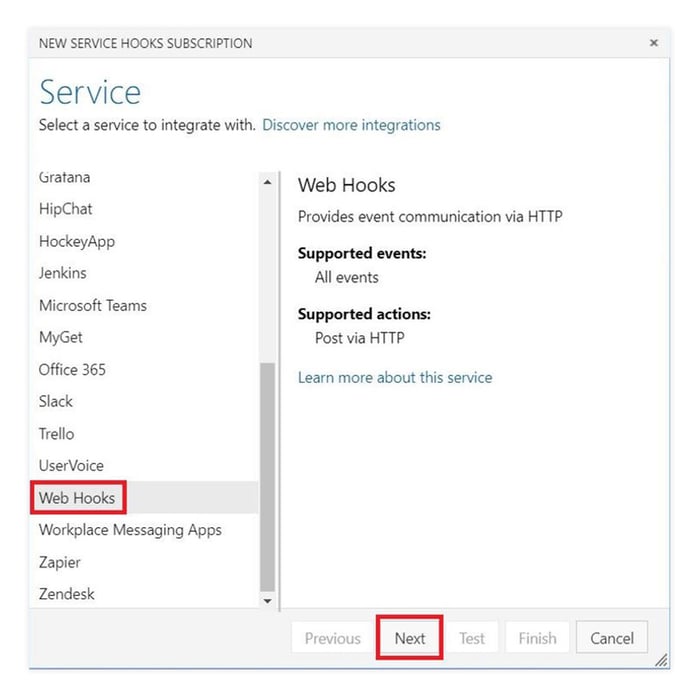
To configure the Service Hook in Azure DevOps, navigate to Service Hooks within Project Settings in Azure DevOps (Microsoft’s documentation on Service Hooks can be found here). On the first page of the Create Service Hook wizard, you’ll choose the Webhooks option and select Next:

new service hooks subscription

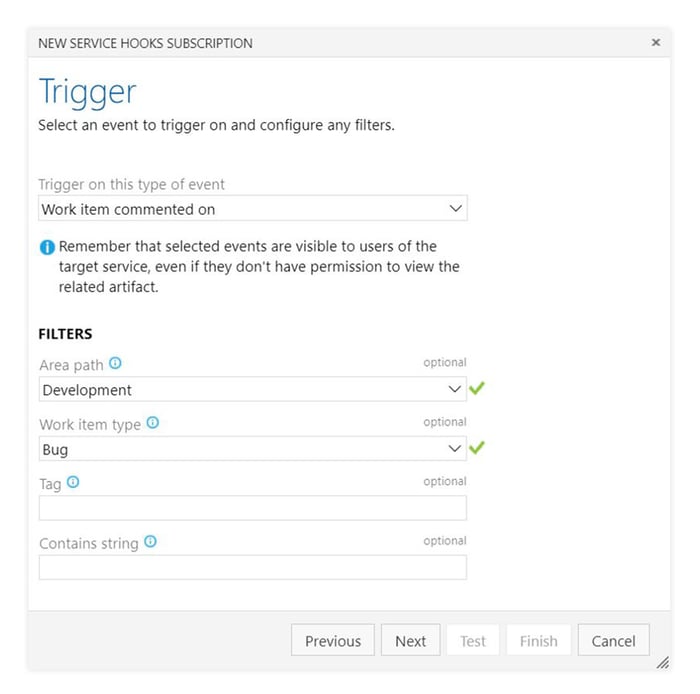
On the next page of the wizard, you’ll choose the type of event the Service Hook triggers on. Vivantio currently supports “Work Item Commented On” and “Work Item Updated.” Enter any filters you want for the area or work item type.

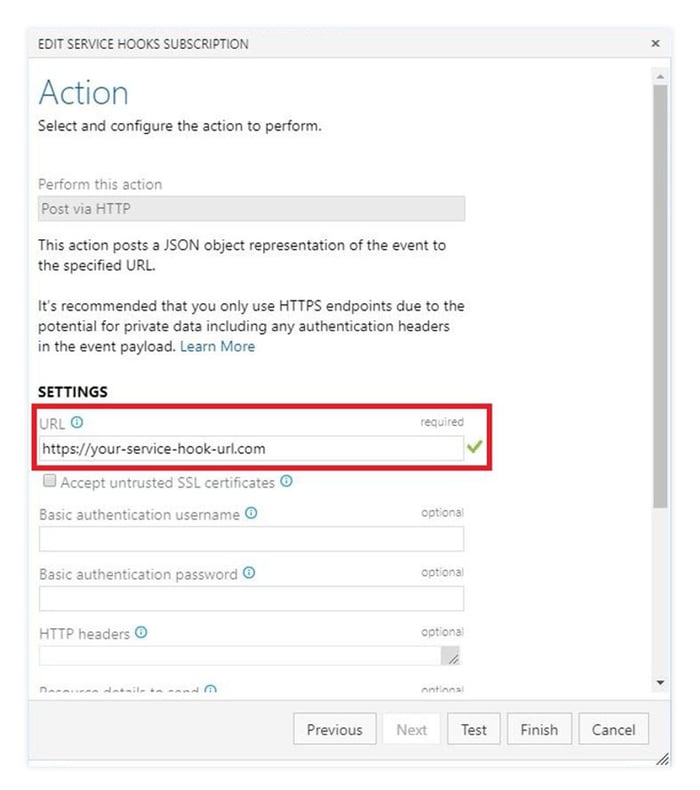
new service hooks triggerSelect and configure the action to perform with the service hook. Under URL,” paste your service hook from Step 1. Scroll to the bottom of the page and select [Latest]for Resource Version.

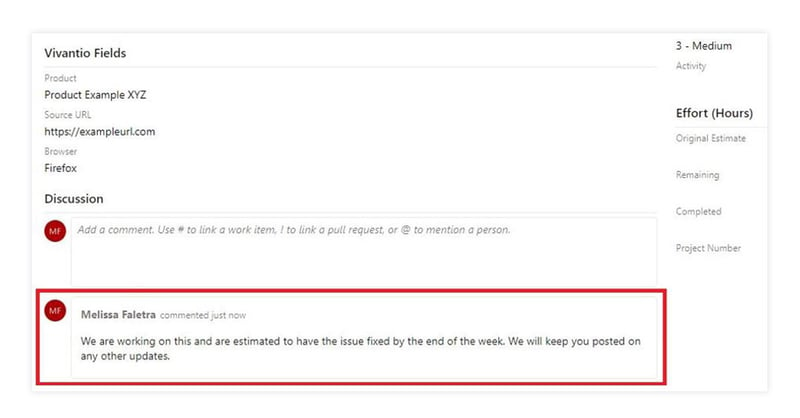
service hook subscription actionNow when we comment on Work Items in Azure DevOps...

comment in devops

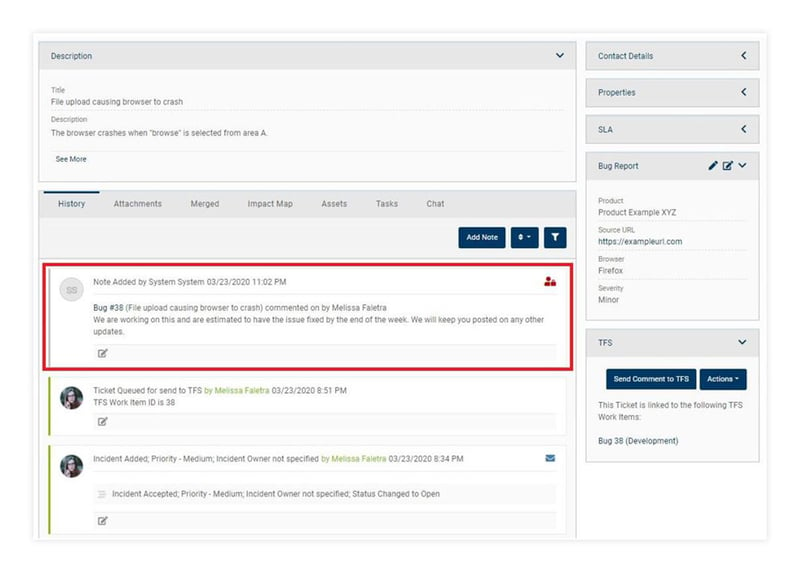
...the comment is automatically added to the linked Ticket’s history in Vivantio:

comment in vivantio from devopsAdditional configurations can be made in Azure DevOps using Webhooks to automatically update fields in Vivantio based on updates in Azure DevOps.

If you’re using Vivantio and Azure DevOps and you don’t have them integrated yet, give it a try and see how it helps improve communications between your service desk and your development team.

Topics: Service Management Vivantio Customer Center System Integration Methods Types of Service Integrations API Integration Tools
7 min read

How to Integrate Microsoft Team Foundation Server (TFS) with Vivantio

By Andrew Stevens on 9/26/17 9:00 AM

PREREQUISITES

In order to connect Vivantio to TFS, you’re going to need:

  • Admin access to your Vivantio instance
  • Admin access to your TFS instance
  • A user account in TFS for Vivantio
  • The IP address(es) for your TFS servers

BASIC CONFIGURATION

Step 1:

Log in to Vivantio, open the Admin Area, and select TFS under the Integration & API heading on the left menu:

TFS Credentials Empty

The first screen you’ll see will prompt you for the version of TFS you’re using, and the credentials to use.

  • If you’re using TFS 2012/13, or 2015, enter a username and password.
  • If you’re using TFS 2017 or VSTS, enter a username and a Personal Access Token. For details on creating a PAT, see the MSDN documentation here.

Having entered those and hit the ‘Save’ button.

Step 2:

The bottom of the screen will update to show a couple of different URLs: the Work Item Alert URL, and the Service Hook URL:

TFS Credentials Populated

You’ll use one of these URLs when you set TFS up to send information back into Vivantio. We’ll get more into that later. But, while you’re here, you should configure the IP Range for Vivantio to accept requests from, using the ‘IP Range’ button in the menu bar:
Jira IP range buttonJira IP range dialogue

Having configured those, you can move on to the next tab, Ticket to Work Item Mapping.


TICKET TO WORK ITEM MAPPING

You can control which types of Vivantio Ticket can be mapped to which types of TFS Work Item by setting up Ticket to Work Item Mappings. This prevents the wrong type of information being transferred or the wrong type of records being created.

Team Foundation Service Ticket To Work Item Mapping Empty

When creating a Ticket to Work Item Mapping, you’ll be prompted for a number of different things:

  • Project Collection – The Project Collection in TFS
  • Project – The Project in TFS
  • Work Item Type – The Work Item Type in TFS
  • Ticket Type – The type of Ticket within Vivantio

These control the basics of the mapping. On the next tab, Sync Options, there are settings relating to the sync of data between:

Team Foundation Server Ticket To Work Item Mapping Empty Sync Options

You can configure Vivantio to automatically send updates to TFS when the Vivantio Ticket is updated. (Note: This option does not force TFS to update Vivantio. That has to be configured within TFS itself.)

Finally, you can add additional field mappings:

Team Foundation Server Ticket To Work Item Mapping Empty Field Mappings

As standard, Vivantio will populate the Work Item Title and Description; if you want to add additional mappings, e.g. for custom fields, you can do so here.

After choosing the appropriate options, hit ‘Save’, and you’re ready to start creating TFS Work Items.


CREATING A NEW WORK ITEM

When viewing a Ticket in Vivantio, under the “More…” menu item, you’ll see the option to “Create New TFS Work Item”:

Jira Create New Jira Issue Menu Item 1

Clicking that button will bring up the “Create New TFS Work Item” dialog:

Team Foundation Service Create New Work Item Dialog Empty

You can optionally enter Notes for the Vivantio Ticket History, then hit ‘Save’ to create the TFS Work Item. After a short period of time, you’ll see a TFS tab appear on the Ticket Details:

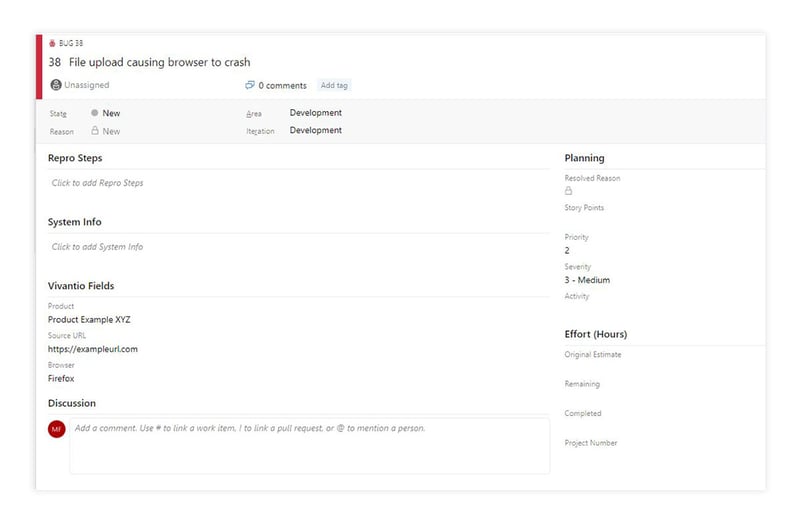
Team Foundation Service Ticket Details Tfs Sub Tab

That includes a link to view the Work Item in TFS, along with options to unlink the ticket from TFS, or to add a direct comment to the TFS Work Item, which can be useful if you didn’t choose to automatically sync actions.
 

GETTING INFORMATION BACK FROM TFS

The next step in the process is getting information added to TFS sent into Vivantio. This is done using one of two mechanisms, depending on what version of TFS you’re using:

  • Work Item Alerts (TFS 2015 or earlier)
  • Service Hooks (TFS 2017 / VSTS)

The configuration is pretty similar either way.

Creating a Work Item Alert

(The Microsoft documentation on Work Item Alerts can be found here.)

Work Item Alerts are the ‘older’ of the two mechanisms that can be used for TFS to update Vivantio. If you’re using a version of TFS that supports Service Hooks, we suggest you use those instead. However, if you do want to use Work Item Alerts, you can do so easily.

You can follow the instructions in the MS documentation to configure the basics of the Work Item Alert – which work items the alert is for, and when. The main difference is that rather than having the alert delivered to an email address, you’ll select the ‘SOAP’ option, and enter in your Work Item URL:

Team Foundation Server TFS Create Work Item Alert

TFS will then send a HTTP request to Vivantio when the alert fires, and Vivantio will add the details of the update as a Note on the ticket.

Creating a Service Hook

(The Microsoft documentation on Service Hooks can be found here.)

Service Hooks are a newer feature within TFS–introduced in TFS 2015. We don’t currently have Vivantio listed within TFS as a dedicated option, so on the first page of the Create Service Hook wizard, you’ll choose the “Webhooks” option:

Team Foundation Server New Service Hook Step 1

On the next page of the wizard, you’ll choose the type of event the Service Hook triggers on:

Team Foundation Service New Service Hook Step 2

Right now, we only support Work Item Commented On and Work Item Updated, but we’re working on introducing support for other events soon. Enter any filters you want for the area or work item type, then move on to the last step:

Team Foundation Server New Service Hook Step 3

All you need to do here is add your Service Hook URL, then click Finish. TFS will then start sending updates on Work Items back in to Vivantio.

If you’re using Vivantio and TFS, and you don’t yet have them integrated, give it a try, and see how it can help you improve communications between your Service Desk and your development team!

Topics: Customer Center Service Integrations Types of System Integration Microsoft Teams TFS Integration Types of Service Integrations
6 min read

How to Integrate JIRA with Vivantio

By Andrew Stevens on 9/26/17 9:00 AM

PREREQUISITES

In order to connect Vivantio to JIRA, you’re going to need:

  • Admin access to your Vivantio instance
  • Admin access to your JIRA instance
  • A user account in JIRA for Vivantio
  • The IP address(es) for your JIRA servers

BASIC CONFIGURATION

Step 1:

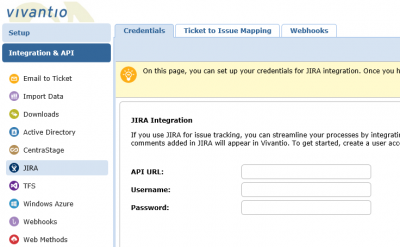
Log into Vivantio, open the Admin Area, and select JIRA under the Integration & API heading on the left menu:

Screenshot of Jira Empty

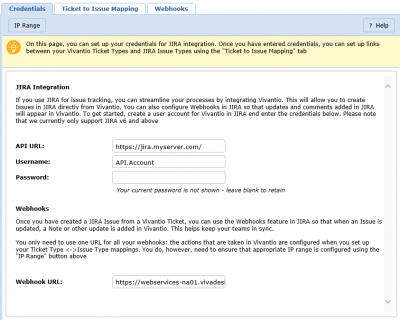
The first screen you’ll see will prompt you for your JIRA credentials. Enter them and hit ‘Save’.

Step 2:

The bottom of the screen will update to show your unique Webhook URL:

Screenshot of Jira Credentials Populated

You’ll use this URL when configuring Webhooks within JIRA.

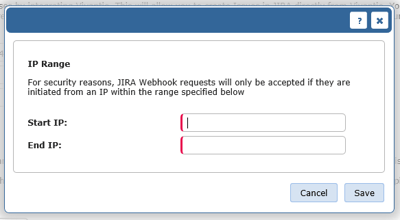
However: before you can do that, you need to configure the IP Range for Vivantio to accept requests from, using the ‘IP Range’ button in the menu bar:

Jira IP Range ButtonJira IP Range Dialogue

Having configured those options, you can move on to the next tab, Ticket to Issue Mapping.


TICKET TO ISSUE MAPPING

Jira Ticket to Issue Mapping Empty

You can control which types of Vivantio Ticket can be mapped to which types of JIRA Issue by setting up Ticket to Issue Mappings. This prevents the wrong type of information being transferred or the wrong type of records being created.

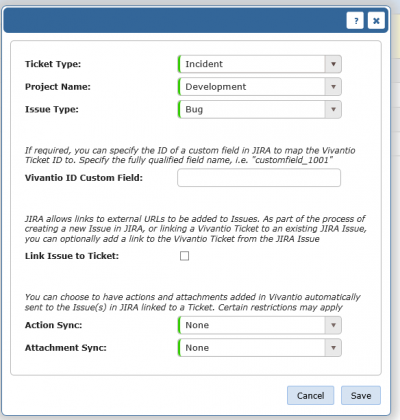
When creating a Ticket to Issue Mapping, you’ll be prompted for a number of different things:

  • Ticket Type – the Vivantio Ticket Type
  • Project – the Project in JIRA
  • Issue Type – the Issue Type in JIRA
  • Vivantio ID Custom Field – if you have a custom field in JIRA that you want to use to store the Vivantio Ticket ID, you can enter the (system) field name here. This will usually be in the format ‘customfield_10010’
  • Link Issue to Ticket – JIRA has a concept of ‘links’ within a ticket – checking this box will add a link to the Vivantio Ticket to the Issue in JIRA
  • Action / Attachment Sync – you can configure Vivantio to automatically send updates to JIRA when the Vivantio Ticket is updated (Note: this option does not force JIRA to update Vivantio though. That has to be configured within JIRA itself.)

After choosing the appropriate options, hit ‘Save’, and you’re ready to start creating JIRA Issues.


CREATING A NEW ISSUE

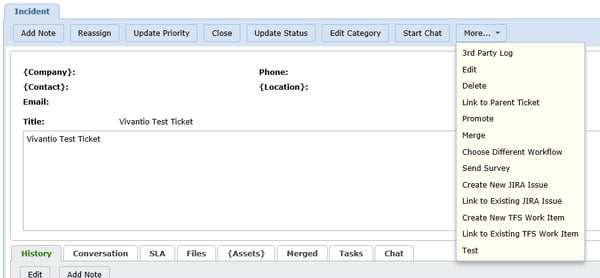
When viewing a Ticket in Vivantio, under the “More…” menu item, you’ll see the option to “Create New JIRA Issue”:

Jira Create New Jira Issue Menu Item 1

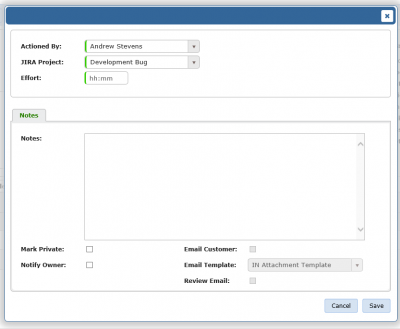
Clicking that button will bring up the “Create New JIRA Issue” dialog:

Jira Create New Jira Issue Dialogue

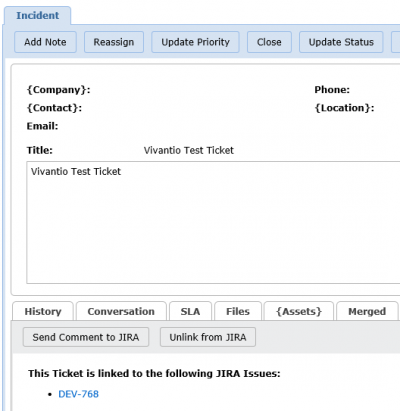
You can optionally enter Notes for the Vivantio Ticket History, then hit ‘Save’ to create the JIRA Issue. After a short period of time, you’ll see a JIRA tab appear on the Ticket Details:

Jira Ticket Details Jira Sub Tab

That includes a link to view the Issue in JIRA, along with options to unlink the ticket from JIRA, or to add a direct comment to the JIRA Issue – useful if you didn’t choose to automatically sync actions.
 

GETTING INFORMATION BACK FROM JIRA

The next step in the process is getting information added to JIRA sent into Vivantio. This is done using Webhooks in JIRA. Full documentation on Webhooks can be found here, but we’ll briefly walk you through the steps required to configure them.

Back in the Vivantio Admin Area, you’ll find your unique Webhook URL, which will look something like:

https://url-to-your-vivantio-instance/webhooks/jira/event?accesskey=xxx-yyy-zzz

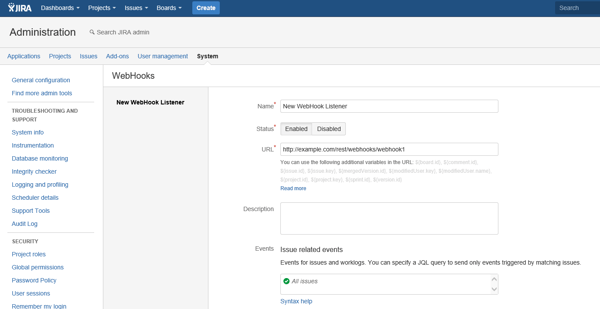
Make a note of this, head in to the “System” section of the JIRA Admin Area, and find the ‘WebHooks” menu option under “Advanced” (towards the bottom left of the screen). You’ll then have the option to “Create WebHook”, which is going to give you a screen more-or-less similar to the below:

Jira New WebHook

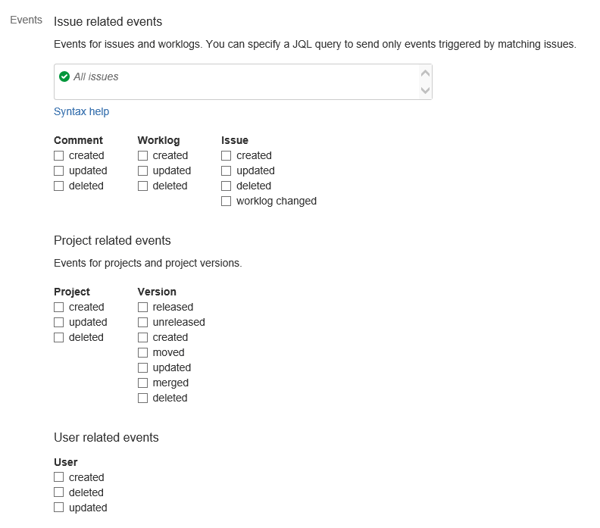
You can enter whatever you want for the “Name”. Vivantio doesn’t use that field. Add your Unique URL in, then head down to the “Events” section, where you choose when you want the Webhook to fire, and for which Issues:

Jira-JIra-New-WebHook-Select-Events

It’s up to you exactly which events you want the Webhook to fire for. For example, you might want to just have the Webhook fire when an Issue is updated or a Comment is added. More advanced users might want to configure the Webhook to only fire for specific transitions as a post function in a Workflow. (Note: see here in the Atlassian docs for more info on that.)

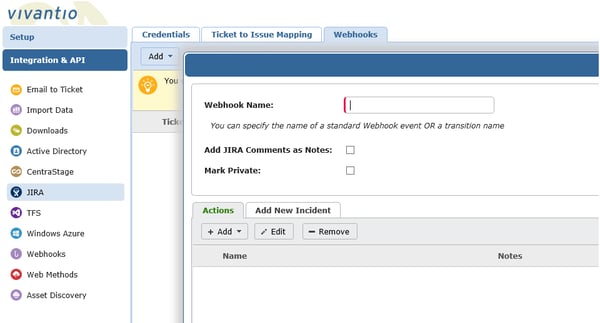
Having done that, you then need to set Vivantio up to listen for that specific event, and decide what actions to take. Back in the JIRA section of the Vivantio Admin Area, select the Webhooks tab, click Add, and choose the type of Ticket you want the Webhook to run for. Completing that step will show you the Add Webhook dialog:

Jira Vivantio Add Webhook

In the name field, you’ll enter either a standard event name (such as ‘issue:updated’) or the name of a transition. For simple integrations, you can then choose to just add the JIRA Comments as Notes–then when the Webhook in JIRA fires, the comments will be added to Vivantio.

If you’re using transitions though, you might want more complicated actions to take place – for example, when an Issue is resolved in JIRA, you might want to change the status of the Vivantio ticket. You can do that using the Actions grid at the bottom of the page.

And there you have it: bi-directional integration between Vivantio and JIRA. If you’re using Vivantio and JIRA, and you don’t yet have them integrated, give it a try, and see how it can help you improve communications between your Service Desk and your development team!

Topics: Customer Center Service Integrations Types of Service Integrations JIRA